How to Recover Permanently Deleted Files in Windows 11/10
Can permanently deleted files be recovered on Windows?
Yes — permanently deleted files on Windows can often be recovered, but only if they have not been overwritten.
Recovery success depends on how quickly you act, the type of storage device (HDD vs SSD), and whether new data has overwritten the original files. In this guide, you’ll learn exactly what to do, what to avoid, and the most effective ways to find and retrieve permanently deleted files on Windows 11/10/8/7.
Quick Solution Guide: Choose Your Recovery Method
- Situation
- Recommended Method
- Scores
- File History was enabled
- Restore from File History
- ⭐⭐⭐⭐
- Previous Versions are available
- Restore Previous Versions
- ⭐⭐⭐
- Files were stored in OneDrive
- Recover from OneDrive Recycle Bin
- ⭐⭐⭐
- No backup available
- Use Data Recovery SoftwareHOT
- ⭐⭐⭐⭐⭐
- Need a free Microsoft solution
- Use Windows File Recovery
- ⭐⭐
- Files were deleted from an SSD with TRIM enabled
- Check SSD Recovery Tips
- ⭐⭐
What Happens When Files Are Permanently Deleted on Windows?
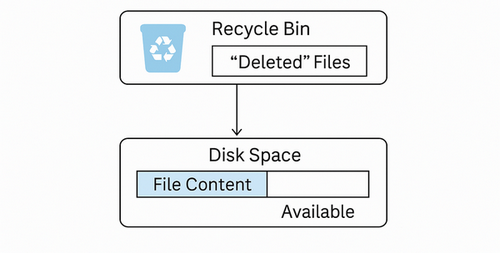
Permanently deleted files are not immediately erased from your drive — Windows simply marks the storage space as available.
This means files deleted using Shift + Delete, emptied from the Recycle Bin, or removed without backup may still physically exist on the disk for a period of time.
When a file is fully deleted:
- The file system removes its reference (metadata), not the actual data
- The data remains stored in disk sectors until overwritten
- The system marks those sectors as free space for new data
Once new data is written to those sectors:
- Original file content may be partially or fully overwritten
- File structure and metadata can be lost
- Recovery becomes incomplete or impossible
In practical recovery scenarios, this is why timing is critical—files are often recoverable immediately after deletion, but may become unrecoverable after normal system use.
Stop Using the Drive Immediately (Most Important Recovery Step)
Emergency Recovery Checklist (Do This First)
- Step
- Action
- 1
- Stop using the affected drive immediately
- 2
- Avoid any actions that write new data to the drive
- 3
- Determine whether the drive is an HDD or SSD
- 4
- Check available backups (cloud, File History, etc.)
- 5
- Create a disk image if possible
- 6
- If recovery is needed, use tools installed on a different drive
The single most important step after permanent deletion is to stop using the affected drive. Every write operation—even something as simple as opening a browser—can overwrite deleted data and make recovery impossible.
In practical recovery scenarios, it is continued drive activity—not deletion itself—that causes permanent data loss.
What NOT to Do After Permanent Deletion
- Installing software on the source drive
- Copying or moving files to the affected drive
- Gaming or video editing, which writes large files
- Running system updates or backups
These actions may seem harmless, but in many recovery cases, they are the primary reason files become permanently unrecoverable.
By minimizing all write activity, you maximize the window for successful recovery.
HDD vs SSD — Recovery Chances Explained
Recovery chances vary significantly depending on whether your files were stored on an HDD or an SSD.
Understanding this difference is critical, as it directly affects how quickly you need to act and what recovery results to expect.
Key Differences Between HDD and SSD Recovery
- Features
- HDD
- SSD
- Data deletion behavior
- Marked as free space
- May be actively erased (TRIM)
- Recovery window
- Longer (hours to days)
- Very short(sometimes minutes)
- Overwrite risk
- Gradual
- Can be immediate
- Recovery success rate
- Generally higher
- Often lower
Why SSD Recovery Is More Difficult
SSDs use a feature called TRIM, supported by modern operating systems like Windows, which allows the system to proactively erase deleted data blocks to improve performance.
Once TRIM has processed those blocks:
- The original data is permanently removed
- Recovery software cannot access the erased sectors
- Recovery becomes unlikely or impossible
How to Check If TRIM Is Enabled on Windows
To assess your SSD recovery window, you can check whether TRIM is enabled:
- Open Command Prompt as an administrator.
Type the following command and press Enter:
fsutil behavior query DisableDeleteNotify
NTFS DisableDeleteNotify = 1 (Enabled) TRIM support disabled for SSDs with NTFS, so deleted data may be permanently wiped soon.
ReFS DisableDeleteNotify = 0 (Disabled) TRIM support enabled for SSDs with ReFS, giving a longer opportunity for recovery.

Knowing this status helps you understand the urgency and guides whether immediate professional intervention is necessary.
First Check Built-in Recovery Options on Windows
If your files were completely deleted but backups exist, these built-in options are the safest way to restore them.
Recover Files Using Windows File History
Windows File History continuously backs up files in monitored folders. To restore a deleted file:
-
Open Control Panel → File History → Restore personal files.
-
Navigate to the folder or file you want to restore.
-
Browse through the timeline of backups to select the version containing your file.
-
Click Restore to recover the file to its original location (or choose another location).
- Limitations of File History
- Quick Summary
Restore Previous Versions on Windows(Shadow Copies / Volume Snapshots)
Windows may also maintain shadow copies or previous versions of files via System Protection. To recover:
-
Right-click the folder where the file was located and select Restore previous versions.
-
Choose a snapshot or previous version that contains your file.
-
Click Restore or copy the file to another location.
- Limitations of Previous Versions
- Quick Summary
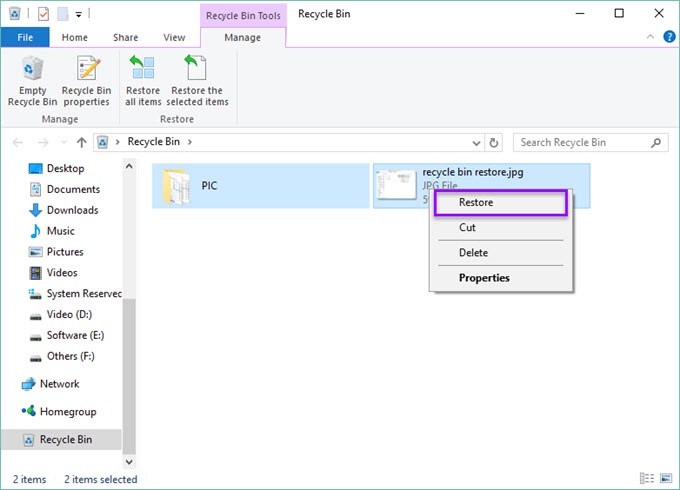
Recover Files From OneDrive Recycle Bin
If your files were stored in OneDrive, check the OneDrive Recycle Bin. Deleted files are often retained for 30 days or more, depending on your account settings. Navigate to the OneDrive website or app, open the Recycle Bin, and restore any missing files.
- Limitations of OneDrive Recovery
- Quick Summary
Using these built-in options first allows you to recover files safely without touching the source drive, preserving the maximum chance of successful restoration. Only if these native methods fail should you move on to professional recovery software.
Restore Permanently Deleted Files Using Recovery Software
When no backups are available, recovery software is often the only practical way to restore permanently deleted files. If you’ve already checked native recovery options and come up empty, the files are no longer accessible through standard system features. However, that doesn’t necessarily mean they’re gone for good. In many cases, the underlying data still exists on the drive—it’s just no longer indexed by the file system.
This is where deep-scan recovery software becomes the most practical and realistic option.
How Recovery Software Actually Works?
Tools like 4DDiG Data Recovery attempt to recover deleted files using two main methods:
Not all recovery tools perform equally. Many free utilities rely only on quick scans based on metadata. Once file records are damaged or removed, these tools may return no results. Deep-scan tools, by contrast, analyze the disk at a lower level and can detect recoverable data that quick scans miss.
How to Get Permanently Deleted Files Back with 4DDiG?
-
Start by installing 4DDiG Data Recovery—but do not install it on the same drive where your files were deleted if possible.Install the software on a separate partition, USB drive, or external disk. This avoids accidental overwriting.
FREE DOWNLOAD Secure Download
FREE DOWNLOADSecure Download
Secure Download
FREE DOWNLOADSecure Download
-
Launch the program and select the original location of the deleted files, then start the scan process. You can use filters to narrow results by file type (documents, photos, videos, etc.) or search by file name if you remember it.
 Pro Tip: Use Deep Scan If Quick Results Don't Show Your Files
If your files don’t appear in the initial results, switch to deep scan mode. Expect longer scan times, but often better recovery results.
-
Then you can preview recoverable files for free before deciding whether to recover them. When recovering, save files to a different drive or external storage. Avoid restoring them to the original location to prevent overwriting.
This "preview-before-recovery" approach acts as a proof-of-recovery step, ensuring you don't waste time or risk further data loss.
![]() Secure Download
Secure Download
![]() Secure Download
Secure Download
Why Recovery Software Sometimes Fails
Even when you follow the right steps and use capable recovery software, results are not always perfect. This is one of the most misunderstood aspects of data recovery—and one many guides avoid discussing.
Understanding why recovery fails helps set realistic expectations and prevents wasted time chasing files that are no longer recoverable.
Why Recovery Software Only Finds Existing Files
Recovery tools don’t magically recreate lost data—they can only detect what still physically exists on the drive.
When a file is deleted:
- The file system removes its reference (metadata), not the data itself
- Over time, this metadata (such as the Master File Table on Windows) can become corrupted or overwritten
- Without metadata, software must rely on raw signature scanning, which is less precise
This is why you may notice:
- Some files are completely missing from scan results
- Folder structures are lost
- File names are replaced with generic labels
If both the metadata and underlying data have been overwritten, recovery software simply has nothing left to work with.
Why Recovered Files Become Corrupted or Unreadable
In some cases, files appear in scan results but fail to open after recovery. This usually points to partial data loss.
Common causes include:
- Overwritten sectors – parts of the file have been replaced by new data
- Missing fragments – especially common with large or fragmented files like videos
- Damaged headers – the file’s structure is incomplete, making it unreadable
For example, a recovered video file might open but stop halfway, or a document may load with missing content. The recovery software found what remained—but the file itself is incomplete.
Can Corrupted Recovered Files Be Repaired?
Yes, corrupted recovered files can be repaired. Some professional recovery tools include built-in repair capabilities. For example, Tenorshare 4DDiG allows users to repair damaged:
This can be particularly useful when the recovered file is detected and restored successfully but remains inaccessible or displays errors when opened.
Advanced Method — Recover Files Using Windows File Recovery (winfr)
For users comfortable with command-line tools, Windows File Recovery (winfr) offers a more advanced way to recover deleted files—especially when traditional methods don’t return results.Just follow these steps:
-
Install Windows File Recovery from the Microsoft Store
-
Open Command Prompt as administrator
-
Run a command specifying source and destination drives. A typical recovery command looks like this:
winfr C: D: /extensive /n \Users\YourName\Documents\*This command tells winfr to:
- Scan the C: drive (source)
- Recover files to the D: drive (destination)
- Use Extensive mode
- Focus on a specific folder path
-
Wait for the scan to complete
-
Review recovered files in the destination folder
While winfr is powerful, it’s not always the easiest or most effective solution:
- Limitations You Should Know
- Quick Summary
How to Prevent Permanent File Loss in the Future?
Prevention is the only reliable way to avoid irreversible file loss. Recovery should always be treated as a last resort.
A few practical adjustments can dramatically reduce the risk of losing important files again, without adding much complexity to your workflow.
Adjust Recycle Bin Settings
- Increasing the maximum Recycle Bin size
- Disabling automatic deletion for large files
- Avoiding “Shift + Delete” unless absolutely necessary
This gives you a longer safety window before files are permanently removed.
Expert Tip: Many users overlook Recycle Bin settings, which can result in files being permanently deleted sooner than expected.
Enable File History (Windows)
If you’re using Windows, enabling File History is one of the simplest and most effective safeguards.
- It automatically backs up versions of files in key folders
- You can restore previous versions even after deletion
- It works quietly in the background once configured
Many recovery failures happen simply because this feature was never turned on.
Use Cloud Backup (OneDrive, Google Drive, iCloud)
Cloud storage adds an extra layer of protection:
- Deleted files often remain in a cloud recycle bin for weeks
- Version history allows you to restore earlier file states
- Files are protected even if your local drive fails
For critical documents, syncing to the cloud ensures you’re not relying on a single device.
Turn On Storage Sense (Windows)
Windows Storage Sense can help manage disk space—but more importantly, it can be configured to control deletion behavior.
You can adjust:
- How long files stay in the Recycle Bin before deletion
- Temporary file cleanup rules
- Disk usage alerts
Used carefully, it helps balance storage efficiency with data safety.
Follow the 3-2-1 Backup Rule
For truly important data, professionals rely on a simple principle:
- 3 copies of your data
- 2 different storage types (e.g., internal drive + external drive)
- 1 offsite backup (cloud or remote location)
Key Takeaways
- Prevention is always more reliable than recovery
- Even the best recovery softwares cannot guarantee success if data is overwritten
- Small, consistent backup habits save significant time and stress in the long run
Frequently Asked Questions
1. Where Do Permanently Deleted Files Go?
Permanently deleted files do not move to a special location. Instead, Windows marks their storage space as available for reuse. Until new data overwrites that space, the deleted files may still be recoverable.
2. How long do permanently deleted files remain recoverable?
There’s no fixed timeframe. Files remain recoverable until their storage space is reused.
- On HDDs, this could be hours, days, or longer if the drive isn’t heavily used
- On SSDs, recovery windows are often much shorter due to TRIM and background processes
In all cases, acting quickly and minimizing drive activity gives you the best chance of success.
3. Can permanently deleted files be recovered from an SSD?
Sometimes. SSDs often use a feature called TRIM that automatically clears deleted data blocks. If TRIM has already been executed, recovery may be difficult or impossible. Immediate recovery attempts provide the best chance of success.
4. Is it possible to recover permanently deleted files for free?
Yes. You can recover permanently deleted files for free using Windows backup features such as File History, Previous Versions, or the Windows File Recovery command-line tool. These methods may work if a backup exists or the deleted data has not been overwritten.
However, free recovery options are not always effective, especially when files were deleted using Shift + Delete, the Recycle Bin has been emptied, or no backup is available. In such cases, professional data recovery software can scan the drive more deeply and help locate recoverable files that built-in tools may miss.
Conclusion
Bring back permanently deleted files is often possible, but success depends on acting quickly, avoiding overwriting the drive, and understanding your storage type. Using built-in recovery options first, followed by professional tools like 4DDiG or Windows File Recovery when necessary, maximizes your chances. Ultimately, prevention through regular backups, cloud storage, and careful file management is the most reliable way to avoid permanent data loss.
💡 Summarize with AI:
 ChatGPT
 Perplexity
 Google AI Mode
 Grok
Grok

Tenorshare 4DDiG
Accidentally lost your data? Dont warry! Try 4DDiG to get them back!
- Dropbox recover deleted files
- Nas deleted file recovery
- Download and use Tiny 11
- C4D recovery files
- Tenorshare 4ddig coupon code
- Tenorshare 4ddig key registration code
- How to corrupt a file
- RTC connecting discord taking forever
- Openai's services are not available in your country
- Chatgpt is at capacity right now
- Google drive for desktop
- Recover deleted maya files
- Myspace photos not loading
- Samsung data recovery
- How to recover a deleted facebook post
- Recover indesign file
- Recover shift deleted files
- Free NAS Software
- Best free data recovery software
- System cannot find the path specified
- ibeesoft data recovery review
- How to recover files from a dead computer
- Hogwarts legacy save file gone
- Best open source data recovery software
- Recover data from floppy disk
- Raid recovery software
- How to take a screenshot on Genshin Impact
- Recover files after factory reset windows 11
- Recent documents not showing in word
- How to recover deleted partition
- Lost bitlocker recovery key
- Free windows 10 data recovery software
- How to recover unsaved word document after computer restarts
- Accidentally closed word without saving
- Seagate recovery software
- AI data recovery
- Reliable data recovery software
- How to recover data from sata hard drive
- How to recover deleted docs on google docs
- How to recover overwritten cctv footage
- The file cannot be accessed by the system
- How to Recover Deleted Flint JSON Files? 5 Easy Methods in 2026
- 24 Billion Credentials Leak: What Happened, Risks, and How to Recover Data
- [2026] How to Recover Deleted AOL Mail in 5 Proven Ways
- [5 Ways] How to Recover Deleted Outlook PST File in 2026
- Mac SSD Data Recovery: How to Recover Lost Files from SSD on Mac
You May Also Like


- Home >>
- Data Recovery >>
- How to Recover Permanently Deleted Files in Windows 11/10