How to Perform Bluebeam Recover Unsaved Changes
In the fast-paced world of digital document management, accidental data loss can be a frustrating setback. Bluebeam, a popular software for PDF creation, editing, markup, and collaboration, is not exempt from this issue. Whether due to a sudden power outage, software crash, or accidental closure without saving, losing unsaved changes in Bluebeam can disrupt workflow and cause anxiety. Fortunately, there are several methods available to Bluebeam recover unsaved changes. In this comprehensive guide, we'll explore four effective ways to recover unsaved changes Bluebeam and get back on track.
- Workable Solutions
- Way 1: Recover Unsaved Bluebeam File via 4DDiG Data Recovery
- Full steps...
- Way 2: Run Revu Recovery System
- Full steps...
- Way 3: Use Inbuilt Feature
- Full steps...
- Way 4: Clear the Cache of Bluebeam Files
- Full steps...
Part 1: Is there Autosave in Bluebeam?
Yes, there is an autosave option in Bluebeam. Although Bluebeam doesn't feature a traditional autosave function like some other software, it offers users the ability to enable Autosave within its settings.

Part 2: How to Perform Bluebeam Recover Unsaved Changes
While Bluebeam lacks an autosave feature, there are alternative methods to recover unsaved changes and minimize data loss. Let's explore four effective ways to achieve this.
Way 1: Recover Unsaved Bluebeam File via 4DDiG Data Recovery
A highly efficient method for recovering Bluebeam files involves utilizing reliable and robust software solutions. 4DDiG Windows Data Recovery stands out as a dependable option, offering rapid and effective recovery of corrupted, deleted, or unsaved Bluebeam files.
Whether your Bluebeam files have been corrupted due to system issues, accidentally deleted, or left unsaved, 4DDiG provides a comprehensive solution to restore them swiftly and efficiently. By harnessing the power of 4DDiG, users can regain access to their important Bluebeam files with confidence, allowing them to resume their workflow without delay or disruption.
Secure
Download
Secure
Download
-
Choose a Local Disk:
After installing and launching Tenorshare 4DDiG Windows Data Recovery, you'll encounter the home interface displaying options for Data Recovery and Advanced Options. In our scenario, select the local disk where your data loss occurred from the list of hard drives, then click Start to initiate the scanning process. Alternatively, you can specify target file types in the upper-right corner before starting the scan.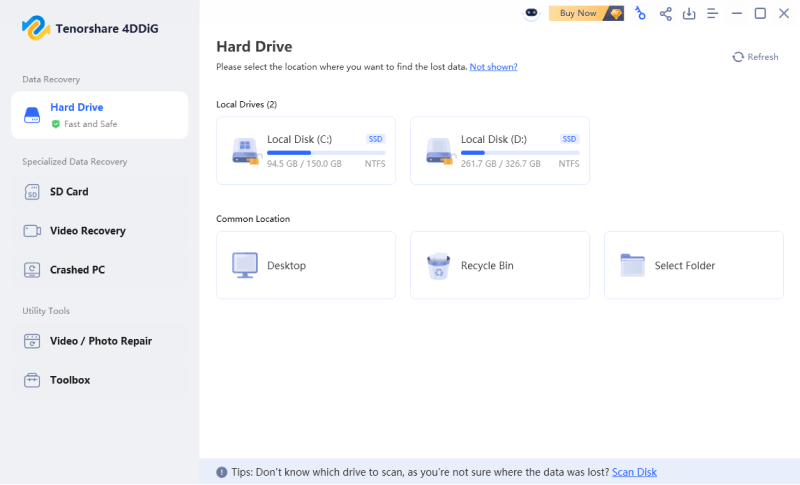
-
Initiate the Scan on the Local Disk:
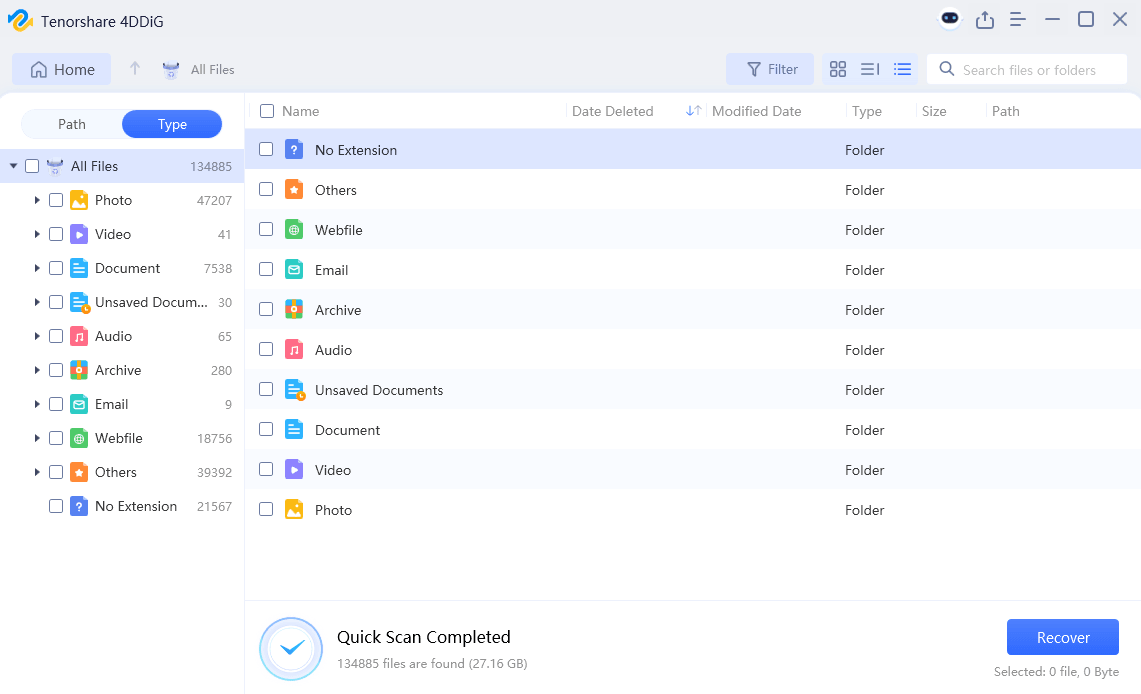
4DDiG promptly begins scanning the selected drive thoroughly for any missing data. You have the flexibility to pause or stop the scan at any point if you've already identified the files you wish to recover. The scanning results are organized into categories such as Deleted Files, Existing Files, Lost Location, RAW Files, and Tag Files under the Tree View.Additionally, you can switch to File View to examine file types like Photos, Videos, Documents, Audio, Emails, and more. Furthermore, you can utilize the search function or apply filters to refine your search criteria, which are accessible on the right side of the panel.

-
Preview and Retrieve Files from the Local Disk:
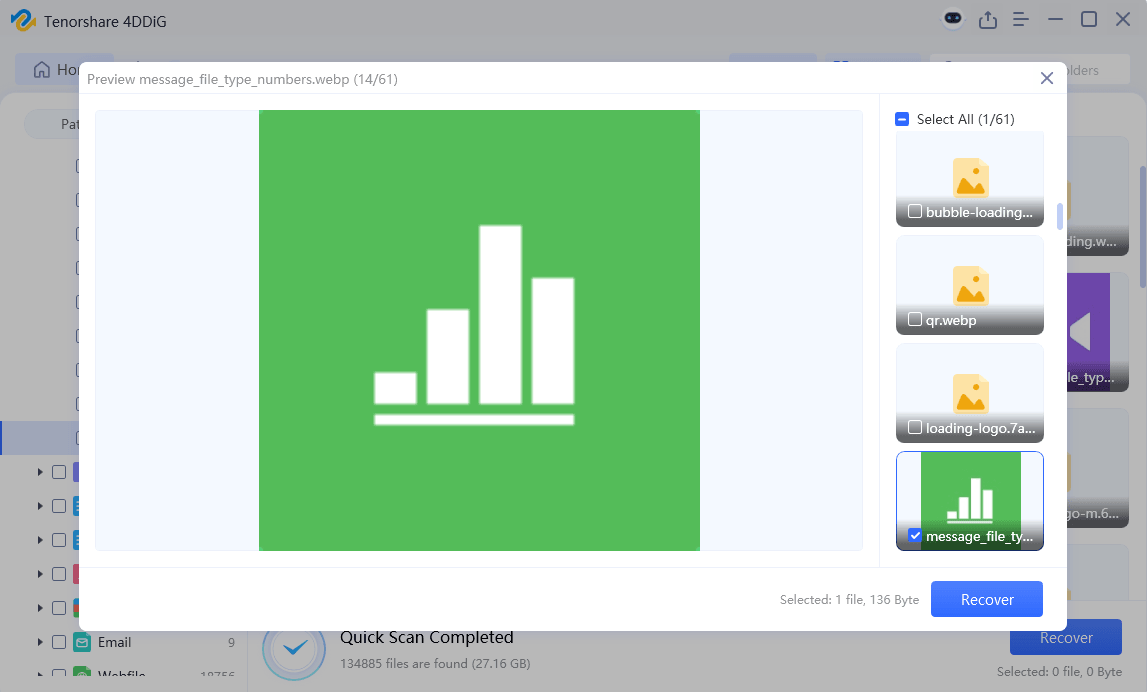
Upon identifying the target files, you can preview them to ensure they are the correct ones before proceeding with the recovery process. It's crucial to avoid saving the recovered files to the same partition where the data loss occurred, as this could lead to disk overwriting and permanent data loss. Instead, opt for a secure location to store the recovered files safely.
Way 2: Bluebeam Recover Unsaved Changes via Revu Recovery System
In instances where a Bluebeam system crash occurs before any alterations to PDF files have been saved, a dedicated recovery system steps in to salvage those changes. This feature serves as a vital lifeline, ensuring that valuable modifications made during your Bluebeam session are not lost to unforeseen technical glitches. To recover unsaved changes Bluebeam, adhere to the following simple guidelines:
- Following a system crash, keep an eye out for any PDF documents containing unsaved modifications. Bluebeam promptly identifies these files and presents them within the Recover Unsaved Changes dialog box, offering a convenient list of potentially affected documents.
- Within the dialog box, peruse the listed documents and select those from which you wish to recover unsaved changes. Once your selections are made, proceed by clicking the OK button to initiate the recovery process.
-
It's worth noting the pivotal role of proactive measures in maximizing the effectiveness of the recovery system. Specifically, activating the recovery system within the Document Preferences settings before encountering a crash is essential.

Way 3: Bluebeam Recover Unsaved Changes with an Inbuilt Feature
When exploring methods to recover unsaved changes bluebeam, it's worth considering the utilization of a built-in recovery feature embedded within the software. This feature is designed to assist users in recovering their unsaved work efficiently. Below is a step-by-step guide detailing how to make use of this feature:
- To initiate the Bluebeam recovery feature, begin by restarting the Bluebeam application on your computer. This action prompts the software to commence its recovery process, scanning for any unsaved files from your previous session.
- Upon restarting, a recovery window will promptly appear, showcasing a list of unsaved files detected by the Bluebeam recovery system. This window serves as a centralized hub where users can easily identify and select the specific file containing the unsaved changes they wish to recover.
- Within the recovery window, browse through the list of detected unsaved files and identify the ones where changes were not saved. Once located, click on the file to select it.
- After selecting the desired file, proceed by clicking the "OK" button located within the recovery window. This action confirms your selection and prompts Bluebeam to initiate the recovery process for the chosen file.
- Upon successful completion of the recovery process, Bluebeam will load the selected file, allowing you to review and verify the unsaved changes that have been recovered. Take this opportunity to ensure that all necessary modifications have been restored accurately.
It's important to note that if you had previously enabled the recovery system within the Document Preferences settings before the occurrence of the Bluebeam crash, the built-in recovery feature will primarily assist in recovering unsaved changes. It underscores the importance of proactively configuring relevant preferences within Bluebeam to optimize its recovery capabilities.
Way 4: Clear the Cache of Bluebeam Files
In some cases, clearing the cache of Bluebeam files can be an effective solution to address issues related to bluebeam how to recover unsaved changes and improve overall performance. The cache, which stores temporary files and data generated during Bluebeam sessions, can sometimes become corrupted or bloated, leading to unexpected errors or difficulties in saving changes. By clearing the cache, you reset Bluebeam's temporary storage, resolving issues related to unsaved changes and restoring normal functionality.
To clear the cache of Bluebeam files, follow these steps:
- Before proceeding with clearing the cache, ensure that Bluebeam Revu and any associated applications are closed to prevent any conflicts or data loss.
- The location of the cache directory may vary depending on your operating system and Bluebeam version. Typically, it can be found in a designated folder within the Bluebeam installation directory or in a system-specific directory for temporary files.
- Once you've located the cache directory, navigate to it and delete all temporary files and cached data associated with Bluebeam. You can usually identify these files by their file extensions or by looking for files with names indicating their temporary nature.
- After clearing the cache, restart Bluebeam Revu to apply the changes. Upon reopening the application, Bluebeam will create new cache files as needed, providing a clean slate for your projects.
Part 4: FAQ about Bluebeam Recover Unsaved Changes
Where are Bluebeam's temporary files stored?
Bluebeam temporary files are typically stored in a designated cache directory on your computer. The exact location may vary depending on your operating system and Bluebeam version.
What should you do if Bluebeam Recover Unsaved changes are not working?
If Bluebeam's built-in recovery features fail to retrieve unsaved changes, consider using third-party data recovery software such as 4DDiG Data Recovery or exploring alternative methods outlined in this guide.
Does Bluebeam create temp files?
Yes, Bluebeam usually stores its temporary files in the primary installation folder.
- Consider the following: E:\Users\John\AppData\Local\Temp\BluebeamSoftware.
- Please be aware that if you install the software on a different drive or directory, the address will be adjusted accordingly. Additionally, your PC's username will replace "John."
Conclusion
Losing unsaved changes in Bluebeam can be a frustrating experience, but it's not the end of the road. By utilizing the methods outlined in this guide, including third-party data recovery software like 4DDiG Windows Data Recovery, built-in features such as the Revu Recovery System, and proactive measures like clearing the cache of Bluebeam files, you can effectively recover your lost data and minimize workflow disruptions. Whether you're an architect, engineer, or project manager, these strategies offer reliable solutions to ensure your Bluebeam projects remain intact and your productivity remains uninterrupted. Remember to stay vigilant, save your work frequently, and explore the various recovery options available to you to safeguard against data loss in the future.
Secure
Download
Secure
Download
💡 Summarize with AI:
You May Also Like
- Home >>
- Windows Recovery Solutions >>
- How to Perform Bluebeam Recover Unsaved Changes
 ChatGPT
 Perplexity
 Google AI Mode
 Grok
Grok


