How to Find Unsaved Word Documents
How to find unsaved word documents? Microsoft Word is a ubiquitous tool for creating documents, presentations, and reports, among other things. While it's a powerful application, the occasional mishap or system crash can lead to losing unsaved work, causing frustration and potentially impacting productivity. How to find unsaved documents on word? In such scenarios, the ability to recover unsaved Word documents becomes invaluable. This article explores various methods and tools available in 2026 to help you retrieve unsaved Word documents efficiently, ensuring that your work is preserved.
Part 1: Can I Find Unsaved Word Documents?
Losing unsaved Word documents can be a common occurrence for many individuals who rely heavily on Microsoft Word for their work or personal projects. Whether due to unexpected system crashes, power outages, or accidental closures without saving, the loss of unsaved work can be frustrating and potentially devastating, mainly if the document contains critical information or extensive revisions.
How to find an unsaved word document? However, despite the initial panic that accompanies the disappearance of unsaved documents, it's essential to understand that, in most cases, these documents are not irretrievable. Microsoft Word, along with various third-party software solutions, offers methods for recovering unsaved documents, providing users with a lifeline to retrieve their work and mitigate the impact of data loss.
Way 1: How to Find Unsaved Word Documents via 4DDiG Data Recovery
Losing unsaved Word documents due to unexpected system crashes, power outages, or accidental closures without saving can result in frustration and potential data loss. Traditional methods of recovery, such as relying on Microsoft Word's built-in features or searching through temporary files, may only sometimes be effective in retrieving unsaved documents.
4DDiG Windows Data Recovery offers a comprehensive solution for recovering unsaved Word documents, providing users with a powerful tool to retrieve lost data from various storage devices, including hard drives, SSDs, USB drives, and memory cards. Here's how 4DDiG Data Recovery can solve the issue of finding unsaved Word documents.
Secure Download
Secure Download
-
Choose a Local Disk
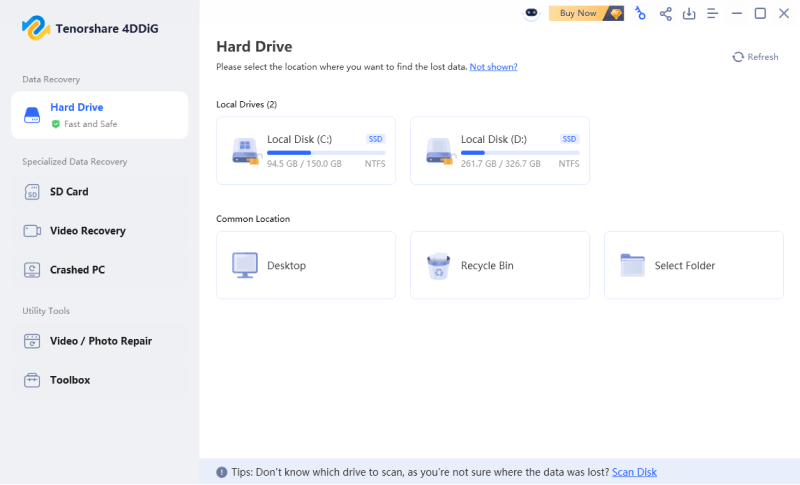
Tenorshare 4DDiG After installation, Windows Data Recovery will start and provide a home screen with options for Data Recovery and Advanced Options. From the list of hard drives, pick the local disc, which is where your data loss happened in this case. To begin the scanning process, click Start. Alternatively, you can select the target file types in the upper-right corner prior to the scan starting.
-
Perform a Scan on the Local Disk
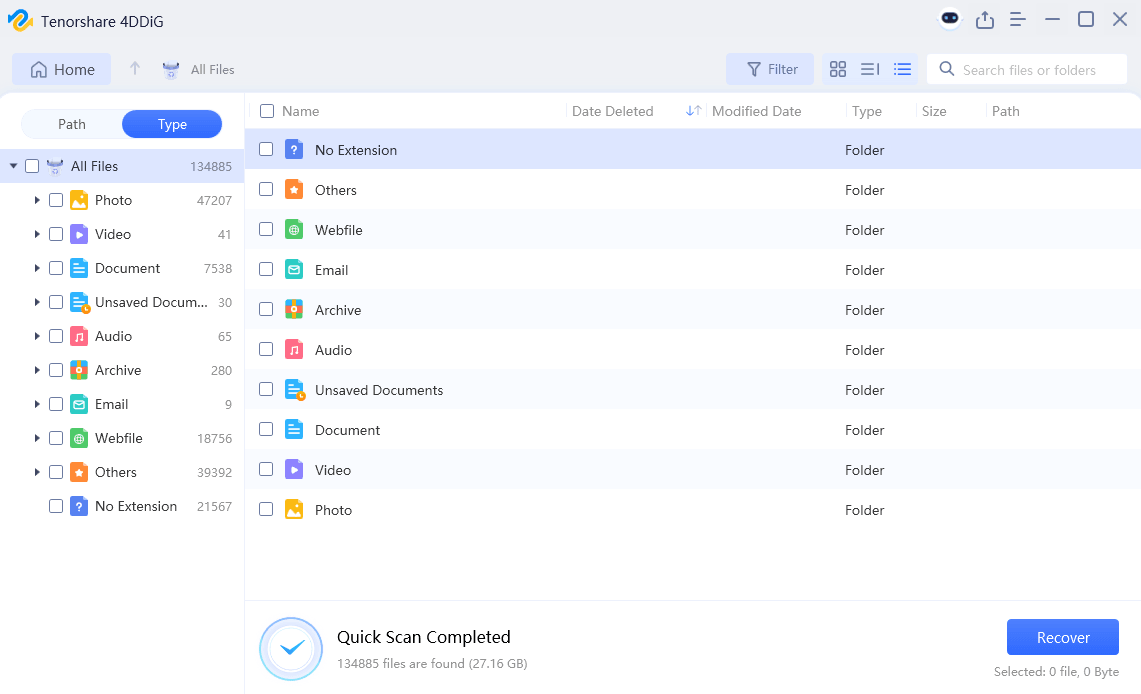
To find any lost data, 4DDiG quickly and fully scans the selected drive. Once you've located the files you want to recover, you can pause or resume the search at any time. Categories including Deleted Files, Existing Files, Lost Location, RAW Files, and Tag Files are available in the Tree View.You may view a variety of file types, including Photo, Video, Document, Audio, Email, and more, by using File View. In addition, you can focus your search and look for certain files by using the filters on the right side of the panel.

-
Preview and Recover Files from the Local Disk
You can see the required files after they have been located before starting the recovery process. It is imperative that the recovered files not be saved to the same partition where the data loss occurred in order to avoid disc overwriting and irreversible data loss. To guarantee the integrity of the files you recover, finish the recovery procedure in a secure place.
[2026] How to Recover Unsaved Word Document on Windows 10 Easily?
Way 2: How to Find Unsaved Word Documents via Manage Document
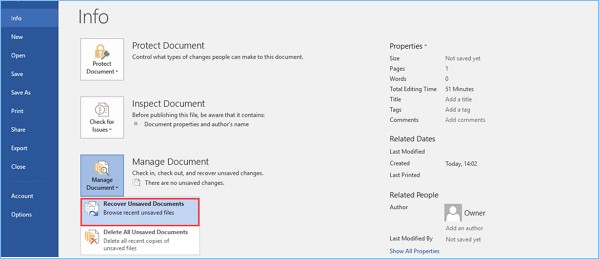
How to find unsaved word document? Microsoft Word includes a helpful feature called "Manage Document" that provides users with a straightforward method for accessing and recovering unsaved documents. This feature serves as a built-in safety net, allowing users to retrieve their work in the event of accidental closures or system crashes. Here's how to utilize the Manage Document feature to find unsaved Word documents:
If you've already saved the File:
- Open the Document you were working on to resume your progress and continue your task seamlessly.
- Navigate to File> Info, where you'll find a range of options for managing your documents effectively.
- Under Manage Documents, take note of the File labelled "(when I closed without saving)," indicating the presence of unsaved changes.
-
In the toolbar at the top of the Document, choose "Restore" to initiate the process of overwriting any previously saved versions with the unsaved changes, ensuring that your latest edits are incorporated smoothly.

Tip: You can also opt to compare versions by selecting "Compare" instead of "Restore," granting you the opportunity to review alterations before making a final decision on restoring the Document.
If you haven't saved the File:
- Go to File> Info > Manage Document> Recover Unsaved Documents, a valuable feature designed to retrieve documents in instances where saving was overlooked or not possible.
- Select the File you wish to recover, then click "Open" to view its contents and verify its relevance to your ongoing work.
- In the toolbar at the top of the Document, select "Save As" to save the File to a designated location, ensuring that your progress is preserved securely and ready for further editing or sharing.
Way 3: How to Find Unsaved Word Documents via AutoRecover
AutoRecover is a valuable feature in Microsoft Word designed to automatically save your work at regular intervals, minimizing the risk of data loss in the event of unexpected closures, system crashes, or power outages. By enabling AutoRecover, users can ensure that their documents are periodically saved in the background, providing a safety net for retrieving unsaved work. Here's how to utilize the AutoRecover feature to find unsaved Word documents:
- Launch the Microsoft Word application on your computer. If you experienced an unexpected closure or system crash, reopening Word may trigger the AutoRecover process, prompting the application to search for and recover any unsaved documents.
- Upon reopening Word after an unexpected closure, the Document Recovery pane may appear on the left-hand side of the application window. This pane displays any unsaved documents that were recovered during the AutoRecover process. Review the list of documents to identify the one you wish to recover.
- In the Document Recovery pane, locate the unsaved document you want to recover. Click on the document's entry in the list to select it. Alternatively, you can use the arrow keys to navigate through the list and choose the desired document.
Way 4: How to Find Unsaved Word Documents from Temporary Files
How to find unsaved documents in word mac? When working in Microsoft Word, temporary files are created as backup copies of your documents to safeguard against unexpected closures or system crashes. These temporary files can often be accessed and recovered, providing a means to retrieve unsaved work that may have been lost due to unforeseen circumstances. Here's how to find unsaved Word documents from temporary files:
- Launch File Explorer on your computer by clicking on the folder icon in the taskbar or by pressing the Windows key + E on your keyboard. File Explorer allows you to navigate through the files and directories on your system.
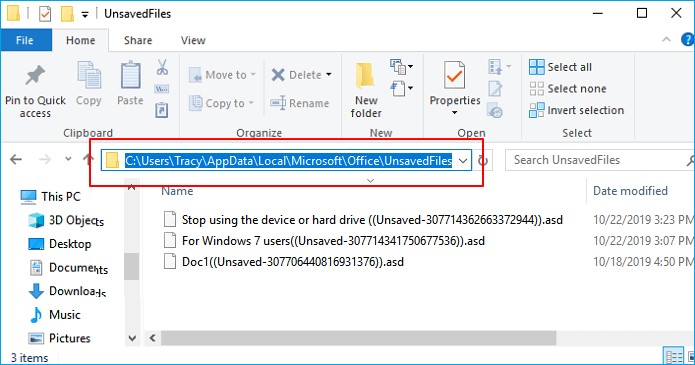
- In File Explorer, navigate to the directory where Microsoft Word's temporary files are stored. The default location for temporary files associated with Microsoft Word is typically as follows:
- C:\Users\[Your
-
Replace [Your Username] with your actual username on the computer.

- Once you've navigated to the UnsavedFiles directory, you'll find a collection of temporary files created by Microsoft Word.
- Scan through the list of temporary files to identify the one corresponding to the unsaved Word document you wish to recover. The temporary files are typically named with a combination of random characters and may not have recognizable filenames.
- Once you've identified the temporary file corresponding to the unsaved document you want to recover, right-click on it and select "Copy" from the context menu.
- After copying the temporary file, navigate to a different directory on your computer where you'd like to store the recovered document. Right-click in the destination folder and select "Paste" from the context menu.
-
Temporary files created by Microsoft Word typically have the ".tmp" file extension. To convert the temporary file into a recognizable Word document, you'll need to change the file extension to ".docx." Right-click on the copied temporary file in its new location, select "Rename" from the context menu, and change the file extension from ".tmp" to ".docx."

Way 5: How to Find Unsaved Word Documents from Recycle Bin
While the Recycle Bin is commonly associated with deleted files, it can also serve as a potential source for recovering unsaved Word documents. When Microsoft Word unexpectedly closes or crashes, it may create temporary files that are subsequently deleted upon reopening the application. These temporary files can sometimes be found in the Recycle Bin, offering an opportunity to recover unsaved work. Here's how to find unsaved Word documents from the Recycle Bin:
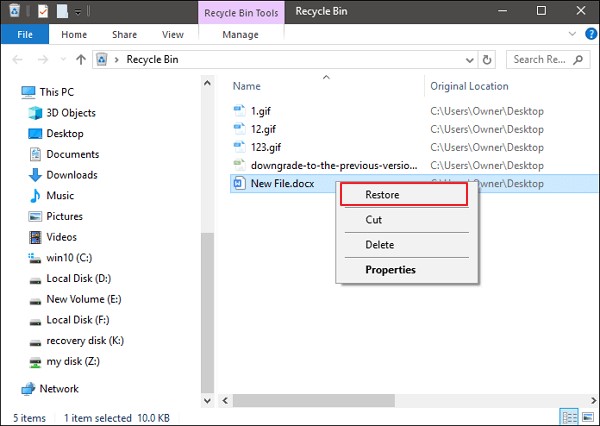
- Double-click on the Recycle Bin icon located on your desktop to open it. Alternatively, you can search for "Recycle Bin" in the Windows search bar and select it from the search results.
- Once the Recycle Bin is open, you'll see a list of deleted files that are currently stored in it. Use the search bar at the top-right corner of the Recycle Bin window to filter the list of files. Enter ".docx" (the file extension for Word documents) in the search bar to display only Word documents.
- Scroll through the list of Word documents in the Recycle Bin and look for any files that match the description of the unsaved document you're trying to recover. Pay attention to the file names and timestamps, as they may provide clues to help you identify the correct document.
- Once you've identified the unsaved Word document you want to recover, right-click on it to reveal a context menu. From the context menu, select the "Restore" option.
-
This action will move the selected document out of the Recycle Bin and restore it to its original location on your computer.

Part 3: FAQ
Q1: How do you recover a Word document that quit unexpectedly?
A1: If Microsoft Word unexpectedly quits, you can often recover your document using the Document Recovery pane. Reopen Word, and any unsaved documents should appear in the pane on the left-hand side.
Q2: Where does Word store temp files?
A2: Word stores temporary files in the following location: C:\Users[YourUsername]\AppData\Local\Microsoft\Office\UnsavedFiles
Q3: How do you recover unsaved Word documents after the computer restarts?
A3: After a computer restart, you can recover unsaved Word documents using the AutoRecover feature in Microsoft Word. Additionally, you can search for temporary files or use third-party data recovery software like 4DDiG Data Recovery.
Q4: Why did my Word document disappear?
A4: There are several reasons why a Word document might disappear, including accidental deletion, application crashes, or system errors. Ensuring regular saving and utilizing features like AutoRecover can help prevent data loss.
Conclusion
How to find unsaved word documents? Losing unsaved Word documents can be a frustrating experience, but with the right tools and techniques, recovery is often possible. In this article, we've explored various methods, from built-in features like AutoRecover to third-party software like 4DDiG Windows Data Recovery, to help you retrieve your work efficiently. By following the steps outlined here and implementing best practices for document management, you can minimize the risk of data loss and ensure that your valuable work is always protected.



 ChatGPT
 Perplexity
 Google AI Mode
 Grok
Grok


