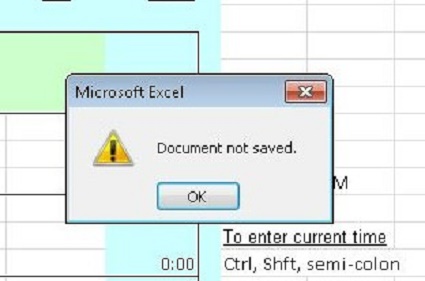
Excel Recover Unsaved Workbooks: How to Do It?
Ever lost an unsaved Excel workbook? It's a frustrating experience that can happen to anyone. But why does it occur, and how can you recover your work? There are several reasons why you might lose an unsaved Excel file.
Maybe you forgot to save before closing, or Excel crashed unexpectedly. Perhaps a power outage interrupted your work. Whatever the cause, losing progress on a critical spreadsheet is stressful. But don't worry!
There are solutions to recover your unsaved workbooks on both Windows and Mac. In this article, we'll explore the five best methods to retrieve your lost data. We'll provide step-by-step instructions to help you get back to work quickly.
Whether you're a beginner or an experienced user, these solutions will give you the tools to recover unsaved files with confidence. Ready to learn how to protect your hard work and never lose an Excel masterpiece again?

Part 1: Where Can I Recover Unsaved Workbooks in Excel?
Excel has a fantastic built-in feature called AutoRecover that can save you from the heartache of losing unsaved work. This automatic backup system regularly saves temporary copies of your workbooks, ensuring that you can recover your progress even if you forget to save or experience a crash.
To access these lifesaving files, simply open Excel and look for the "Document Recovery" pane on the left side of the screen. Here, you'll find a list of autosaved files that you can restore with just a click.
But where exactly does Excel store these temporary files? The location varies slightly depending on your Windows version, but you can typically find them in the UnsavedFiles folder. Here's a quick breakdown:
Windows 10/8/7/Vista:
C:\Users\YourUserName\AppData\Local\Microsoft\Office\UnsavedFiles
Windows XP: C:\Documents and Settings\YourUserName\Local Settings\Application Data\Microsoft\Office\UnsavedFiles
So, the next time you find yourself in a pinch, remember to check these locations for your autosaved Excel files. With this knowledge, you can work with confidence, knowing that Excel has your back!
Part 2: 5 Best Solutions for Excel Recover Unsaved Workbooks
Now that you know where to look for unsaved Excel workbooks, it's time to explore the best solutions to recover them. We’ll explain five effective methods to help you get your lost files back, ranging from built-in Excel features to powerful third-party recovery software.
Let’s check these easy methods:
Way 1: Use 4DDiG Data Recovery for Excel Recover Unsaved Workbooks
If you've tried other solutions and still can't recover your unsaved Excel workbooks, don't worry! There's a reliable tool that can help, 4DDiG Windows Data Recovery Pro. This powerful software is designed to recover lost, deleted, or corrupted files from your Windows PC, including those precious Excel workbooks you thought were gone forever.
What makes 4DDiG stand out? For starters, it's incredibly easy to use. Even if you're not a tech wizard, you'll be able to navigate the intuitive interface and recover your files in just a few clicks. Plus, 4DDiG supports over 2000 file types, so whether you're dealing with Excel worksheets, Word documents, photos, videos, or more, this tool has you covered.
But the real magic of 4DDiG lies in its advanced recovery capabilities. With a 98% recovery rate and patented technology, this software can dig deep into your hard drive to find and restore files that other tools might miss. It can even recover data from formatted, corrupted, or RAW partitions!
Some key features of 4DDiG Windows Data Recovery include:
- Recovers 2000+ file types, including Excel workbooks
- Works with a wide range of storage devices
- Offers a high 98% recovery rate
- Provides an easy-to-use interface for quick recovery
Secure Download
Secure Download
Don't let lost Excel files ruin your day. Try 4DDiG Windows Data Recovery Pro and get your unsaved workbooks back in no time! To recover your unsaved Excel workbooks with 4DDiG Windows Data Recovery, follow these simple steps:
-
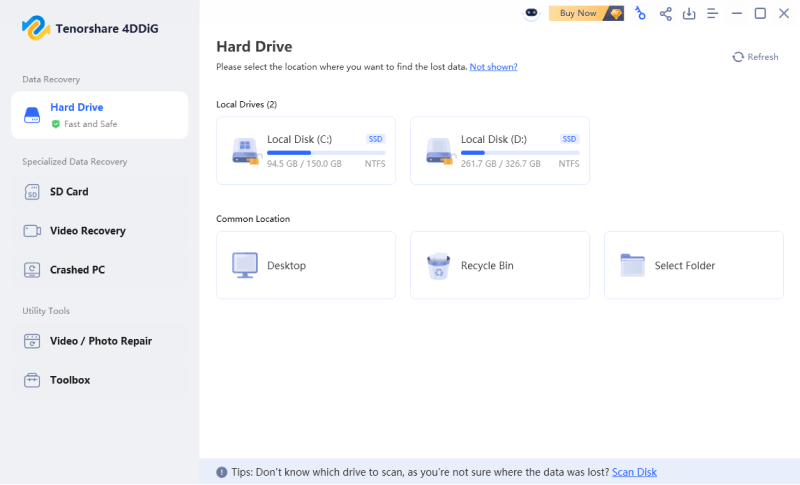
Select the Location
Launch 4DDiG and choose the location where you lost your Excel files, such as a local disk, external drive, or USB flash drive. Click "Start" to begin the scanning process.
-
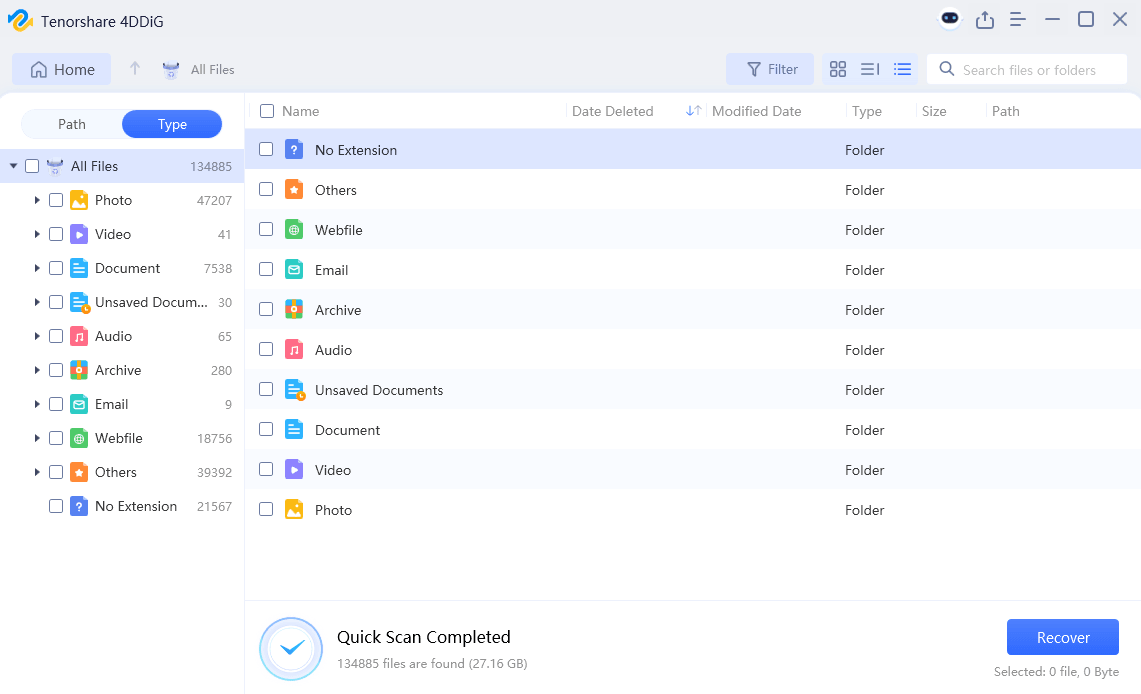
Scan and Preview
Let 4DDiG scan the selected location for any recoverable files. Once the scan is complete, browse through the found files and preview your lost Excel workbooks to ensure they're the ones you need.
-
Recover Your Files
Select the Excel workbooks you want to recover and click the "Recover" button. Choose a safe location to save your restored files, and voila! Your unsaved work is back in your hands.
Way 2: Open TEMP Folder for Excel Recover Unsaved Workbooks
Did you know that temporary files can act as backups? Even if you can't find your unsaved workbook in the recovery folder, it might still be hiding in a temporary folder on your computer.
To locate these hidden gems, navigate to the following path:
C:\Users[username]\AppData\Local\Microsoft\Office\UnsavedFiles
Once you're there, look for your missing Excel file. If you find it, simply open it and save it to a new location. Voila! Your unsaved work is back in your hands.
If you're not sure how to access this folder, don't fret. Here's a step-by-step guide:
-
Open Excel and click on the "File" tab. Then, select "Info" and choose "Manage Workbook" from the options. In the drop-down menu, click "Recover Unsaved Workbooks."

- A dialog box will appear, displaying any unsaved files. Select the one you want to recover and click "Open." Once the file is open in Excel, click "Save As" to store it in a safe location.
Way 3: Access AutoRecover for Excel Recover Unsaved Workbooks
There is a built-in feature in Excel “AutoSave”. This handy tool automatically saves your work at regular intervals, ensuring that you never lose too much progress. If you have AutoSave enabled, you might be able to find your unsaved workbook and bring it back to life.
Here's how to access AutoRecover and recover your unsaved Excel files:
-
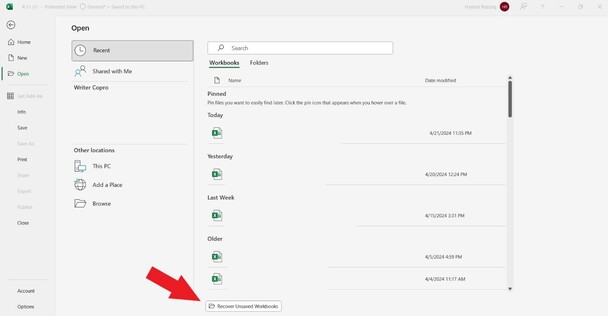
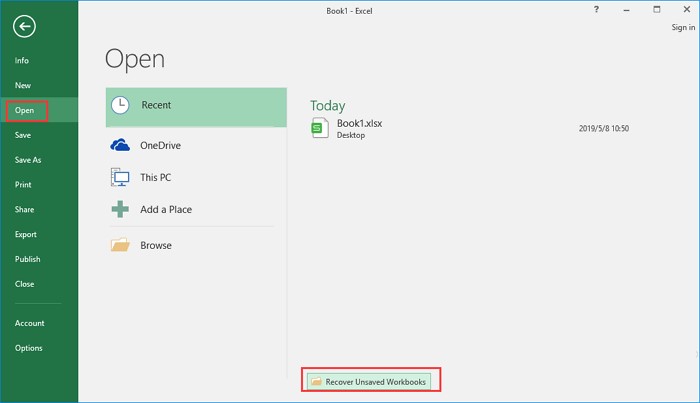
Open Excel and click on the "File" tab. In the left-hand menu, select "Open." At the bottom of the screen, look for the "Recover Unsaved Workbooks" button and click on it.

- Excel will display a list of unsaved files. Find the one you need and double-click on it to open it. Once the file is open, click "Save As" to store it in a safe location.
-
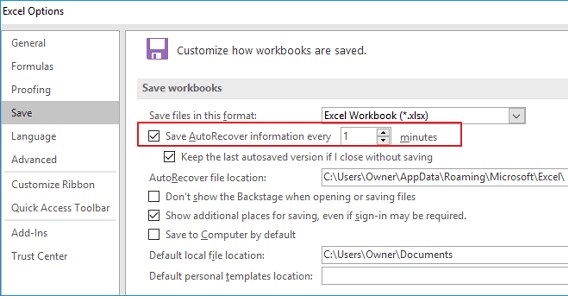
To prevent future losses, make sure AutoRecover is enabled and set to an appropriate interval. To do this, click "File" > "Options." In the left navigation pane, select "Save." Look for the "Save AutoRecover information every xx minutes" option and adjust the time as needed. Click "OK" to save your changes.

Way 4: Use Document Recovery for Excel Recover Unsaved Workbooks
If you saved your Excel file at least once before the lost an unsaved Excel workbook, you can use Excel's Document Recovery feature to retrieve the last automatically saved version.
Here's how to do it:
-
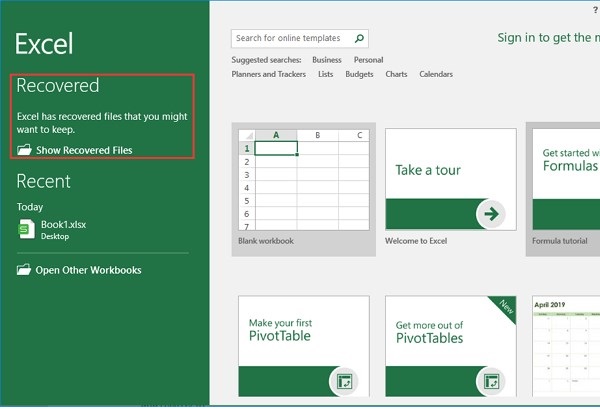
Open Excel and look for the "Recovered" section on the left-hand side of the screen. Click on "Show Recovered Files" to access the Document Recovery pane.

- Excel will display a list of unsaved files that were automatically backed up. Find the one you need and click on it to open it. Once the file is open, save it to a new location to ensure its safety.
Way 5: Use File History for Excel Recover Unsaved Workbooks
File History is a built-in Windows feature that automatically backs up your files, allowing you to restore previous versions with ease. Here's how to use it to recover an older version of your Excel workbook:
- Open Windows Explorer and navigate to the folder where your Excel file is located.
- Right-click on the file and select "Previous Versions." This will open a window displaying all the available versions of your file that File History has backed up.
- Browse through the list of versions and select the one you want to restore. Click "Restore" to replace the current file with the selected version, or choose "Open" to view the previous version without overwriting the current one.
It's important to note that File History only works if you've enabled it beforehand. To turn on File History, go to the Control Panel, click "System and Security," and then select "File History." Choose the drive where you want to store your backups and click "Turn on."
Part 3: Frequently Asked Questions
Q: How long does Excel save unsaved workbooks?
Ans: Excel automatically saves unsaved workbooks every 10 minutes by default. You can adjust this interval in the Excel Options menu under the "Save" tab, ensuring your work is backed up regularly.
Q: How do I find a lost workbook?
Ans: To find a lost workbook, check the "Recovered" section in Excel, look in the TEMP folder, or use File History to restore a previous version. You can also try searching your computer for the file name.
Q: Why does Excel close without asking to save?
Ans: If Excel closes without asking to save, it may be due to a crash or power outage. To prevent this, enable AutoRecover in the Excel Options menu and set it to save your work frequently.
Q: Why did all my Excel files disappear?
Ans: If your Excel files have disappeared, they may have been accidentally deleted, moved, or hidden. Use Windows Search to locate the files, check the Recycle Bin, and explore alternative locations where you might have saved them.
Final Thoughts
Losing an unsaved Excel workbook can be a frustating, but don’t worry. In this article, we've explored five effective methods to recover your lost files and get back to work quickly. You now have a toolkit of solutions at your fingertips. But if all else fails, don't panic 4DDiG Windows Data Recovery is here to save the day. With its advanced algorithms and user-friendly interface, this powerful software can dig deep and recover even the most stubborn unsaved workbooks. So, the next time you find yourself in a data loss bind, remember these tips and give 4DDiG a try. Your Excel masterpieces are worth it!

 ChatGPT
 Perplexity
 Google AI Mode
 Grok
Grok


