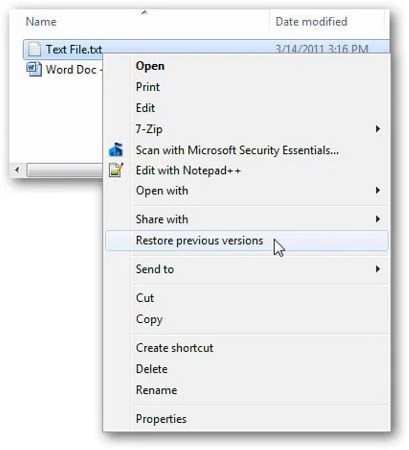
How to Recover Unsaved WordPad Document

5 mins read

Updated on 2024-07-11 14:35:37 to Windows Recovery Solutions

Have you ever lost an important WordPad document due to an unexpected system crash or accidental deletion? It can be incredibly frustrating, especially if you forgot to save your work. WordPad is a user-friendly word processor that comes built-in with Microsoft Windows. It's perfect for creating simple documents like letters, notes, and posters. Many people prefer WordPad over Microsoft Word because it's free and offers more formatting options than Notepad.

However, WordPad lacks an auto-save feature, which means your work could be lost if something goes wrong. But don't worry, there are solutions! In this article, we'll explore three effective methods to recover your unsaved or deleted WordPad documents. Keep reading to get back your work!

recover unsaved wordpad document

Part 1: Can You Recover Unsaved WordPad Document?

Yes, you can! Many people don’t know this, but even though WordPad doesn’t automatically save your work, there is still hope if you accidentally close your document without saving.

Windows keeps temporary files that can act as a safety net in such situations. These files aren’t immediately gone; they’re just hidden in certain parts of your computer.

If you know where to look, or if you use the right tools designed for recovery, you can get these unsaved documents back. We will carefully guide you through the steps to find and recover these hidden files. We’ll teach you where to look for these files and how to use recovery software to bring back your work.

Understanding these methods can make it much easier to retrieve your important documents. Let’s start the process and help you recover your valuable information.

Part 2: How to Recover Unsaved WordPad Document?

Now that you know it’s possible to retrieve unsaved WordPad documents, let’s explore the specific steps you can take. We'll guide you through practical methods to recover your work using Windows' built-in features and third-party tools, ensuring you can reclaim your lost documents efficiently.

Way 1: Recover Unsaved Wordpad Document via 4DDiG Data Recovery

When it comes to recovering unsaved WordPad documents, 4DDiG Windows Data Recovery stands out as a fantastic solution. This powerful software is tailored to address the specific challenges associated with retrieving lost or unsaved WordPad files.

One of the key advantages of using 4DDiG for this purpose is its ability to recover data from a wide range of scenarios. Whether you accidentally closed WordPad without saving, experienced a sudden system crash, or even faced a virus attack, 4DDiG can help you get your unsaved documents back.

The software employs advanced scanning techniques to thoroughly search your computer for any traces of unsaved WordPad files. By meticulously analyzing your hard drive, SSD, or other storage devices, 4DDiG maximizes the chances of successfully recovering your lost work.

Moreover, 4DDiG is designed to be user-friendly, making the recovery process simple and stress-free. Even if you lack technical expertise, the intuitive interface and clear guidance provided by the software will walk you through the steps necessary to retrieve your unsaved WordPad documents.

Some key features of 4DDiG that make it ideal for recovering unsaved WordPad files include:

  • Comprehensive scanning algorithms to locate unsaved documents
  • Support for various data loss scenarios, including accidental closure and system crashes
  • Compatibility with multiple storage devices to recover files from different sources
  • User-friendly interface and step-by-step instructions for a smooth recovery process
FREE DOWNLOAD

Secure Download

FREE DOWNLOAD

Secure Download

Follow these simple steps to recover your unsaved WordPad documents using this software:

  • Select the Location
    Install and launch 4DDiG Windows Data Recovery on your computer. From the main interface, choose the location where you lost your unsaved WordPad file, such as your hard drive, SSD, or external storage device. Click "Start" to initiate the scanning process.

    ecovery
  • Scan and Preview
    4DDiG will begin scanning the selected location for any traces of unsaved WordPad documents. You can pause or stop the scan at any time if you locate your desired file. Once the scan is complete, browse through the recovered files using the "Tree View" or "File View" options. Preview the recovered WordPad documents to ensure they are the ones you need.

    tree view
  • Recover and Save
    Select the unsaved WordPad files you want to recover. Click the "Recover" button to start the recovery process. Choose a safe location on your computer to save the recovered files, making sure not to save them in the same location where they were originally lost to avoid overwriting. Wait for the recovery process to complete, and then access your recovered WordPad documents from the designated location.

    local drive

By following these three simple steps, you can effectively use 4DDiG Windows Data Recovery to retrieve your unsaved WordPad files and restore your valuable work.

Way 2: Access Temp Files to Recover Unsaved WordPad Document

If you accidentally close WordPad without saving your document, don't panic. Windows automatically creates temporary files while you work, which can be a lifesaver in situations like this.

Here's how you can recover your unsaved WordPad document by accessing these temporary files:

  • Press the Windows + R key combination on your keyboard to open the Run dialog box. This is a quick way to access various system functions and folders.
  • In the Run dialog box, type %AppData% and press Enter. This command will open the AppData folder, which is a hidden directory where applications store their data, including temporary files.
  • Once inside the AppData folder, use the search box in the top-right corner to search for files with the .asd or .tmp extension. These are the most common file types used for temporary files, including those created by WordPad.

    temp files
  • To help identify the correct temporary file, sort the search results by modification date. Look for files that were created or modified around the time you were working on your unsaved WordPad document.
  • When you find a likely candidate, double-click on the file to open it in WordPad. If the file opens and contains your unsaved work, immediately click on the "File" menu and choose "Save As." Give the file a recognizable name and save it to a safe location, such as your Documents folder.

Keep in mind that temporary files are not always a guaranteed solution, as they may be overwritten or deleted by the system over time. However, it's always worth checking this method before moving on to more advanced recovery options.

Way 3: Recover Unsaved WordPad Document from its Previous Versions

Windows has another built-in feature called "Previous Versions" that can help you recover your work. This feature automatically saves copies of your files at regular intervals, allowing you to restore earlier versions if needed.

Here's how to use Previous Versions to recover your unsaved WordPad document:

  • Open the folder where you would typically save your WordPad documents. This could be your Documents folder or a specific project folder.
  • Right-click on the folder and select "Properties" from the context menu. This will open the Properties window for that folder.
  • In the Properties window, click on the "Previous Versions" tab. This tab will display a list of available previous versions of the folder and its contents, along with the date and time they were created.
  • Look for a previous version that corresponds to the time when you were working on your unsaved WordPad document. Click on that version to select it.
  • Click the "Restore" button to replace the current folder with the selected previous version. If you're worried about overwriting existing files, you can also choose "Open" to view the contents of the previous version first.

    previous versions
  • If you selected "Open," browse through the folder to find your unsaved WordPad document. If it's there, copy and paste it to a safe location, such as your desktop or a new folder.

It's important to note that for Previous Versions to work, you must have had System Protection enabled on your computer before the unsaved changes were made to your WordPad document. If System Protection was not active, you might see a message that says, "There are no previous versions available."

Part 3: FAQ Related to Recover Unsaved WordPad Document

Q: How do I recover notes in WordPad?

Ans: To recover unsaved notes in WordPad, check the temporary files folder by typing %AppData% in the Run dialog (Windows + R). Look for .asd or .tmp files and open them in WordPad.

Q: How to find unsaved WordPad documents?

Ans: You can find unsaved WordPad documents by searching for temporary files (.asd or .tmp) in the AppData folder. Alternatively, try restoring previous versions of your documents folder using the "Previous Versions" feature.

Q: Where are WordPad documents stored?

Ans: By default, WordPad documents are stored in the Documents folder. However, you can choose to save them in any location on your computer or external storage devices when using the "Save As" option.

Final Thoughts

Losing an unsaved WordPad document can be a frustrating experience, but there's no need to despair. By using the methods outlined in this article, you can recover your lost work and get back on track. Now you have powerful tools at your disposal. Don't let data loss hold you back – try 4DDiG Windows Data Recovery today and experience the peace of mind that comes with knowing your files are always recoverable.

William Bollson (senior editor)

William Bollson, the editor-in-chief of 4DDiG, devotes to providing the best solutions for Windows and Mac related issues, including data recovery, repair, error fixes.

(Click to rate this post)

You rated 4.5 ( participated)