[2026] How to Use TestDisk Data Recovery?
Have you ever accidentally deleted important files or lost data due to a system crash? Don't panic! TestDisk data recovery might be your lifesaver. In this guide, you'll learn how to use TestDisk to recover your lost data in 2026.
TestDisk is a powerful, free tool that can help you retrieve lost partitions and make non-booting disks bootable again. But is it the best option for you? We'll explore that and introduce you to its alternative that might better suit your needs.
This article will walk you through data recovery steps. You'll discover how to use these tools effectively and choose the right one for your situation. Ready to rescue your lost files? Let's get started!
Part 1: What Is Testdisk Data Recovery
TestDisk is a free, powerful data recovery tool that works on Windows, Linux, and macOS. It's a lifesaver when you've lost important files or can't boot your computer. Unlike typical software, TestDisk doesn't need installation. You just unzip it and run.
This tool is part of a package that includes PhotoRec, its trusty sidekick. Together, they form a dynamic duo for data recovery. TestDisk's main job is Recovering lost partitions and making non-bootable disks work again.
But that's not all. TestDisk can also bring back deleted files from various file systems like NTFS, FAT, exFAT, and ext2. It's a whiz at recognizing many file systems, from the common ones to the less known. When partitions are damaged, TestDisk steps in. If they're not overwritten, it can often recover your data. Even with partial erasure, it can salvage some information. For severely corrupted disks, PhotoRec takes over, hunting for recoverable files in the raw data.
Part 2: The Best Alternative for Testdisk Data Recovery
4DDiG Windows Data Recovery . is an excellent choice if you're looking for a user-friendly alternative to TestDisk. It's perfect for those who find complex recovery techniques daunting or miss a proper graphical interface in TestDisk. Like TestDisk, it can recover lost partitions and data from various file systems. But 4DDiG makes the process much easier with its simple interface.
This tool can recover over 2000 file types from various storage devices. It can rescue your data from accidental deletions, formatting errors, and even system crashes. What sets 4DDiG apart is its AI-powered video recovery and repair function. It can also save recovered data directly to cloud storage, adding an extra layer of security.
4DDiG also excels in speed and effectiveness, with a 98% recovery rate and an average recovery time of just 5 minutes. Its ability to recover data from crashed PCs and repair corrupted files makes it a more comprehensive solution than TestDisk.
Secure
Download
Secure
Download
- Feature
- TestDisk
- 4DDiG
- User Interface
- Command-line
- Graphical User Interface (GUI)
- Ease of Use
- Complex for beginners
- User-friendly
- File Type Recovery
- Limited
- 2000+ file types
- Recovery Speed
- Varies
- Average 5 minutes
- Partition Recovery
- Yes
- Yes
- Preview Before Recovery
- No
- Yes
- Corrupted File Repair
- Limited
- Yes
- Data Recovery from Crash
- Limited
- Advanced capabilities
- AI-Powered Recovery
- No
- Yes (for videos)
Here's how you can use 4DDiG to recover data:
-
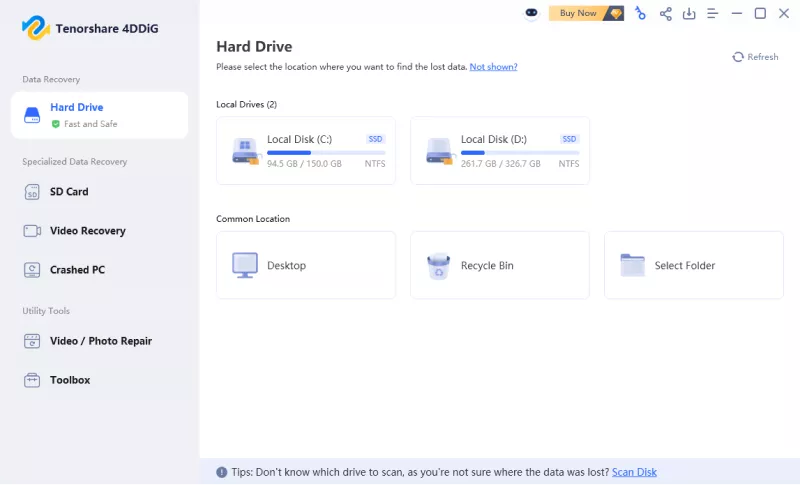
Open 4DDiG and pick the local disk where you lost your files. It could be your main hard drive or an external one. Click 'Start' to begin.

-
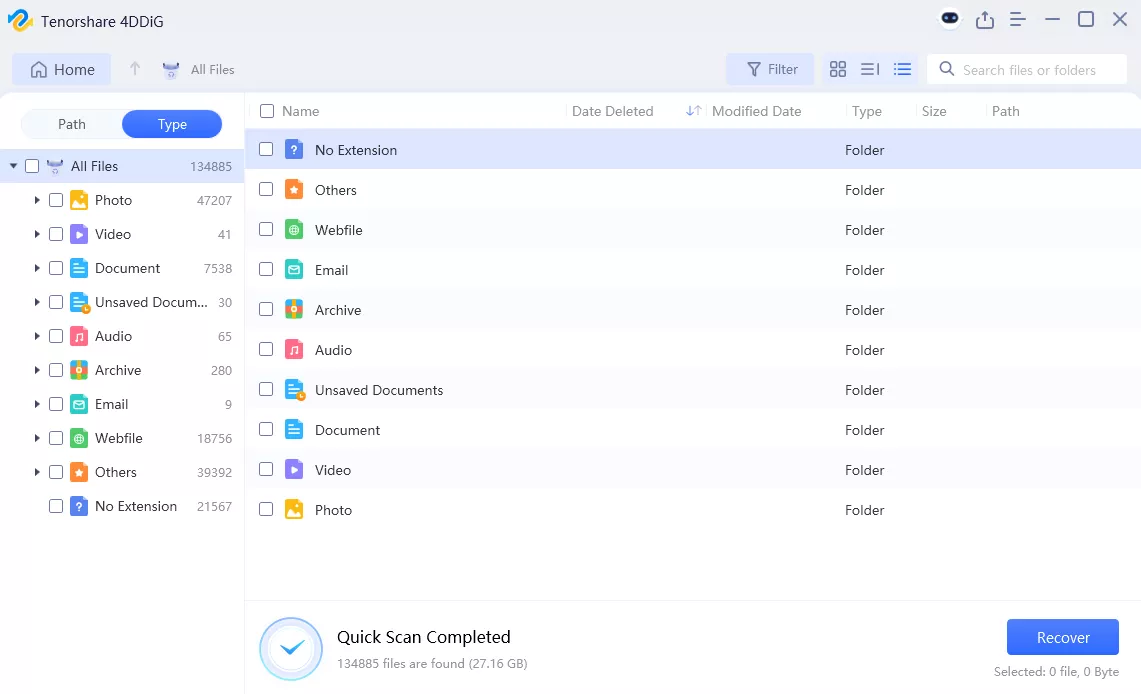
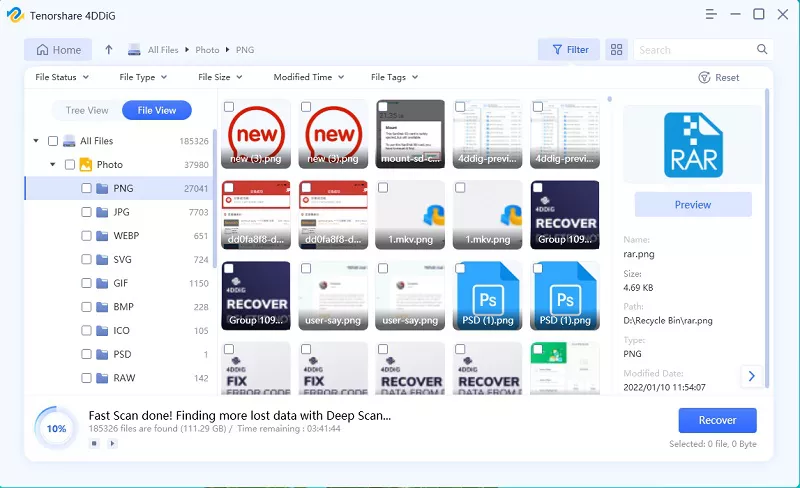
4DDiG will search your disk for lost files. You can pause or stop anytime if you see what you need. Use the categories on the left to find specific file types.

-
Look through the found files. Select the ones you want and click 'Recover'. Choose a safe place to save them; not the same disk you're recovering from!
Remember, 4DDiG can also help with trickier situations, like recovering data from lost partitions. Just select the lost partition option when you start.

Part 3: How to Use Testdisk Data Recovery?
TestDisk is a powerful tool for recovering lost data on both Windows and Mac. While it might seem complex at first, following a few simple steps can make the process much easier.
For Windows
Here's how to use TestDisk on Windows:
-
Start by downloading TestDisk from its official website. Once it's installed, launch the program on your Windows PC.
-
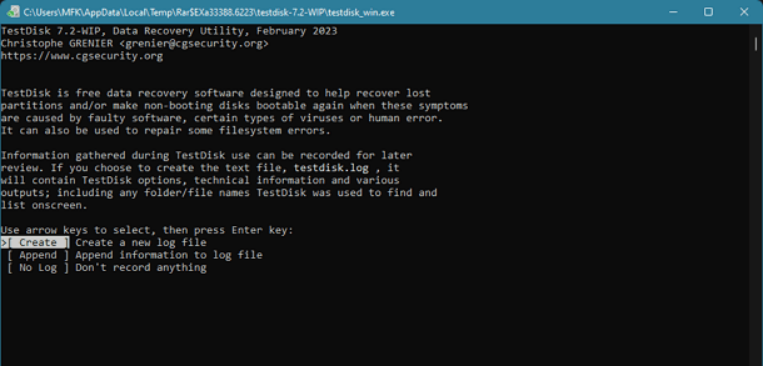
You'll see a simple interface. Choose "Create" to start a new log file. This helps TestDisk keep track of its actions during the recovery process.

-
TestDisk will show you a list of available disks. Use the arrow keys to select the one you want to recover data from, then choose "Proceed."

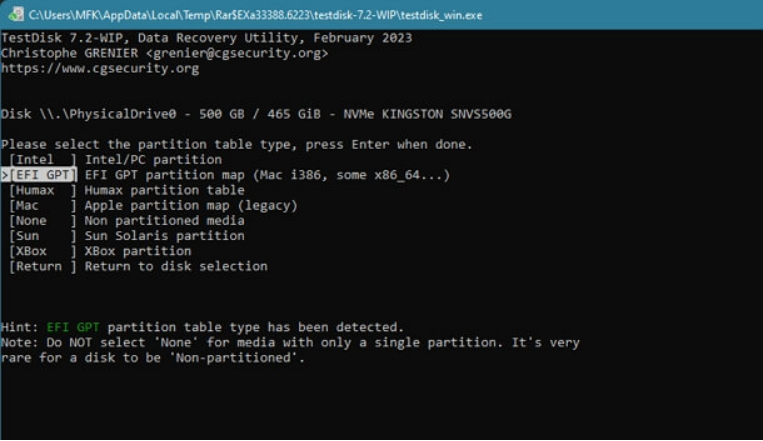
Next, you'll need to pick a partition table type. For most Windows PCs, the Intel option is the right choice. Select it and press Enter.

Now it's time to analyze your disk. Choose "Analyze" and let TestDisk work its magic. This might take a while, depending on your disk size.
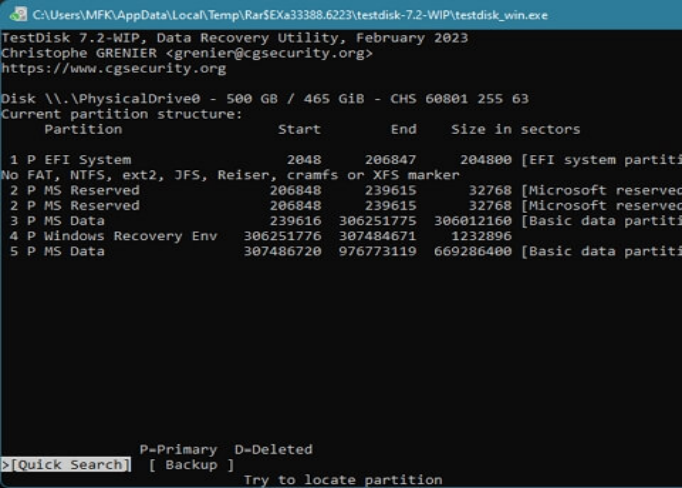
After the analysis, use the "Quick Search" option to find your lost files. TestDisk will scan your disk and show you what it finds.

You'll see a list of recoverable files. Use the arrow keys to navigate and select the ones you want to save. Press "C" to copy them. Choose a safe place to save your recovered files; ideally on a different drive to avoid overwriting any data.
For MAC
Here's how to use TestDisk on your Mac:
-
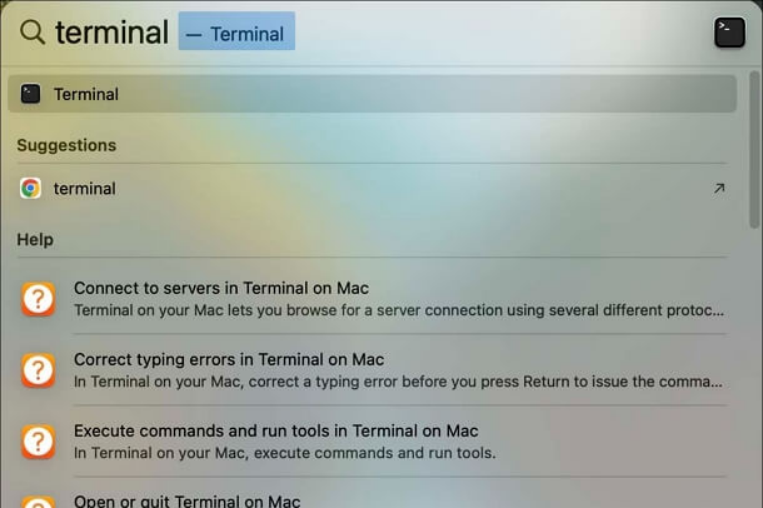
Unlike on Windows, you'll start by opening Terminal. Don't worry if you're not familiar with it; we'll guide you through the process.

-
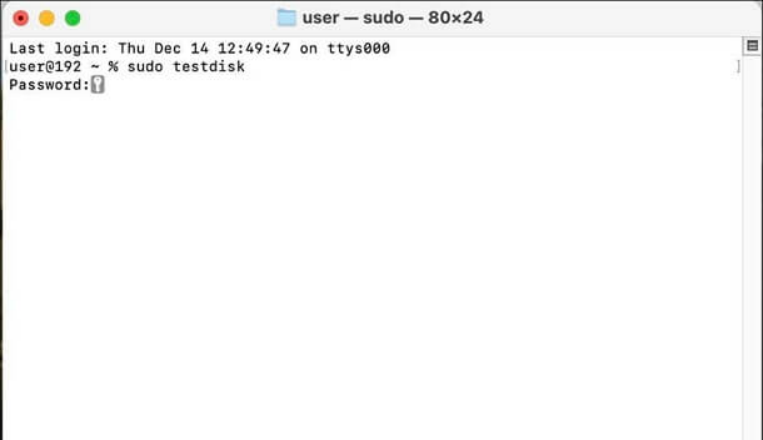
In the Terminal window, type "sudo TestDisk" and press Enter. You might need to enter your Mac password. This gives TestDisk the permissions it needs to access your disk.

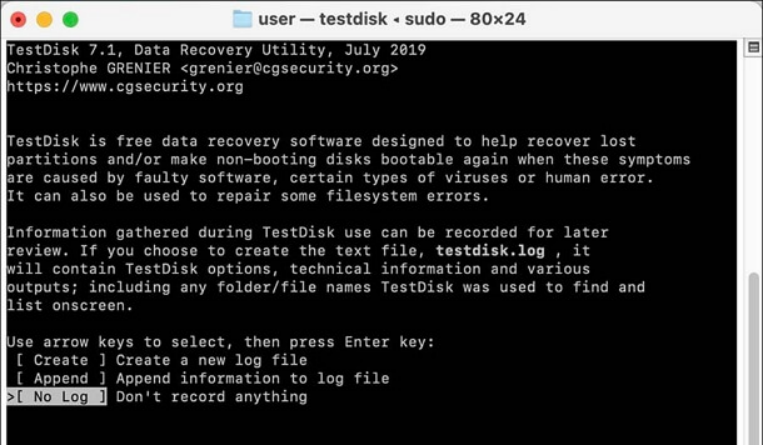
TestDisk will ask if you want to create a log. Select "No Log" for now and press Enter.

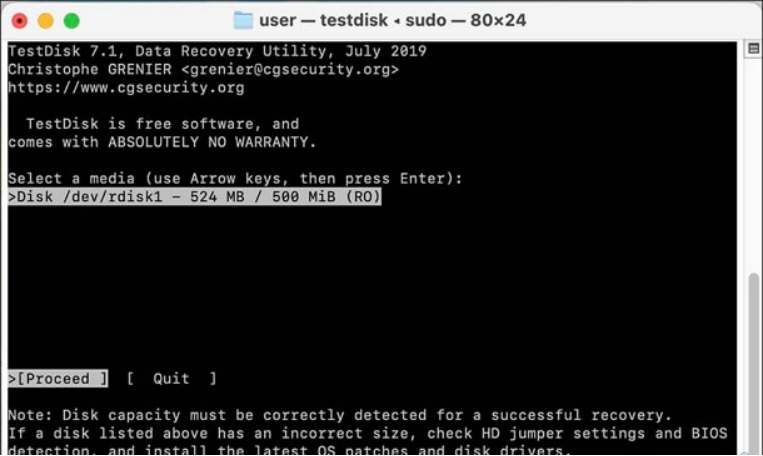
You'll see a list of disks connected to your Mac. Use the arrow keys to highlight the one you want to recover data from, then press Enter to select it.

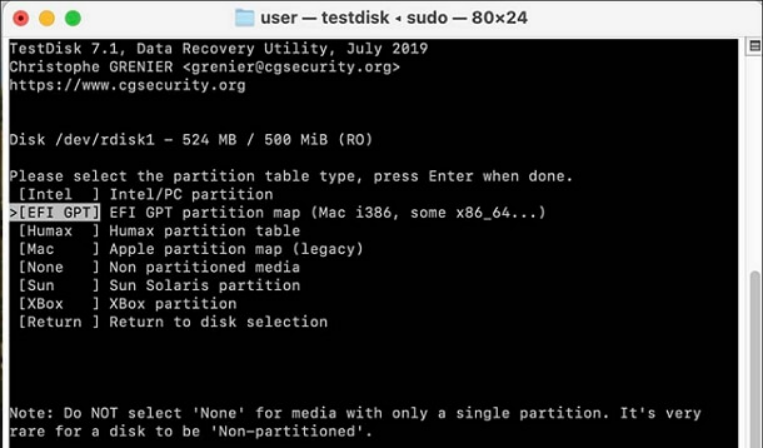
Now you need to choose the partition type. If you have a newer Mac, select "EFI GPT". For older Macs, choose "Mac" instead.

Select "Analyze" and press Enter. TestDisk will start examining your disk. After the analysis, perform a "Quick Search" to find your lost files.
TestDisk will show you a list of recoverable files. Use the arrow keys to navigate through them. When you find a file you want to recover, press "C" to copy it. You'll then need to choose where to save the recovered file by pressing "Y".
Part 4: Frequently Asked Questions
Q1: Is TestDisk data recovery free?
Ans:Yes, TestDisk is completely free to use. You can download and use it without any cost, making it a great option if you're on a budget.
Q2: What is the use of TestDisk?
Ans:TestDisk helps recover lost partitions and make non-booting disks bootable again. It can also undelete files from various file systems, making it a versatile data recovery tool.
Q3: How to recover deleted files on Linux with TestDisk?
Ans:To recover files on Linux, open Terminal and run TestDisk with sudo privileges. Follow the on-screen prompts to select your disk, analyze it, and recover your files.
Final Thoughts
TestDisk is a powerful tool for data recovery, but it can be complex for beginners. 4DDiG Windows Data Recovery . offers a user-friendly alternative with advanced features. Both tools can help you recover lost files and partitions, but 4DDiG's intuitive interface and additional capabilities make it a strong choice for many users. Remember, the key to successful data recovery is acting quickly. The sooner you start the recovery process, the better your chances of retrieving your lost files. No matter which tool you choose, always backup your important data regularly. This can save you a lot of stress and potential data loss in the future.

 ChatGPT
 Perplexity
 Google AI Mode
 Grok
Grok

