How to Take a Screenshot on Mac (Quick & All Methods 2026)
If you’re new to macOS or just switched from Windows, you might be wondering how to take a screenshot on Mac quickly and efficiently. Fortunately, macOS includes several built-in screenshot shortcuts and tools, making it easy to capture anything on your screen from full windows to scrolling web pages.
This guide discusses every method, shortcut, and advanced option so you’ll never struggle with how to take a screenshot on Mac again.
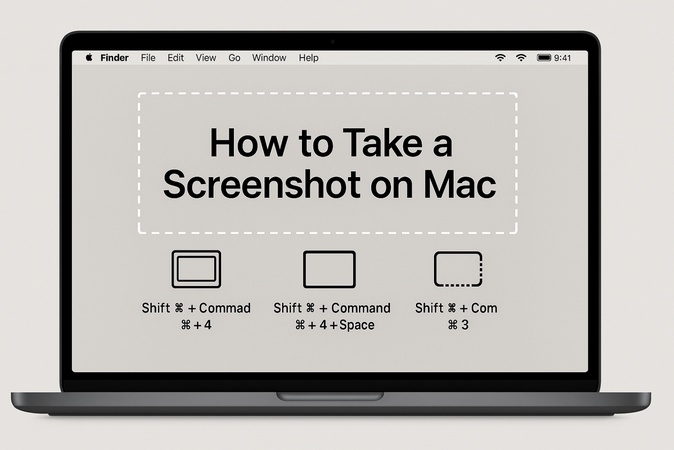
Part 1. Quick Start: The Fastest Way to Take Screenshot on Mac (Keyboard Shortcuts)
Before diving into full explanations, here are the fastest shortcut-based ways to take screenshots. These are ideal when you need an instant capture without opening extra tools. Whether you want a full screen, a window, or a partial shot, macOS makes it incredibly easy using just a few keys. Some of them can even take high-resolution screenshots.
Below are the different methods on how to take a screenshot on Mac:
1. Take a full screenshot on Mac
➡️ Shortcut: Command + Shift + 3
2. Take a selected or partial screenshot on Mac
➡️ Shortcut: Command + Shift + 43. Capture a Window or Menu
➡️ Shortcut: Command + Shift + 4, then press Space4. Capture to the clipboard
➡️ Shortcut: Press Control Key with any screenshot shortcut above
Part 2. Full Guide: How to Take a Screenshot on Mac [All Screenshot Methods]
Below are the complete explanations for every screenshot method on macOS. Each one includes when to use it and what it’s best for.
1. Full Screen Screenshot
When you need to capture everything visible on your screen, including multiple apps or the full desktop, macOS provides a one-key shortcut to capture your full display instantly.
- Shortcut: Command + Shift + 3
- Best for: Full desktop captures, software demos, tutorials, and multi-window screenshots.
- When to use: Use this when you need to capture everything on your screen at once, including the menu bar and all open windows.
2. Partial / Cropped Screenshot
If you only want to capture part of your screen, macOS allows you to drag and select any region. This avoids extra cropping and keeps your screenshot clean from the start.
- Shortcut: Command + Shift + 4
- Best for: Cropping out irrelevant areas, capturing charts, and grabbing specific UI elements.
- When to use: Use this when you only want to capture a specific area of your screen without showing unnecessary background elements.
3. Window / Menu Screenshot
Mac lets you isolate and screenshot any active window or dropdown menu with a crisp shadow effect. This is perfect for clean UI examples or instructions.
- Shortcut: Command + Shift + 4, then hit Space
- Best for: UI tutorials, app windows, settings panels, and dropdown menus.
- When to use: Use this when you need a clean screenshot of a single app window or menu without capturing the rest of your desktop.
4. Screenshot to Clipboard
Rather than saving files to your desktop, you can copy screenshots directly to your clipboard for quick pasting into messages, documents, or image editors.
- Shortcut: Add the Control key with any screenshot shortcut
- Best for: Quick pasting into Slack, email, Google Docs, and Photoshop.
- When to use: Use this when you want to paste a screenshot directly into apps like Notes, Word, Photoshop, or email without saving a file.
5. Use Screenshot Tool
For more control, macOS includes a full screenshot utility that provides on-screen options for full screen, partial, window, and screen recording.
- Shortcut: Command + Shift + 5
- Best for: Timed screenshots, screen recordings, saving to a custom location, and advanced customization.
- When to use: Use this when you want advanced controls such as screen recording, timed captures, or choosing a custom save location.
Part 3. How to Take a Scrolling Screenshot on a Mac
Apple still does not provide a built-in scrolling screenshot feature, but there are several effective ways to capture full pages, long chat threads, or entire webpages.
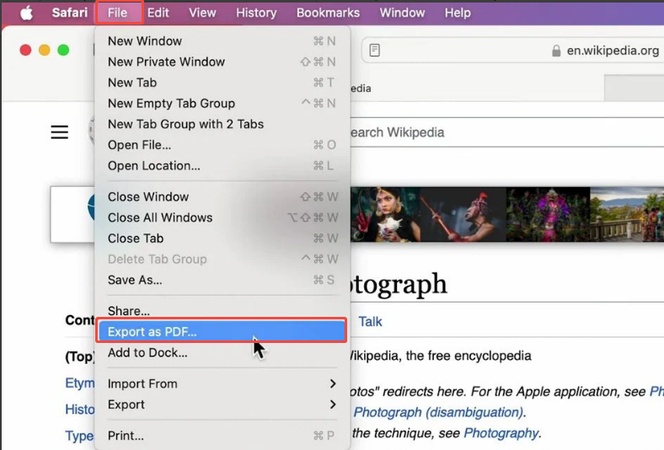
1. Safari "Export as PDF" full-page method
Best for: Web pages, articles, receipts, blog posts.
Safari includes a built-in full-page PDF export option that captures the entire webpage from top to bottom, even content not visible on screen. Here is how to take a full-page screenshot on Mac Safari browser:
-
Open the webpage in Safari and go to “File”, then choose “Export as PDF” to save webpage as PDF.

-
Choose a save location in the pop-up window and click “Save”.
-
Open the PDF, and it contains the entire page (even the parts below the fold) in perfect quality.
2. Use Chrome/Firefox full-page capture
Best for: Long pages, technical documentation, screenshots for work.
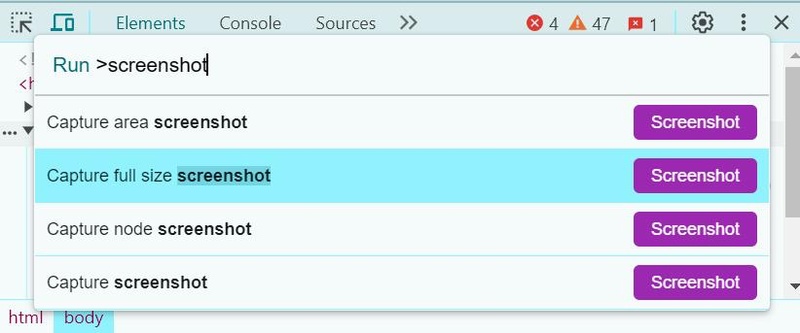
Chrome and Firefox allow you to generate full-page captures using their developer tools. It’s slightly technical but very effective for long content. Below is how to take a long screenshot on Mac using Chrome DevTools.
-
Open the webpage in the Chrome Browser and press “Command + Option + I” to open DevTools.
-
Press Command + Shift + P and search "Capture full-size screenshot".
-
Press Enter to take and save the screenshot on your default download location.

3. Best Third-party Tools(Shottr, CleanShot X, Snagit)
Best for: Webpages, app interfaces, long tutorials.
If you need scrolling screenshots frequently, third-party apps offer the smoothest experience, with editing features included.
Examples:
- Shottr: Free, lightweight, great for long captures.
- CleanShot X: Premium, excellent editing tools.
- Snagit: Best for professionals and annotators.
How to Take a Screenshot of an Entire Webpage on Mac:
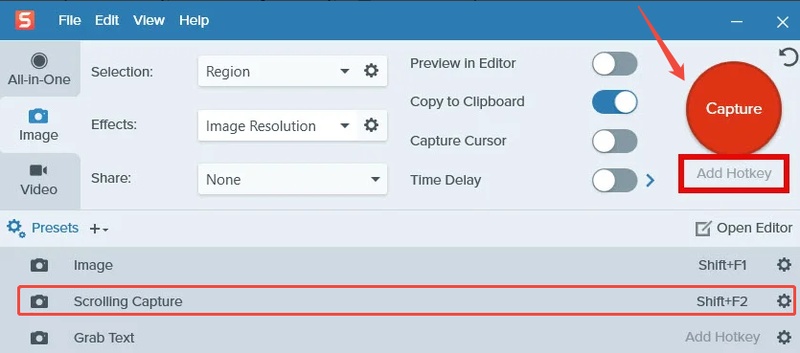
In this example, we will use Snagit:
-
Open Snagit and select the capture mode from the left, such as image, all-in-one, etc.
-
The tap the “Capture” arrow and activate the “Scrolling Capture” option (Or, press Shift+F2).
-
Then Snagit will start scroll screenshot on your Mac. When the screenshot is complete, eidt and save your long screenshot.

Part 4. How to Screenshot on Different Mac Models
Different Mac models support the same shortcuts, but certain devices may benefit from optimized workflows.
1. MacBook Air / Pro (All Models)
MacBooks rely heavily on keyboard shortcuts, making traditional screenshot shortcuts the fastest capture method. Below is how to take a screenshot on Mac Air or Pro models:
- Full screen: Command + Shift + 3
- Partial: Command + Shift + 4
2. iMac / Mac Mini
Desktop Macs often use larger screens, making window-only or partial screenshots more practical for clean captures.
- Windowed screenshot: Command + Shift + 4 + Space
3. Using a Windows Keyboard on Any Mac
If you’re using a Windows keyboard with your Mac, the shortcuts still work using slightly different key mappings. Here is how to take a screenshot on Mac with Windows keyboard:
- Full screenshot: Windows Key + Shift + 3
- Replacement keys:
- Command = Windows key
- Option = Alt
Part 5. Where Are Screenshots Saved on Mac?
By default, macOS saves screenshots to your Desktop as PNG files. To change this, press “Command + Shift + 5” then “Options” and “Choose a new save location”.
Part 6. Advanced: How to Take an HDR Screenshot on macOS
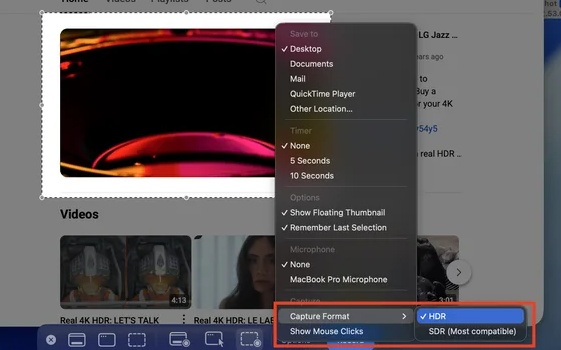
HDR video often appears to be washed out or black when captured normally because macOS protects high-dynamic-range content. However, there’s a simple workaround, and here is how to take HDR screenshot on macOS:
-
Open the HDR video in QuickTime and pause the video at the frame you want to take a screenshot.
-
Press “Command + Shift + 5” and select the screenshot option you want: Entire Screen, Selected Window, or Selected Portion.
Click “Options” in the toolbar (bottom of screen).
-
Then click “Capture Format” and select “HDR” capture format. Finally click “Capture” This feature was added in macOS 26 update and macOS Sequoia, but does not work for older OS versions.

Part 7. How to Edit, Crop, Mark Up, or Blur a Screenshot
macOS includes powerful editing tools inside the Preview app and Markup toolbar, allowing you to make quick edits without installing anything extra.
A. Crop a Screenshot
To crop a screenshot in Preview, open the image, drag to select the area you want to keep, and then go to Tools on top and choose Crop to apply the cut.
B. Add Simple Markups (Text, Arrow, or Shapes)
To add annotations, click the Markup toolbar in Preview and select tools like Text, Arrow, Shape, or Highlight to place visual notes directly on your screenshot.
C. Blur or Hide Sensitive Information
To blur or hide private details, use the Markup toolbar’s pixelate or shape-cover options, placing them over the content you want to obscure.
D. Share or Export Your Edited Screenshot
To save or send your edited screenshot, go to File and click Export to create a new file or click the Share button to send it via Mail, Messages, AirDrop, or other apps.
Bonus: How to Instantly Enhance Blurry or Low-Quality Screenshots with 4DDiG AI Photo Enhancer
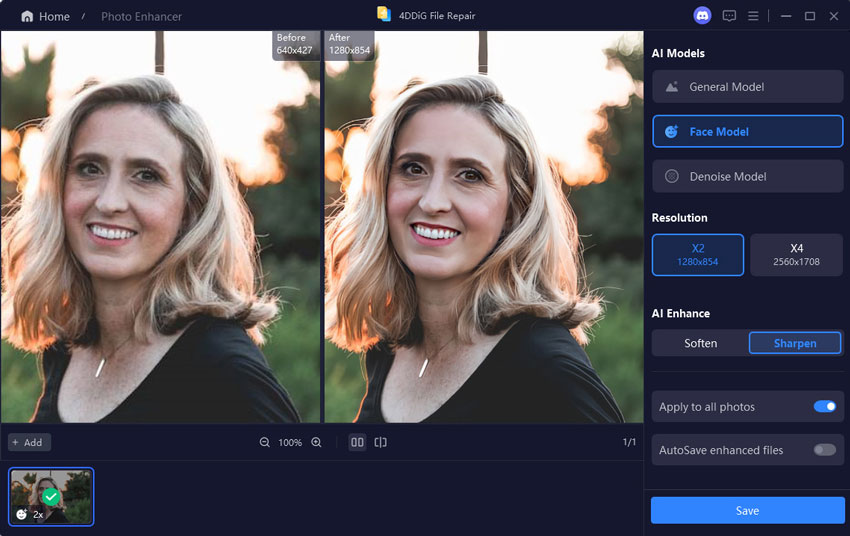
If your screenshots appear blurry, pixelated, or low-resolution, especially when enlarged, an AI enhancer is the easiest way to restore clarity. 4DDiG AI Photo Enhancer uses AI upscaling to sharpen text, improve images, and remove noise automatically.
Features Related to Screenshot Enhancement:
- AI upscaling video to 4K/8K
- Text sharpening for UI screenshots
- Photo denoising and restoration
- Auto enhancement for old or compressed images
- Support converting BMP, PNG, CR2, and HEIC to JPG
- Extend image background using AI with one click
- Colorize black-and-white photos to restore old images
Steps to Enhance Low Quality Screenshots using 4DDiG on Mac
-
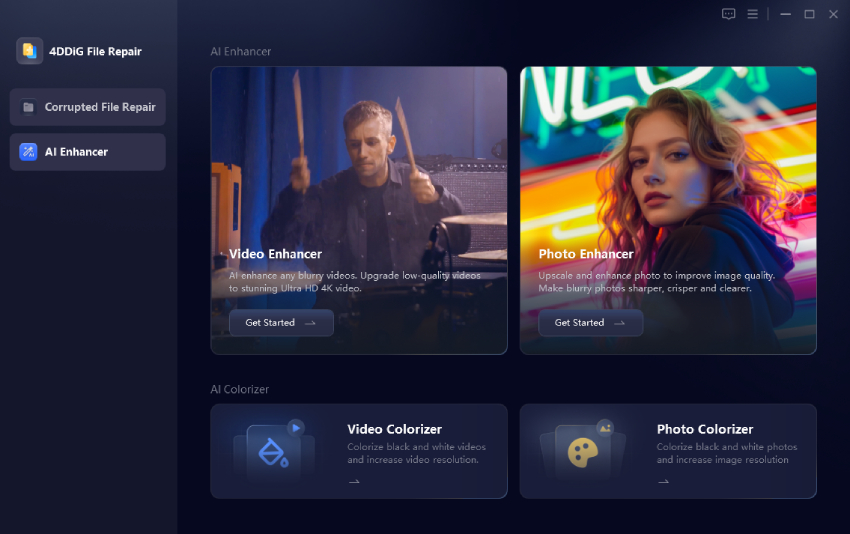
Download and install the 4DDiG File Repair tool and open it. Now, go to the "AI Enhancer" tab and then “Photo Enhancer”.

-
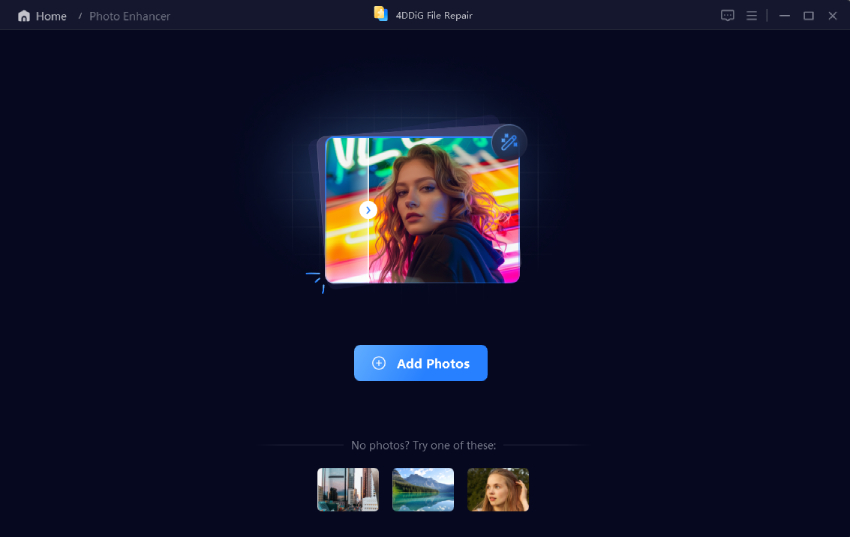
Click the "Add Photos" button to add your low-reaolution screenshots.

-
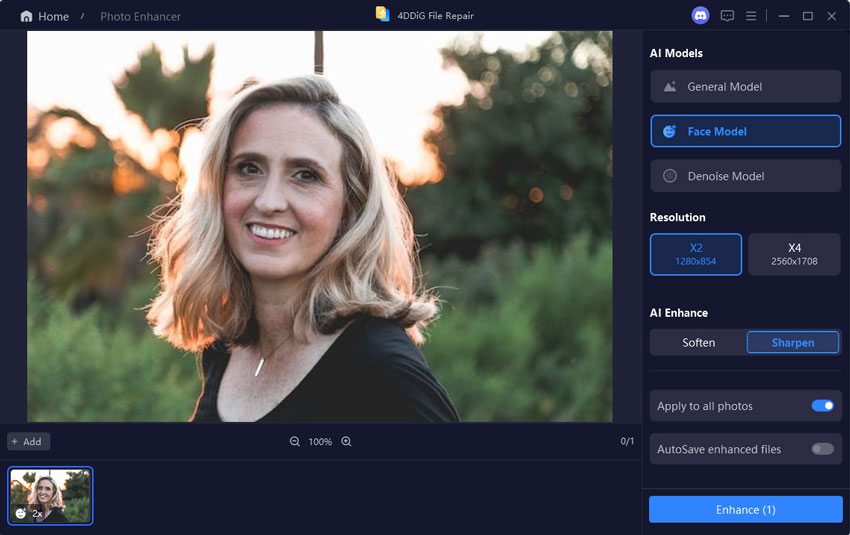
Select the "AI Model" along with the "Resolution" and "AI Enhance" type, then click "Enhance" to begin AI image enhancement on 4DDiG.

-
Once the image is enhanced, you can see the results in a side-by-side preview. Apply further enhancements if needed or click “Save” to save the enhanced image on your Mac.

Troubleshooting: Screenshot on Mac Not Working
If you are wondering, why can’t I take a screenshot on my Mac, here are some troubleshooting tips that you can follow:
1. Screenshot Shortcuts Are Disabled
When you press the screenshot shortcuts, nothing happens because the assigned keyboard combinations are turned off. Re-enable them by going to System Settings and then Keyboard to choose Shortcuts and turning on all screenshot options.
2. Another App Is Blocking Screenshots
The screen briefly flashes or dims, but no screenshot file is ever created because another app is interfering. Close interfering tools such as certain Chrome extensions, VPN overlays, or security apps, and then try taking a screenshot again.
3. The Save Location Is Invalid or Full
Screenshots appear to capture normally, but no image is saved because the set destination folder is unavailable or out of space. To fix it, change the save location by pressing Command + Shift + 5, opening Options, and selecting a new folder.
4. You Don’t Have Screen Recording Permission
Screenshot shortcuts or the Screenshot Tool work inconsistently because the system is blocking screen access. Enable permission by going to System Settings > Privacy & Security > Screen Recording and turning on access for the apps you use.
5. Keyboard Issues
Screenshot shortcuts fail because one or more keys are not registered correctly. Test each key individually in a text field or connect an external keyboard to confirm whether the shortcut works.
Conclusion
Learning how to take a screenshot on Mac is simple once you know the built-in shortcuts and tools available. Whether you need full-screen captures, window shots, scrolling screenshots, or advanced HDR grabs, macOS provides flexible options for every task.
If your images come out blurry or low-quality, 4DDiG AI Photo Enhancer can instantly sharpen and restore them for professional results.
Secure Download
Secure Download
 ChatGPT
 Perplexity
 Google AI Mode
 Grok
Grok

