How to Reduce Noise in Photoshop 2026 | Step-by-Step Guide
Are you tired of dealing with noise or grainy images? Do you want to enhance the quality of your photos by reducing noise? Look no further!
In this step-by-step guide, we will focus on how to reduce noise in Photoshop and explore effective techniques to deal with this issue. Whether a beginner or an experienced user, these methods will empower you to achieve cleaner and sharper images. So, let's dive in and learn how to reduce noise in Photoshop easily!
Part 1. What Causes Digital Noise?
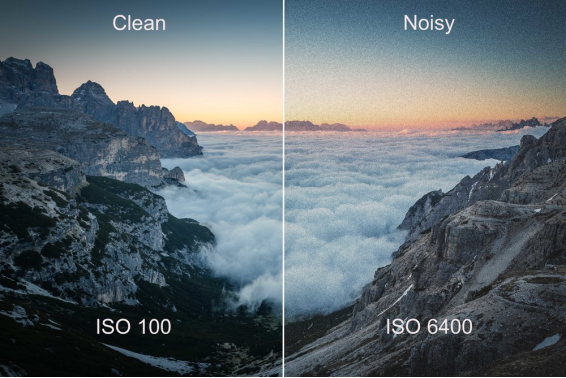
Digital noise is a common issue that can occur in photographs due to various factors. It is caused by using a high ISO setting, shooting in low-light conditions, or using older camera models. Understanding the causes of digital noise is crucial to address this problem effectively.
☞ Two Main Types of Photo Noise
- Colour noise: Colour noise manifests as unwanted coloured pixels scattered randomly throughout an image. These specks of colour can be distracting and make the image appear less sharp and clear.
- Luminance noise: Luminance noise appears as grainy or speckled patterns of brightness variations. It can make your image look rough and less refined, especially in areas with low light or high ISO settings.
☞ Possible Factors Causing Noise Photo
- High ISO Settings: Higher ISO settings amplify the sensor's signal, but they also amplify noise, especially in darker areas of the image.
- Low Light Environment: When shooting in dim lighting, cameras increase the ISO sensitivity to capture more light, which can introduce noise.
- Over-exposure: Prolonged exposure can cause the camera sensor to heat up, leading to increased noise, particularly in long-exposure photography.
- Incorrect/Excessive Image Processing: The algorithms used to process images can sometimes introduce noise, especially if they attempt to enhance details in low-light conditions.
- Smaller Sensor: Cameras with smaller sensors (like those in smartphones) tend to produce more noise compared to larger sensors (like those in DSLRs) due to less light capture.
Both colour and luminance noise resulting from the above reasons can degrade the overall quality of your photos, making them appear less professional and polished. Therefore, addressing this issue and reducing noise is important to achieve cleaner and more visually appealing images.
Part 2. Recommended Tools to Eliminate Noise in Photoshop
After testing, we finally selected 2 main techniques in Photoshop for photo noise reduction, which is easier for new users.
Reduce Noise Filter
⛳ Location: Filter > Noise > Reduce Noise
☺️ Best For: Reduce noise in photographs taken at high ISO settings or in low light.Camera Raw Filter
⛳ Location: Filter > Camera Raw Filter
☺️ Best For: Comprehensive image adjustments, including noise reduction, for both RAW and non-RAW files.
☞ If you want to explore more apps like Photoshop that can process and edit image, please check this toolTop 8 Photoshop Alternatives for 2025: Free & Paid
Part 3. How to Reduce Noise in Photoshop [3 Ways]
After walking through the overview of the 2 popular denoise techniques in Photoshop, now, let's begin to apply them to remove noise with Photoshop:
Method 1. Use Reduce Noise Filter - Basic Mode
If your image has noise all over it, the Basic Mode of the Reduce Noise filter can be a useful starting point and get the answer to how to reduce noise in Photoshop. This method can also be applied to sharpen images in Photoshop
-
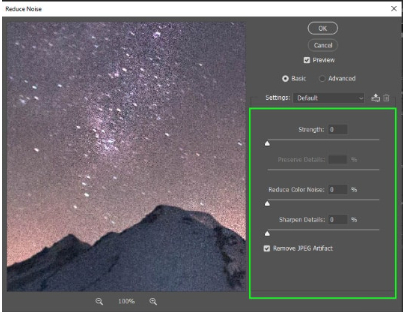
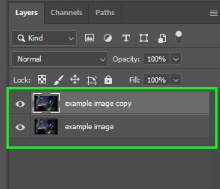
Begin by duplicating the image and converting it into a smart object. Then, open the 'reduce noise' filter, following the steps outlined in the earlier part of this tutorial. The filter will open in its default basic mode with various sliders.

-
The primary slider is labeled 'strength,' you can adjust it to eliminate noise. Since the image contains a significant amount of noise, we will select the maximum value of 9 (the highest available is 10).

The 'preserve details' slider complements the 'strength' slider by refining its effect. When reducing noise excessively, there is a risk of losing important details. Given the severe noise in my image, I will choose a value of 3%.

You can employ the 'reduce color noise' slider if you observe any color noise in your image. In my image, some color noise is near the stars, so I will select 45%.

It is important to exercise caution when adjusting the 'sharpen details' slider since setting it to high values may reintroduce noise. For my image, I will opt for a value of 8.

-
After editing, click 'OK' to return to the canvas. The resulting image, after applying the 'reduce noise' filter, should appear as follows:


Method 2. Use Reduce Noise Filter - Advanced Mode
You can utilize the Advanced Mode of the Reduce Noise filter for more control over noise reduction and get the answer to how to reduce noise in image Photoshop.
-
Duplicate the image layer by selecting it and pressing "Ctrl+J" (Windows) or "Command+J" (Mac).

-
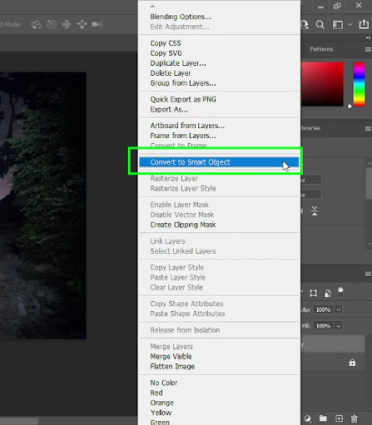
Convert the duplicate layer into a smart object by right-clicking on the layer and choosing "Convert to Smart Object." This ensures non-destructive editing.

-
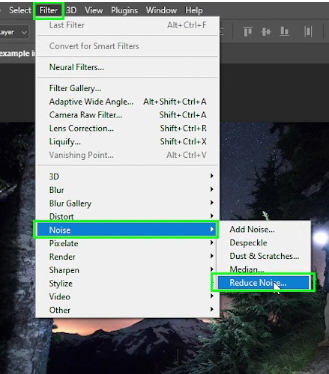
With the duplicate layer selected, go to the top menu and choose "Filter" > "Noise" > "Reduce Noise." The Reduce Noise dialogue box will appear.

-
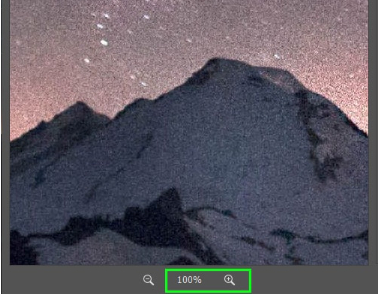
Set the zoom level to 100% in the Reduce Noise dialogue box to see the noise details.

-
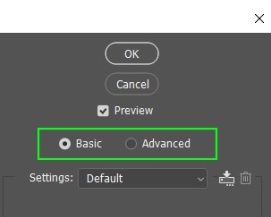
On the right side of the dialogue box, you'll find two options: Basic and Advanced. Select the Advanced mode for more precise noise reduction.

-
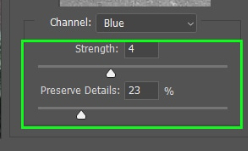
In Advanced mode, you can remove noise per channel (red, green, and blue). Analyze the image and identify which channel has the most noise. Adjust the sliders for each channel to reduce noise selectively.

-
Experiment with the sliders and find the balance between noise reduction and preserving details. Be mindful not to overdo it, as excessive noise reduction can result in losing important image elements.

- Once the noise reduction adjustments are satisfied, click "OK" to apply the changes.
Method 3: Use Camera Raw Filter
Another effective approach to reduce noise in image Photoshop is utilizing the Camera Raw Filter.
- Open the image you want to edit and duplicate it. Convert the duplicate layer into a smart object for non-destructive editing.
-
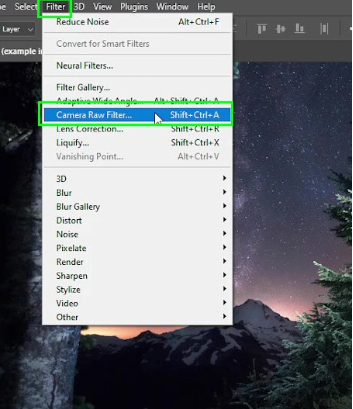
Go to the top menu and select "Filter" > "Camera Raw Filter."

-
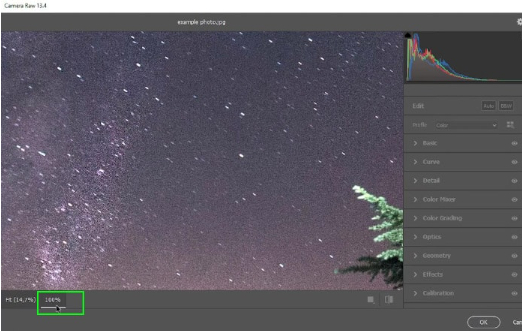
Set the zoom level to 100% for accurate noise assessment in the Camera Raw dialogue box.

-
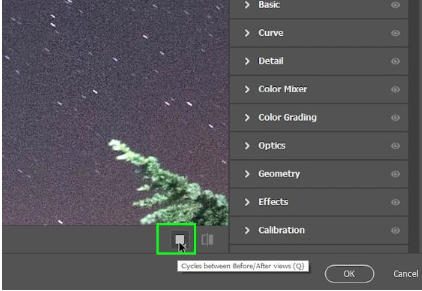
Enable the "Before and After" view mode by clicking the small square icon at the bottom of the panel. This allows you to compare the edited version with the original image.

-
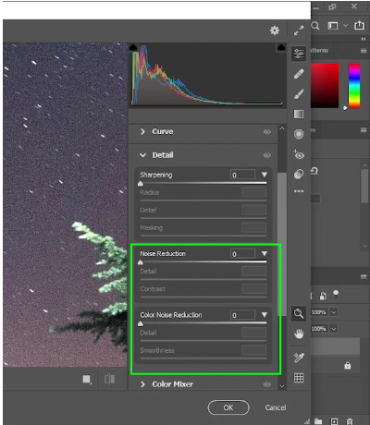
Navigate to the "Detail" panel on the right side. Here, you'll find options for reducing noise and enhancing details.

-
Adjust the "Noise Reduction" slider to reduce noise. Avoid pushing it too high to maintain a natural look. Move the "Detail" slider slightly to recover some lost details, but avoid reintroducing noise.

-
If reducing noise affects the contrast, use the "Contrast" slider to restore it. Find the appropriate balance for your image.

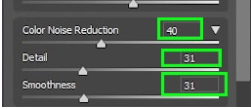
Use the "Color Noise Reduction" slider for colour noise reduction. The "Detail" slider helps recover lost details, while the "Smoothness" slider softens areas affected by color noise. Experiment with the sliders until you achieve the desired result. Remember that the optimal settings may vary depending on the specific photo.
Part 4. Alternative Way for Photo Noise Reduction with AI [Easier] HOT
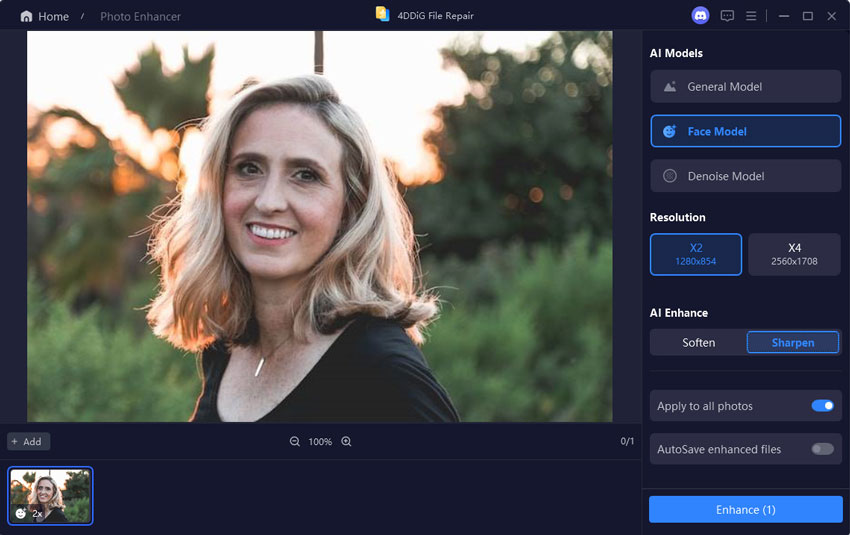
You may have found that it is quite complicated to manually to eliminate noise with Photoshop, which is not friendly for newbies. In a bid to meet the needs of all users in any field, we have presented an easier alternative. That is 4DDiG AI Photo Enhancer, an AI-powered software applied for more advanced noise reduction and photo enhancement capabilities.
In detail, it comes with a specific Denoise AI Model for photo noise removal. Just add the noise or grainy photo to the gadget, and then its top-notch AI algorithsm will analyze the image, remove blur/noise/grain/flaw from the picture, sharpen them, and enhance the resolution to 4K or higher 8K. Besides, it is capable of restore old or faded photos with adding vivid color.
✨ Main Features of 4DDiG AI Photo Enhancer
- Quickly fix noise/blurry/grainy/scratched/distorted/corrupted photos with AI
- Apart from Denoise Model, it also provide Face/General/Colorize AI Models
- Increase photo quality to 4K and higher 8K
- Restore old photos and convert black-and-white images to color
- AI sharpen images, removing any flaws, scratches, or wrinkles
- Support PNG, WEBP, HEIC, JPG, and more photo formats
- Excellent effect and high success rate (up to 99%)
✨ How to Get Rid of Noise in Photos with 4DDiG AI
-
Launch 4DDiG Photo Enhancer on your PC and navigate to the left "AI Enhancer" tab. Then click the "Photo Enhancer" section.
FREE DOWNLOADSecure Download
FREE DOWNLOADSecure Download

-
Later, to upload the noise photo to reduce, please tap on the blue "Add Videos" button or drag it to 4DDiG Photo Enhancer directly.

-
After importing your photos, choose an AI model to enhance them. Select the model that best suits your needs and adjust the resolution (X4 is recommended). Once selected, click the "Enhance" button to start photo denoise.

-
Once satisfied with the enhanced photo, click "Save" to export it. You can easily locate the saved photo by clicking the "Open Folder" button after completing the export process.

With 4DDiG AI Photo Enhancer, you can transform blurry and low-quality photos into visually stunning masterpieces with improved sharpness, details, and vibrant colors. Give it a try and witness the remarkable difference in your photo collection.
Part 5. People Also About Photoshop Noise Reduction
Q1: How to reduce grain in Photoshop?
How to make a photo less grainy in Photoshop? In fact, the solutions are similar to that of noise reduction in Photoshop.
Q2: Why is Photoshop reduce noise not working?
Ensure your image is in RGB mode. Go to "Image" > "Mode" and select RGB Color if it's not.
Q3: How do I reduce the noise of a JPEG in Photoshop?
The above ways can be used to reduce JPEG noise, such as the Reduce Noise Filter in Photoshop.
Q4: Do you know any noise reduction plugin for Photoshop?
Here is a list displaying feasible noise reduction Photoshop plugins:
- Topaz DeNoise AI: Excellent for both high ISO images and long exposures.
- Luminar AI: Integrates well with Photoshop and provides a variety of AI-powered editing tools, including noise reduction.
- Neat Image: Offers advanced noise reduction algorithms, effective for both digital and film images
Conclusion:
Reducing noise in Photoshop is essential for achieving high-quality, professional-looking images. By following the step-by-step techniques mentioned above, you can effectively reduce noise and improve the overall appearance of your photos and get the answer to your question of how to reduce image noise in Photoshop.
Additionally, advanced tools like 4DDiG AI Photo Enhancer provide enhanced capabilities for repairing and enhancing images. So, unleash your creativity and enjoy noise-free, visually stunning results in your Photoshop projects!
Secure
Download
Secure
Download






 ChatGPT
 Perplexity
 Google AI Mode
 Grok
Grok


