How to Get Rid of Red Eyes in Photos Like a Pro
Took some photos with on-camera flashes and found out the subjects have red eyes? Here is how to get rid of red eyes in photos with minimal and simple steps. Also, learn how to fix blurry photos with 4DDiG Photo Repair.
Question
“Hi, I took some family photos last night with the flash on as it was rather dark. But I found out that all the photos have red eyes. Please tell me how to get rid of red eyes in photos because they look terrible.”
Taking photos with the flash on is a necessity when the surrounding light is low and the environment is dark. While flash can help improve the lighting condition while taking photos, it leaves behind red eyes on the subjects. You may not always notice the red eyes unless you zoom in on the photos and focus on the subjects.
There is no doubt that the red eyes on the subjects ruin the photos because everyone’s focus immediately goes to the distracting red eyes. Fortunately, you can get rid of the red eyes in photos if you have the right tool. Adobe Photoshop and Lightroom are the most preferred software, but there are easier alternatives available. In this article, we have illustrated the steps to remove red eyes from your photos to make them look normal.
Part 1. What Causes Red Eye in Photos?
When you shoot photos with the camera flash on due to the dark surroundings, the light reflects off the retina, and red or orange spots appear on the eyes. The bright light coming from the camera flash is so fast that the eyes cannot get enough time to absorb the light.
Therefore, less light enters the eyes, and more light gets reflected. Since you cannot help but use a camera flash when the lighting is low, you can use a larger flash or move away from the subject as far as possible. If that is not possible, you must learn how to get rid of red eye in a photo through editing.
Part 2. How to Get Rid of Red Eyes in Photos?
There are several photo editing tools that can help users to remove red eyes in photos, ranging from manual editing software like Photoshop to dedicated red eye remover tools online.
Way 1. Get Rid of Red Eye in Photoshop
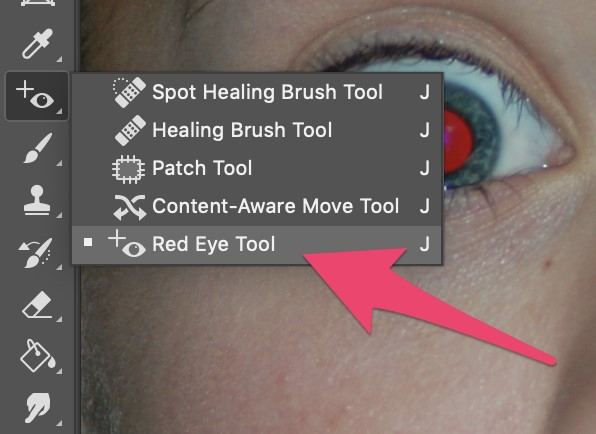
Adobe Photoshop is a go-to software for professional photo editing. It comes with a “Red Eye Tool” that allows users to easily correct red eyes in photos. With this tool, you can select on the red area in the eyes, and Photoshop automatically corrects the color.
Here are the steps on how to remove red eye in Photoshop.
-
Open Adobe Photoshop and go to File>Open to import your photo with red eyes.

-
Zoom in on the red eyes. Click on the Healing Brush tool on the left panel. From the menu, click on the Red Eye Tool option.

-
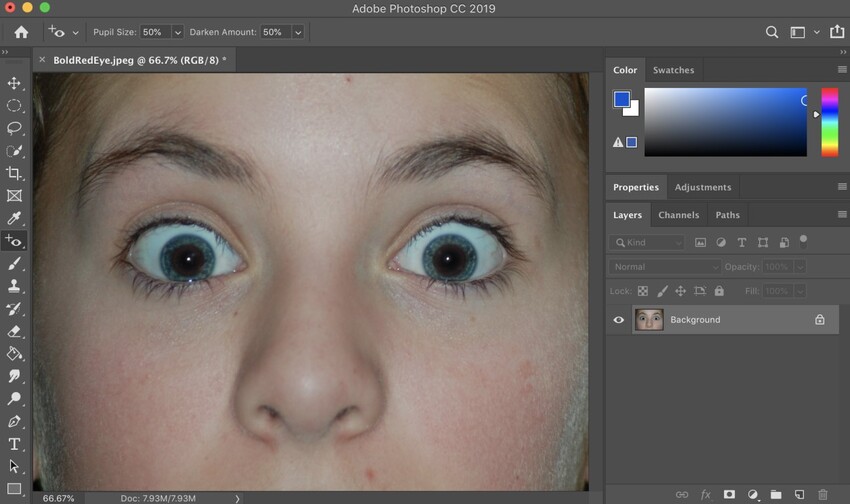
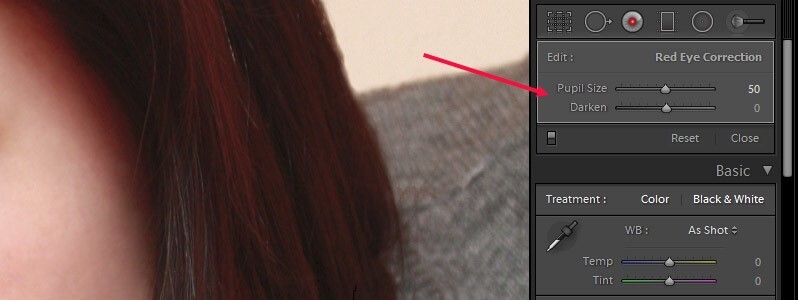
Change the Pupil Size if the red spot is large on the eyes. Similarly, you can change the Darken Amount based on the complexion of the eyes.

-
Click on the red eyes on your photo, and they will become normal instantly.

How to Restore Old Photos in Photoshop? An Easy Guide for Beginners
Way 2. Get Rid of Red Eyes in Photos Using Red Eye Remover
keyword: how to get rid of red eye in a photo
If you do not have Photoshop or don’t want to download a dedicated desktop tool, there are online red eye removers available. Fotor's Red Eye Remover is a popular online photo editor that you can use to remove red eyes without any editing skills. It can automatically detect the red eyes in your photos and remove them instantly.
Here’s how to get rid of red eye in a photo via Fotor's Red Eye Remover.
-
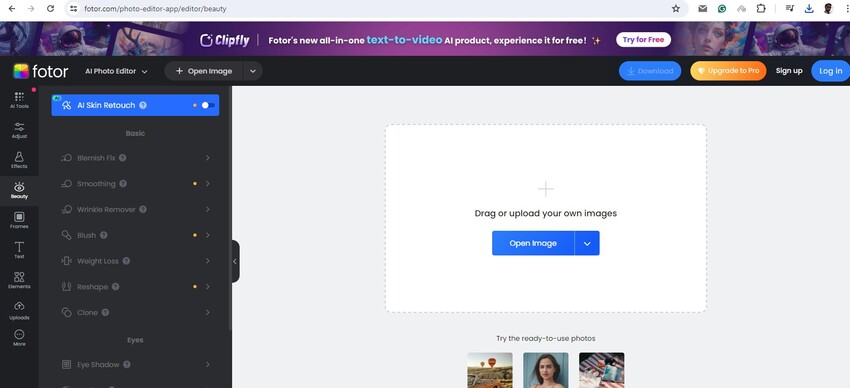
Open Fotor's Red Eye Remover and click the Open Image button. Select the red eye photo from our device.

-
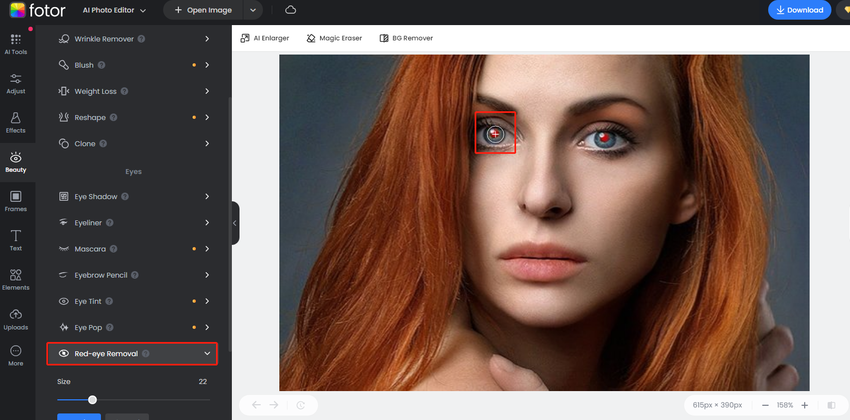
From the left panel, click the Red-eye Removal option and select the different size.

-
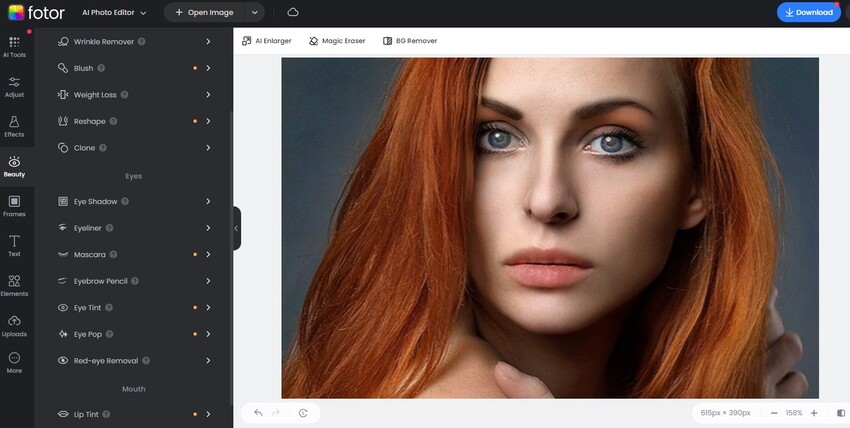
Click on the red eyes one by one, and they will turn into normal eyes instantly. Once you’re satisfied with the adjustments, hit the Apply button to finalize the changes.

-
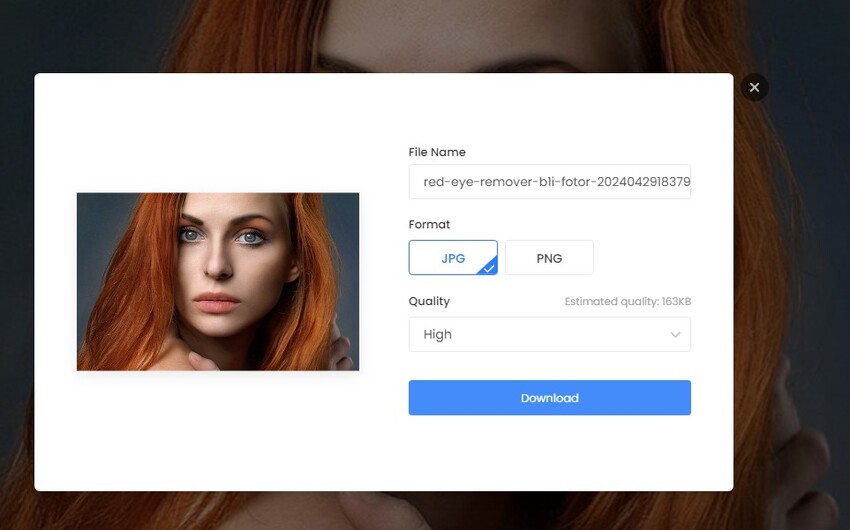
Click the Download button and select a format for your edited photo. Hit Download again to save it to your device.

Way 3. Get Rid of Red Eyes in Photos Using GIMP
If you are looking for a completely free image editor that can remove red eyes in photos, GIMP is a good choice. GIMP is a cross-platform photo editor that is available for Windows, macOS, and Linux users. The software has a simple user interface, and you can download it for free and install it on your computer. Here are the steps on how to remove red eyes in pictures via GIMP.
- Download and install GIMP on your computer. Launch the software and open the red eye photo.
- Hit the “+” key to zoom in until the entire screen focuses on the red eyes.
-
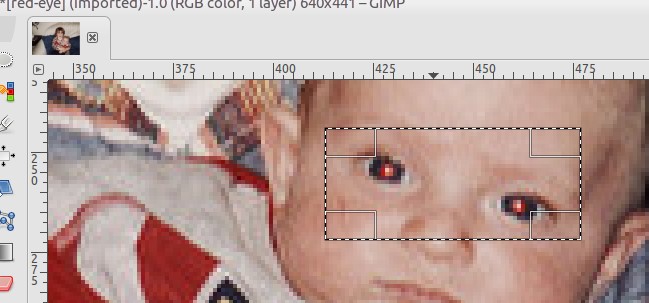
From the Toolbox, use the Rectangle Select Tool or Ellipse Select Tool to to select red area within the eyes. Keep the Feather Edges in between 15 and 20.

- Draw ellipses on the red eyes by pressing the Shift key.
-
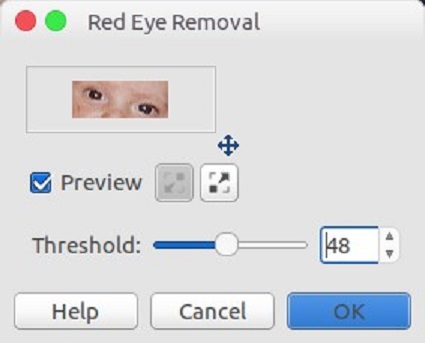
Go to Filters> Enhance> Red Eye Removal.

-
Adjust the parameters as required and click the OK button to get normal eyes in place of red eyes.

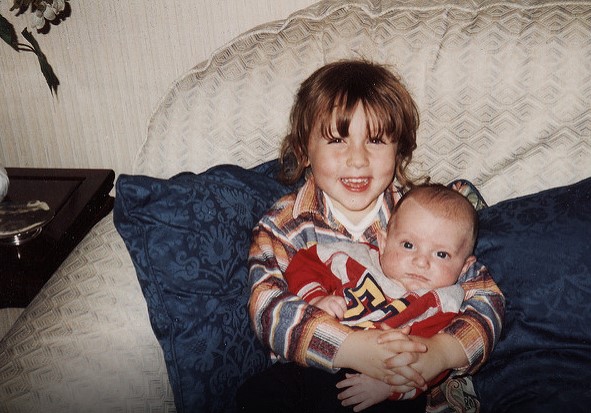
That’s it! Now you can get the normal photo as below.

Way 4. Remove Red Eyes in Photos Using Lightroom
Adobe Lightroom is equally popular as Adobe Photoshop when it comes to editing photos. Professionals prefer Lightroom for editing RAW photo files as there are more editing tools available. Lightroom comes with a dedicated Red Eye Correction tool to remove red spots from eyes instantly. Here are the steps on how to get rid of red eye in Lightroom.
- Open your red eye photo in Lightroom and switch to the Develop mode from the top.
-
Click the Red Eye Correction icon. Choose the Red Eye option.

-
Hover your mouse pointer to the center of the eye and draw a circle by dragging it out.

-
Adjust the Pupil Size and Darken options.

- When you are satisfied with the result, click the Done option.
Way 5. Remove Red Eye on iPhone Using Photos App
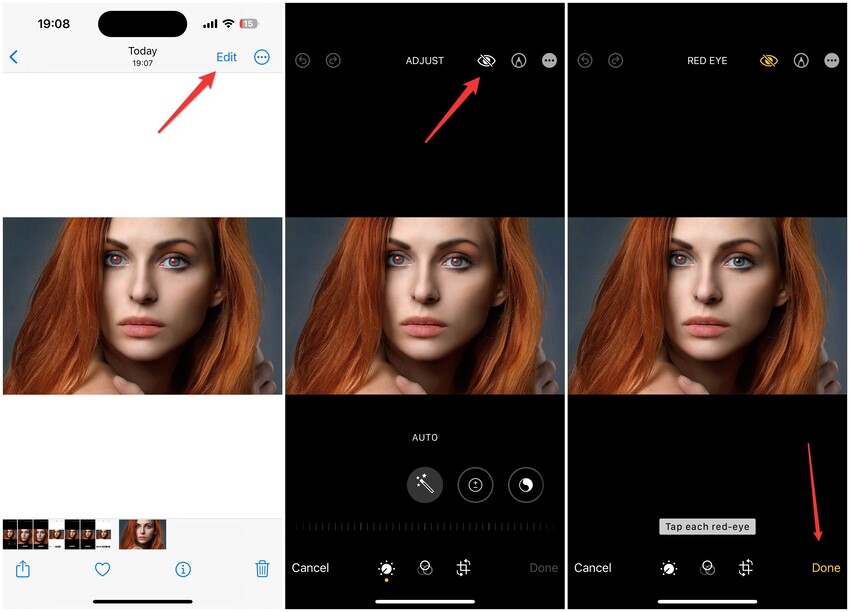
If you are an iPhone user, you can use its built-in Photos app to remove red eyes from photos instantly. The Photos app comes with a dedicated Red Eye Correction option to fix photos with red spots in the eyes of the subjects. Here are the steps on how to remove red eye on iPhone via Photos app.
- Open the red eye image in the Photos app.
- Tap on the Edit option located at the top-right corner.
- Tap on the Red Eye Correction option located at the bottom.
- Tap on the red eyes one by one, and they will normalize automatically.
-
Tap on the Done option if you are satisfied with the result.

Part 3. Tips to Prevent Red Eyes in Photos
There are certain steps you can follow to prevent red eyes in the photos that you shoot in a dark environment.
Light Up The Surroundings
The first step is to stop using the camera flash while shooting photos. You should install lights and lamps so that you can brighten the surroundings. Once the surrounding is not dark and the faces of the subjects are well lit up, you can shoot photos without the flash on and prevent red eyes.
Look Away From Camera
If you cannot light up the surrounding, you should ask the subjects not to look directly at the camera. Ask them to look away from the camera, or you should shoot the photo from a different angle so that the light from the camera flash does not go into the eyes directly. That is how you can avoid red eyes in photos.
Use Red Eye Reduction Option
f you use a decent DSLR camera, you should check the manual to find the red eye reduction option. Most DSLR cameras come with this red eye reduction option. The built-in settings set the flash off twice so that human eyes can get enough time to absorb the light and prevent red spots in photos.
Bonus Tips: How to Fix Blurry Photos with AI
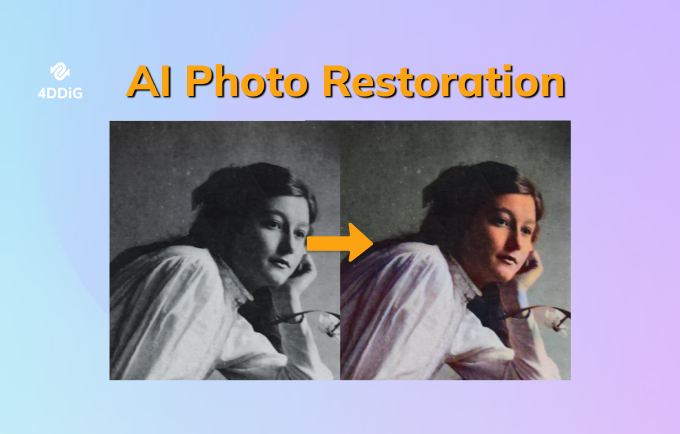
If your photos have become blurry, grainy, or faded, you can recover and sharpen them with an AI tool easily. We recommend 4DDiG Photo Enhancer to upscale images to 4K and higher 8K, remove blur and noise from photos, and restore old faded photos with coloful hues instantly with a few clicks. The software is adept in fixing pixelated, blurry, noisy, and scratchy photos.
4DDiG Photo Enhance also uses powerful 4 AI models (General/Face/Denoise/Colorize) to enhance the resolution, overall quality, and facial clarity effectively. You can also colorize any faded or black and white photos. Most importantly, the software can enhance and fix 3000 photos all at once, and it supports a wide range of photo formats. Here are the steps to fix blurry photos via 4DDiG Photo Enhancer.
-
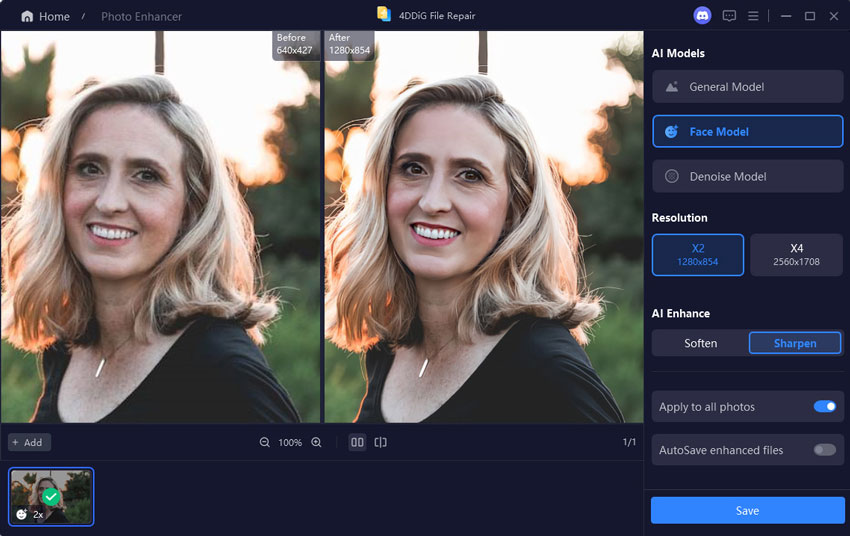
Download and install 4DDiG Photo Enhancer which is available for Windows and macOS users. Launch the software, select the AI Enhancer option from the left menu, and then tap on the "Photo Enhancer" tab.
FREE DOWNLOADSecure Download
FREE DOWNLOADSecure Download

-
Now, hit the "Add Videos" button to transfer the blurry images that you want to sharpen and enhance.

-
Choose a specific AI model and reset the resolution (General Model and X4 are recommended). Upon selection, touch on the "Enhance" button to start.

-
When the photo enhancement and unblur process is finished, check the result and press the "Save" button to export it.

If your photos are corrupted or damaged, you need to navigate to the "Corrupted File Repair" section from the left menu and choose the "Photo Repair" option.
Conclusion:
When capturing photos in the dark with the flash on, you are likely to get red eyes. Red eyes in photos can ruin all the fun and make the subjects look weird. To overcome this, we have illustrated how to get rid of red eyes in photos like a pro via Photoshop and Lightroom. We have also suggested a free alternative and an online tool for those seeking quick fixes. Moreover, beyond just red-eye correction, if you're dealing with damaged or blurry photos, we recommend 4DDiG AI Photo Enhancer. This powerful tool offers instant fixes for making your photos remain clear and pristine. Don’t hesitate to use it and preserve your cherished memories.
Secure
Download
Secure
Download






 ChatGPT
 Perplexity
 Google AI Mode
 Grok
Grok

