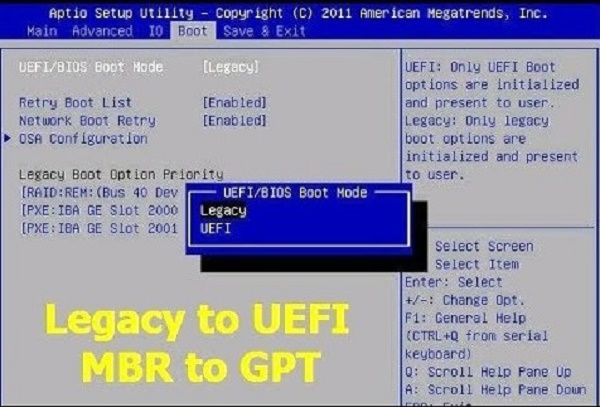
How to Change DPI of Image to 300/600 [for Beginners]

5 mins read

Updated on 2024-12-28 16:49:10 to Photo Tips

There is a need to understand how the DPI of an image can be manipulated in order to get the best print quality. The dpi calculates the image’s resolution, and its quality determines how detailed the picture will be when printed. Changing the DPI of the image can improve this element.

Thus, one can achieve the desired parameters for various uses. In this guide, you’ll find five ways to change dpi of images if you’re a beginner.

What Is DPI in Photos?

DPI, or dots per inch, tells us how many dots are printed within one inch of the picture. It determines the amount of detail in the prints; the higher the DPI, the more detailed the prints are on the printing surface. This knowledge is useful in striving to print images that will look clear and professional just as seen on screen.

Ideal DPI for Different Uses

The suitable DPI varies based on how the image will be used:

  • Printing: For high-quality prints, a DPI of 300 is standard. This resolution ensures images appear sharp and detailed on paper.
  • Web Images: Images displayed on websites typically have a resolution of 72 DPI. This lower DPI keeps file sizes small, allowing web pages to load quickly while maintaining adequate on-screen quality.

How to Check Photo DPI

Knowing your image's DPI is important, especially when preparing for print. Here are methods to check DPI on different platforms:

On Windows:

  • Right-click on the image file and select 'Properties' from the context menu.

  • Click on the 'Details' tab.

  • Under the 'Image' section, find the 'Horizontal Resolution' and 'Vertical Resolution'. These values represent the DPI.

    check image dpi windows

On Mac:

  • Open the image with the 'Preview' application. Click on 'Tools' in the Preview’s top menu bar.

  • Select 'Show Inspector' or press 'Command + I'.

  • In the 'Inspector' window, view the DPI under 'Image DPI'.

    check image dpi mac

Way 1: How to Increase DPI of Image in Paint

Microsoft Paint is a simple tool that comes with Windows. You can use it to change the DPI of an image. This helps improve print quality.

Steps to change DPI in Paint:

  • Open the Paint app and click on "File" and then "Open" to add your image.

  • Click on "File" again and choose "Properties."

  • In the Image Properties window, set the units to "Pixels".

  • Enter the desired width and height in inches to adjust dimensions.

  • Divide the number of pixels by the size in inches to get the new DPI.

  • Click "OK" to apply changes, then save your image.

    change image dpi on paint

This method adjusts the image's dimensions, and that is how to increase image dpi in the Paint app quickly, enhancing print quality.

Way 2: How to Change Image to 300 DPI in Affinity Photo

Affinity Photo is a popular image editing software. You can use it to change an image's DPI. This method changes the DPI without altering the image's pixel dimensions, ensuring better print quality.

Steps to change DPI in Affinity Photo:

  • Launch Affinity Photo and open your image file.

  • Go to "Document" in the menu and select “Resize Document”.

  • In the dialog box, uncheck the "Resample" option to keep the pixel dimensions the same.

  • Enter "300" in the DPI field and click "Resize" to apply the new DPI setting.

    change image to 300 dpi affinity photo

Way 3: How to Change DPI in Photoshop/GIMP

Adobe Photoshop and GIMP are powerful image editing tools. Both allow you to change an image's DPI. Both methods adjust the DPI without changing the image's pixel dimensions, improving print quality.

Steps to adjust DPI in Photoshop:

Here is how to increase dpi in photoshop and enlarge the image without losing quality at the same time:

  • Launch Photoshop and open your image file. Click on "Image" in the menu and select "Image Size."

  • Untick the "Resample" box to keep the pixel dimensions the same.

  • Enter the desired DPI (e.g., 300) in the Resolution field.

  • Click "OK" to apply the new DPI setting.

    increase dpi in photoshop

Steps to change DPI in GIMP:

Those steps can also be applied to resize an image and keep the quality:

  • Run GIMP and upload your image file.

  • Go to "Image" in the menu and select "Scale Image."

  • Enter the desired DPI in the X and Y resolution fields.

  • Click "Scale" to apply the new DPI setting.

    adjust dpi in gimp

Way 4: How to Change DPI of Image Online on Canva

Canva is an online design tool. While it doesn't allow direct DPI changes, you can set custom dimensions to achieve the desired print quality. By setting the correct dimensions on Canva, you can create high-quality images suitable for printing.

Steps to prepare high-DPI images in Canva:

  • Go to Canva.com and create a new design with custom dimensions.

  • When photo edition is finished, click the top-right “Share” > “Download” tab.

  • From the draw-down list, select a file type like JPG or PNG.

  • Then drag the slider under the “Size” label to the higher value to increase image DPI up to 300.

  • Click on "Download" to save the file.

    increase image dpi canva

Way 5: How to Increase DPI of Image with AI

Enhancing image quality has become more accessible with AI-powered tools like 4DDiG AI Photo Enhancer. This software improves photo resolution and sharpness, making it suitable for various applications.

Unlike the above tools, this software can make it a reality to enhance photo quality to 4K or higher while increasing DPI value to 300 or more with ONCE CLICK. Besides, to ensure convenient photo upscale, it empowers users to batch repair and inprove the resolution, width, and height of multiple images. Beyond those features, this great gadget also comes with an AI Photo Colorizer, which can help you restore old, faded, black-and-white photos.

FREE DOWNLOAD

Secure Download

FREE DOWNLOAD

Secure Download

Features of 4DDiG AI Photo Enhancer:

  • Automatically upscales images to 4K resolution, enhancing details and clarity.
  • Reduces graininess in photos, resulting in cleaner images.
  • Improves image colors to create sharp, vibrant visuals.
  • Allows enhancement of multiple images simultaneously, saving time.
  • Compatible with various image formats, including JPG, JPEG, PNG, WEBP, TIF, and BMP.

Steps to enhance image using 4DDiG AI Photo Enhancer:

  • Boot up the 4DDiG File Repair executable and head to the left “AI Enhancer” and tap on “Photo Enhancer”.

    open 4ddig ai photo enhancer
  • Click "Add Photos" use the drag-and-drop action to import the image you wish to enhance.

    add photos to change dpi
  • Based on your needs (e.g., General, Denoise, Face), choose the appropriate AI model. Then set the Resolution as “X4”. Meanwhile, you can also enter higher values for “Width” and “Height” from the “Custom” section.

    select resolution ai model and change image dpi
  • Click "Enhance" to start the enhancement process. After processing, preview the enhanced image and save it to your computer.

    enhance preview and save images with higher dpi

Using AI tools like 4DDiG AI Photo Enhancer simplifies the process of improving image quality, making it accessible even for beginners.

People Also Ask about Image Change DPI

Q1: How to get the right resolution for PNG with photo DPI?

To achieve the desired resolution for a PNG image, adjust its DPI (dots per inch) using image editing software or online DPI converters. This ensures the image meets specific quality requirements.

Q2: How to compress a photo to 150 DPI and 100KB?

First, reduce the image's DPI to 150 using an image editor. Then, utilize an online image compressor to decrease the file size to 100KB, balancing quality and size.

Q3: How to tell the DPI of an Apple photo file?

On a Mac, open the image in Preview, click "Tools," then select "Show Inspector." The DPI is displayed under the "Image DPI" section.

Q4: What is the best DPI for scanning photos?

For high-quality scans, especially for printing, a DPI of 300 is recommended. This setting balances detail and file size effectively.

Conclusion

It is crusial to change DPI of image for achieving the desired print quality. Among the various methods discussed, utilizing AI-powered tools like 4DDiG AI Photo Enhancer stands out for its efficiency and effectiveness. This software allows you to change the DPI and enhances image quality by repairing corrupted photos, reducing noise, and sharpening details. Its user-friendly interface and advanced features make it a valuable tool for beginners and professionals seeking to improve their images.

FREE DOWNLOAD

Secure Download

FREE DOWNLOAD

Secure Download

William Bollson (senior editor)

William Bollson, the editor-in-chief of 4DDiG, devotes to providing the best solutions for Windows and Mac related issues, including data recovery, repair, error fixes.

(Click to rate this post)

You rated 4.5 ( participated)