How to Transfer Photos from iPhone to Computer without Losing Quality
Of all the operations that make up iOS file management, one of the most important is the ability to sync photos from iPhone to the computer. This way all of your valuable memories are backed up and can be taken anywhere while freeing useful storage space from your device.
In this guide, we will tell you about the five more or less effective ways on how to transfer photos from iPhone to computer without Losing Image Quality. That is something you do want to stay good however when transferring your images to PC or Mac computer.
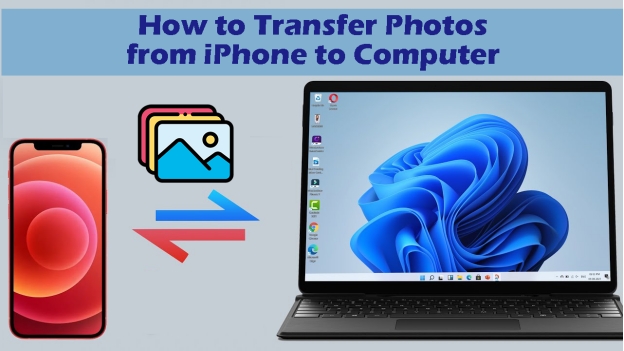
What Should We Consider If Moving Photos From iPhone to Computer?
Before transferring photos from your iPhone to your computer, several factors need to be considered to ensure a smooth and quality-preserving process:
- Make sure that the transfer doesn’t compress or downgrade your photo quality by moving them in the wrong format.
- Make sure your computer can contain the files and has enough storage space available.
- Be careful with your data interruptions and use reliable cables and connections to do it.
- Choose how you’re going to name and label your photos so you can find them later with ease.
- You should always back up your photos to cloud storage or an external drive. This helps to avoid losing them accidentally.
Method 1. How to Transfer Photos from iPhone to PC with USB Cable
When you connect your iPhone to a Windows PC, there are 2 ways of transferring your images with the help of Windows Explorer and the Photos app. This section discusses both these methods in detail below:
1. Via Windows Explorer
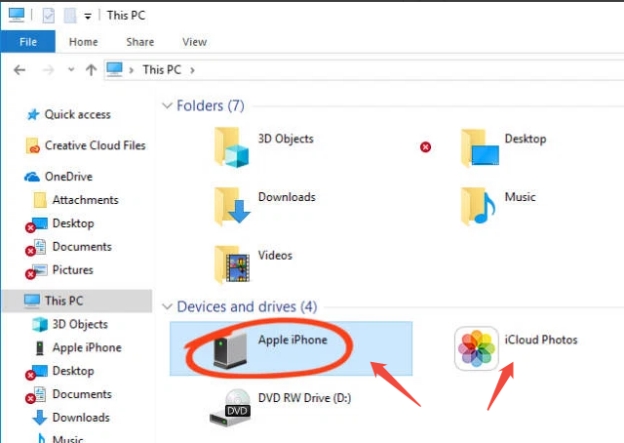
One super easy and direct way to move photos from an iPhone to a PC is to use Windows Explorer. You can also get to your iPhone's internal storage like a USB drive using the steps below:
-
Plug your iPhone with the USB cable into the PC. Unlock your iPhone if asked and on your iPhone tap the “Trust This Computer” button.
-
Look under “Devices and Drives” in “File Explorer” on your PC and your iPhone should be listed.
-
Go to your DCIM folder to view your photos. Copy and paste the photos into your selected location on the PC.

2. Via Windows Photos App
Importing and organizing your photos is made intuitive with the interface of the Windows Photos app. It simplifies the experience and reduces the manual steps involved in the process. Hence, making the task more efficient for you with the following quick steps:
-
Unlock your iPhone, which is connected to the PC, with a USB cable. Open your Photos app on your PC.
-
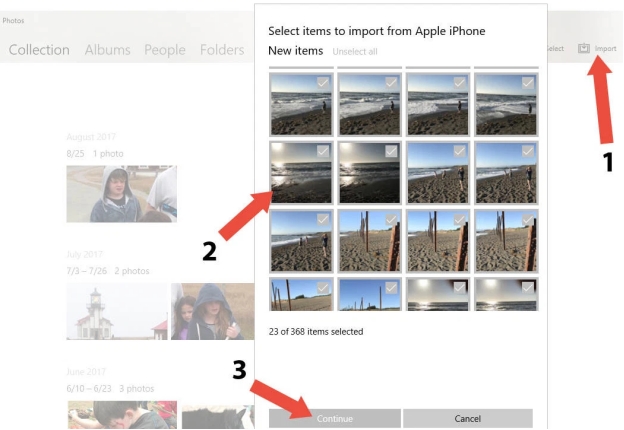
Click "Import" > "From a USB device". Choose the photos you wish to import and click 'Continue'.

Method 2. How to Transfer Photos from iPhone to Mac Using Mirroring
Viewing and saving photos on your iPhone straight into your computer can be done using mirroring. If all you want to do is quickly see and copy a few select photos and don’t need to sync your entire library, this is a useful method with the following steps:
-
Make sure the two devices are on the same network with Bluetooth turned on.
-
On iPhone, open the Control Center and tap on the “Screen Mirroring” or “AirPlay” icon. Then choose your Macbook from the available device list.
-
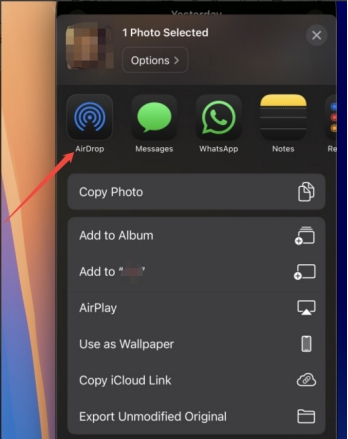
Open the Photos app on your iPhone and select your photos. Then click "Share" > “AirDrop”. Pick your Mac as the destination device.
-
Click the cursor on your Mac screen in the desired folder and hit “CMD + V”.

Method 3. How to Send Photos from iPhone to Computer via Email
Emailing photos is an easy and quick way to get a few pictures into your computer. This method is great for transferring a few high-quality images without extra apps/software and the process is also simple with the following steps only:
-
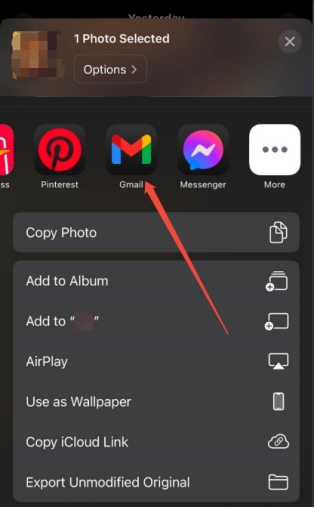
First, you need to open up the Photos app from the iPhone. After that, select the photos you want to transfer. Go to the share icon and choose the mail client of your choice like “Gmail or Apple Mail App”

-
Enter your email address and hit send. Download the photos on your computer and use your email there.
Method 4. How to Copy Photos from iPhone to PC/Mac Using Cloud Services
Many users do not know how to transfer iPhone photos to pc without losing quality. To simplify the transfer process, you can simply use cloud services such as iCloud, Google Photos, or Dropbox, and when it comes to high-quality images, it means you keep them without having to worry about losing them during the transfer process.
For those who want to access their photos from in front of the computer, as well as on iPhones, iPads, and Android devices, this is the perfect method with the steps listed below:
-
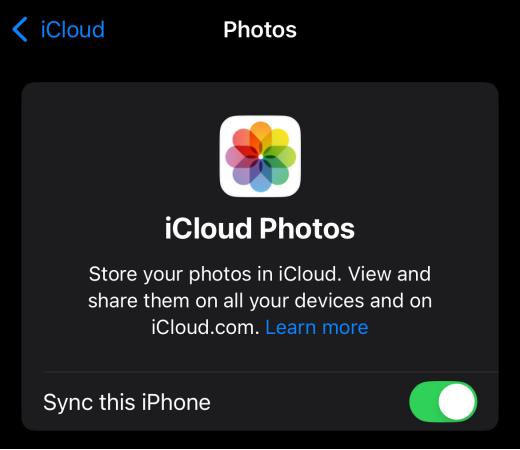
Enable the Photos app to sync with the cloud service of your choice on your iPhone.
-
For most iPhone users, it is automatically enabled with iCloud. You can enable it by going into settings and your ID then going to “iCloud” and “Photos”.
-
Log in to the same iCloud account from your PC or Mac. Get the photos from cloud storage onto your computer.

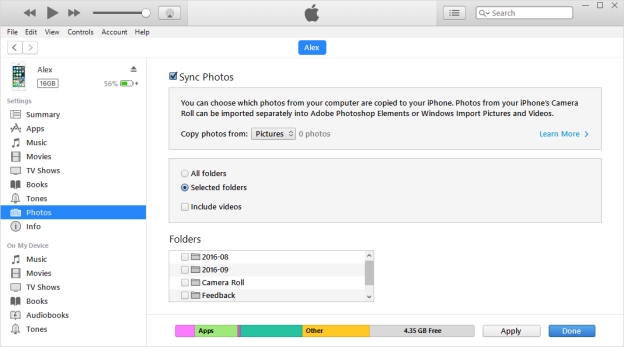
Method 5. How to Transfer Photos from iPhone to PC Using iTunes
A great thing is that iTunes can be used to sync photos from your iPhone to your computer. Using this method is fantastic for setting up backups and transferring large photo libraries.
-
Connect your iPhone with a USB cable and select it (under Devices in iTunes).

-
Enable Sync Photos and then go to 'Photos'. Select the folder to push photos to and hit ‘Apply’. Later. you will sync photos from iphone to PC via iTunes.
Common Issues When We Copy iPhone Photos to PC/Mac
When you need to send photos from iPhone to PC, you may encounter many issues, and here are the solutions you need to know:
Issue 1: What to Do If Photo Is Corrupted After Transfer from iPhone to PC/Mac
Sometimes you get corrupted photos from interrupted transfers or file compatibility issues. Luckily, 4DDiG Photo Repair can help to recover such files. It can even fix severely damaged and corrupted photos with ease.
What Can 4DDiG Photo Repair Do for You
- Repair multiple photos that are corrupted, damaged, pixelated, blurry, not opening, wrong color, and others.
- Work with multiple image formats, e.g., JPG, JPEG, PNG, WEBP, HEIC, SVG, RAW, TIFF, GIF, and more
- Batch repair up to 3000 images at once, saving you time
- With high success rate, it can fix heavily corrupted photo data
- Restore missing or damaged picture header
- Compatible with computers, SD card, HDD, SSD, cameras, and more storage media, can fix photos from them.
Steps to Repair Images with 4DDiG Photo Repair
-
Launch the software called 4DDiG File Repair and click “Photo Repair” from the “Corrupted File Repair” section.
FREE DOWNLOADSecure Download
FREE DOWNLOADSecure Download

-
Now, click “Add Photos” to select damaged photos after the iphone to laptop transfer from your storage. Alternatively, you can opt to drag and drop your corrupted photos to the software directly.

-
After selecting all the corrupted photos, click “Repair All”.

-
4DDiG Photo Repair will repair your images in a few seconds and you can save them by clicking the “Save All” button.

With these 3 simple and easy steps complete your corrupted and damaged images will be repaired. So, now you do not need to worry about incomplete file transfers or damaged image files on your iPhone since 4DDiG will take care of that for you.
Issue 2: Why Can't I Transfer Photos from iPhone to PC
The most common reasons behind this are outdated drivers, connectivity issues, or incorrect settings in your iPhone.
Here are some suggested solutions you may try:
Install the latest iTunes and drivers for your PC.
Use a genuine Apple USB cable.
-
Check when you’re unable to unlock an iPhone, is to confirm your iPhone is unlocked, and that ‘Trust This Computer’ is selected.
Make sure that the above suggestions are followed if you want seamless image transfer between your iPhone and computer.
Conclusion
Managing storage, and making sure your memories stay safe, means you must know how to transfer photos from your iPhone to the computer. From basic, standard USB transfers to everything in between, well-advanced tools like 4DDiG Photo Repair, you'll know it to be a smooth and most importantly quality preserving process.
So, whether you’re someone who works through manual methods or automated options; you’re going to have an option that matches your needs.
Secure Download
Secure Download
💡 Summarize with AI:
You May Also Like
- Home >>
- Photo Tips >>
- How to Transfer Photos from iPhone to Computer without Losing Quality



 ChatGPT
 Perplexity
 Google AI Mode
 Grok
Grok


