How to Fix Grainy Photos | Clear & Enhance Images Fast
Grainy photos, also known as noisy images, are a problem in photography. This happens when photos are not clear, especially in low light, high ISO or digital zoom. Whether it’s a vacation shot or a project image, no one wants grain to ruin the quality.
But don’t worry! You can learn how to fix grainy photos and get clear images with modern tools and techniques. This guide will show you the best ways, including advanced solutions like 4DDiG AI Photo Enhancer to make your photos less grainy and super clear.

Why Are My Photos Grainy?
Grain or noise in photography happens when random pixels mess up the image and reduce the sharpness and quality. This is a problem in digital photography especially in certain situations. Noise in photography means unwanted speckles or distortions that hide image details. It becomes more visible in low light or high ISO.
Here are the common reasons why photos turn grainy:
- Low Light Conditions: Cameras can’t capture details in low light. To compensate, they increase the ISO and that introduces noise.
- High ISO Settings: ISO is the sensitivity of your camera’s sensor to light. Higher ISO values make the image brighter but grainy.
- Digital Zoom: Using digital zoom instead of optical zoom enlarges the image and makes it pixelated and grainy.
- Small Camera Sensors: Cameras with small sensors like smartphones or compact cameras produce grainier photos than professional DSLRs.
Now that you know the reasons, let’s move on to make grainy photos clear.
Way 1: How to Fix Grainy Photos with AI Using Professional Software
The fastest way to fix grainy photos is by using AI. 4DDiG AI Photo Enhancer is the one of the best tool recommended by many users to remove grain and noise. 4DDiG uses advanced AI algorithms to analyze and enhance images pixel by pixel.
It’s good for removing noise while preserving image details. Whether it’s night photos, high-ISO images or smartphone pictures, 4DDiG gives professional results.
Secure Download
Secure Download
✨ 4DDiG AI Photo Enhancer Features:
- Remove noise for night photos, high-ISO images, and more.
- Automatically removes grain while preserving image details.
- Supports batch processing multiple images.
- Come with 4 powerful AI models: General, Face, Denoise, and Colorize Models.
- Adept in enhancing photos to 4K and higher 8K.
- Support an extensive range of image formats, like JPG, PNG, WEBP, TIFF, and more
- Restores clarity and textures for a professional look.
- Add color to black-and-white photos or old faded images
- For both beginners and experts with 99% success rates.
✨ How to Remove Grain from Photo Using 4DDiG AI Photo Enhancer:
-
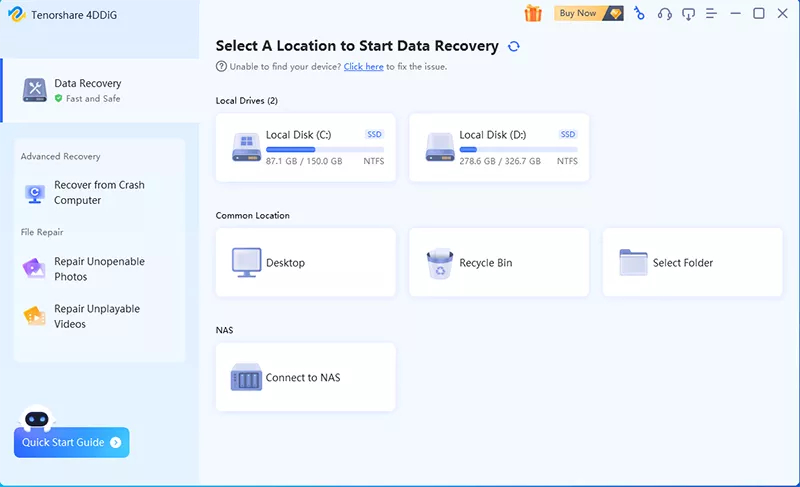
Open 4DDiG File Repair (contain the 4DDiG AI Photo Enhancer tool) software, select “AI Enhancer” and click on the “Photo Enhancer” box.

-
Upload your grainy photos by clicking “Add Photos”.

-
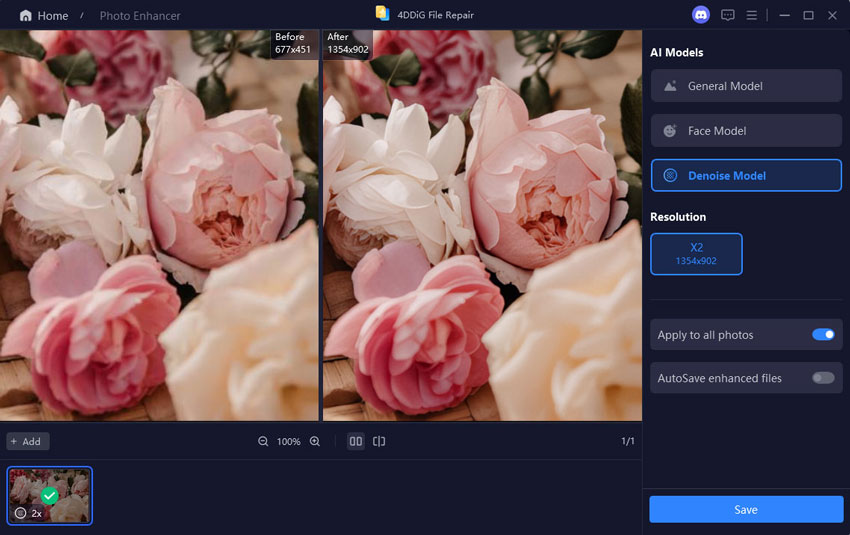
To make grainy photos clear, select a suitable AI model such as Denoise Model or General Model. Likewise, adjust resolution as “4X” and touch on “Enhance” to kick off the grain removal.

-
The software will apply the model, remove noise from a photo and restore clarity. Preview the enhanced photo, adjust if needed and click “Save” to export the final result.

Unlike many tools, 4DDiG doesn’t lose quality while reducing grain so it’s good for professionals and casual users.
Way 2: How to Fix Grainy Photos in Photoshop
Adobe Photoshop has tools to reduce grain and improve photo quality. It can’t remove all grain but can make blurry or grainy photos look much clearer. Photoshop has a built-in feature to reduce noise and repair images to some extent.
If you’re new to Adobe Photoshop, CS6 is a good starting point. It has the basic features and shortcuts to get you started with photo editing. Photoshop 7.0 is also a good choice if you’re starting from scratch as it gives a simple and easy introduction to Photoshop’s editing tools.
⭕ Method 1: Use Dust & Scratches Filter
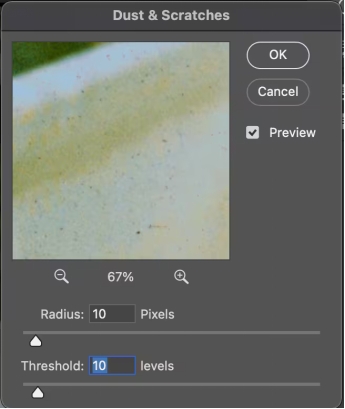
Dust and Scratches filter in Photoshop is a quick way to reduce grain in photos without losing too much detail. It’s good for removing small noise spots.
☞ Steps:
-
Open Your Photo: Open the grainy photo in Photoshop.
-
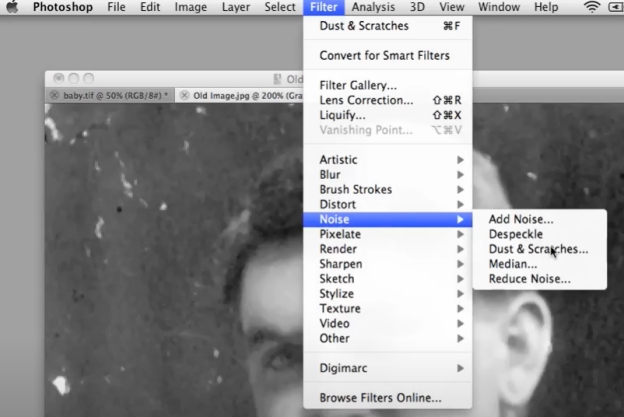
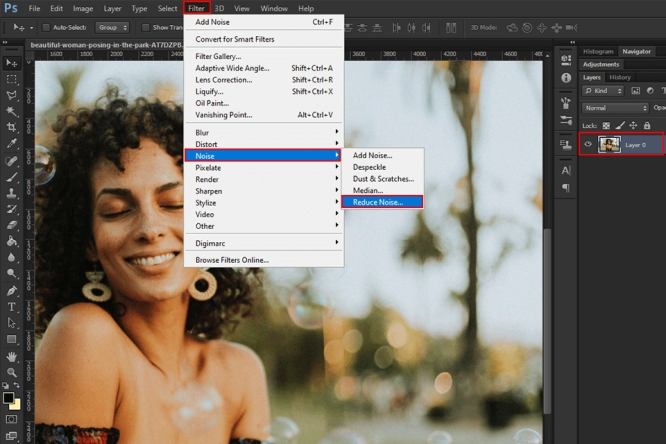
Apply the Filter: Go to “Filter” > “Noise” > “Dust & Scratches”.

-
Adjust Settings:
- Move the Radius slider (start with 1-2 pixels) to reduce grain.
-
Use the Threshold slider to keep important details visible. The higher
value keeps more details.

- Lower the layer opacity.
- Or “Edit” > “Fade Dust & Scratches” to reduce the filter’s intensity.
-
Refine If Needed: If the effect is too strong:
⭕ Method 2: Reduce Noise Filter
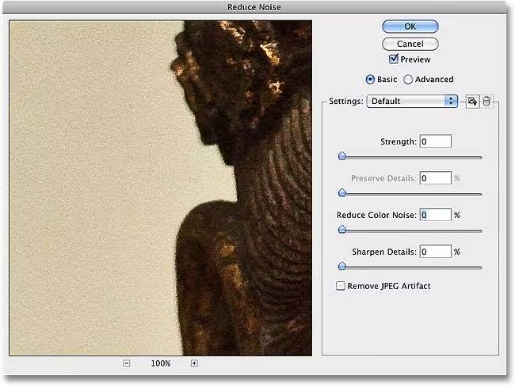
Reduce Noise filter in Photoshop gives more control to fix grainy photos especially when there’s a lot of grain or colored noise. Now follow us to see how to make grainy photos clear and unblur images in Photoshop.
☞ Steps:
-
Duplicate the Layer: Open your photo and press Ctrl/Cmd + J to duplicate the layer. This will keep the original safe.
-
Apply the filter by navigating to “Filter” > “Noise” > “Reduce Noise”.

-
Adjust the Sliders:
- Strength: Reduces overall noise. Start low and increase slowly.
- Preserve Details: Keeps edges and sharp areas clear. Adjust this to make the photo look natural.
- Color Noise: Removes colored specks. Increase if you see colored spots in the grain.
- Sharpen Details: Adds sharpness lost during noise reduction. Use lightly.
-
Check Remove JPEG Artifact if the photo has compression
issues.

-
Preview and Apply: Zoom in to check the changes. When satisfied, click OK to apply.
Combine noise reduction with sharpening filters like Unsharp Mask or Smart Sharpen for best results. Also, to learn more details, you can check: How to Reduce Noise in Photoshop [Multiple Methods].
Way 3: How to Remove Grain from Photos in Lightroom on iPhone
Lightroom Mobile on iPhone has the same powerful tools to reduce grain as its desktop version. Using its simple interface you can quickly remove noise whether it’s from low light or high ISO. The Noise Reduction tools let you selectively adjust luminance and color noise to get clearer and smoother images without losing important details. Follow these steps:
☞ Step:
-
Install and Open Lightroom Mobile: Download Adobe Lightroom from the App Store and log in to your account.
-
Add Your Photo: Open the Lightroom app and select the grainy photo from your phone’s gallery to add it.
-
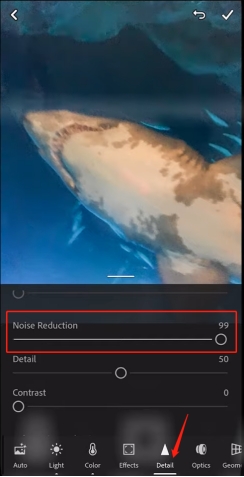
Go to the Edit Tools: From the bottom menu on Lightroom, touch on the “Detail” section.
-
Adjust Noise Reduction: Move those sliders of “Noise Reduction” to higher values.

-
Preview and Save: Zoom in to check the changes. When done, tap export to save or share the photo.
Lightroom’s adjustments are non-destructive so you can always go back to the original. You can clean up grainy photos and make them look pro from your iPhone!
Way 4: How to Fix Grainy Photos Free Online
For quick fixes without downloading software, online tools like Fotor and VanceAI offer noise-reduction solutions. They have free solutions to remove grain from photos.
⭕ Fotor
Fotor is an AI-powered photo editing tool that removes noise and grain from images. Whether you’re fixing low-light photos or compressed images, Fotor helps restore clarity and sharpness with pro results.
Features
- Auto AI Denoising: Removes noise using advanced AI.
- Precision Slider: Adjust noise reduction for clarity and detail.
- Unblur Images: Sharpens and enhances image quality.
- Multi-use: Fixes noise in low light, smartphone, and compressed images.
Limitations
- File Size: May have size and resolution limitations.
- Feature Access: Some features require a premium subscription.
☞ Steps to Remove Grain and Noise
Click the "Remove Noise Now" button on Fotor’s website.
-
Upload your grainy photo to Fotor and the AI will automatically fix it.
-
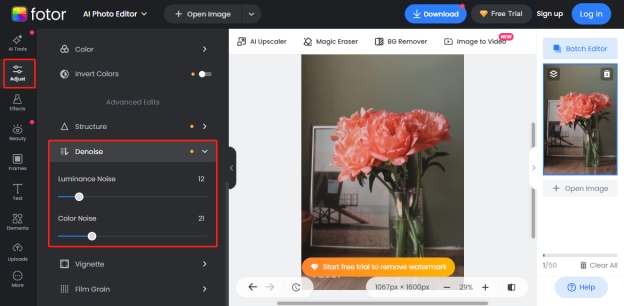
If the result is not satisfying, tap “Adjust” > “Denoise” from the left menu.
-
Then you can move the sliders of “Luminance Noise” and “Color Noise” to remove grain from photos.

-
Check before-and-after views. Then click the top-roght “Download” button to save the enhanced image in high quality.
⭕ VanceAI
VanceAI is an AI-powered tool that specializes in fixing grainy photos and removing noise and JPEG artifacts. With advanced algorithms, it delivers sharp, clear and pro quality images. Perfect for photographers, bloggers and e-commerce users.
Features:
- AI Noise Reduction: Removes grain, restores detail.
- JPEG Artifact Removal: Cleans compression artifacts.
- Fast: Processes images quickly for batch tasks.
- Detail Preservation: Retains natural textures while removing noise.
- Safe: Images are deleted within 24 hours for privacy.
Limitations
- Free Trial: Limited credits; subscription required for more usage.
- Processing: Free users face size and batch limitations.
☞ Steps to Remove Grain and Noise
Visit the VanceAI website and hit the “Upload Image” button.
-
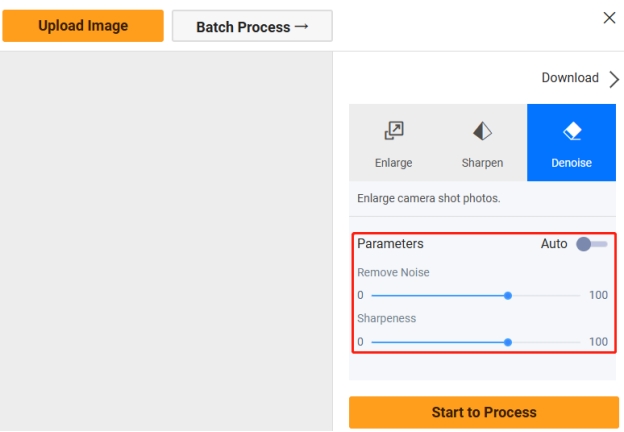
Turn on the “Auto” switch to auto-denoise your photos with AI.
-
Or, drag the slider of “Remove Noise” and “Sharpeness” to fix grainy photos manually till you are content of the result. Once done, click “Start to Process”.

-
AI denoiser will remove noise and grain. See the results and save the image.
You are need to pay for a subscription if you want to download the watermark-free photos after denoising from Fotor.
You May Also Like Removing Grain from Photos
Q1: How to fix grainy photos from high ISO?
Grainy photos from high ISO can be fixed with noise-reduction tools. Software like 4DDiG AI Photo Enhancer is very effective as it uses AI to identify and remove noise while preserving image details. You can also use tools like Photoshop or Lightroom to remove grain manually by adjusting the noise reduction sliders under the detail settings.
Q2: How to remove grain from night photos?
To remove grain from night photos, use noise reduction features in photo editing software, and focus on luminance and color noise. Shooting with a larger aperture, slower shutter speed and lower ISO during capture can also help minimize grain in night photos.
Q3: Can blurry/grainy photos be sharpened?
While blurry or grainy photos can be improved, they may not be perfect. Use sharpening tools in editing software to enhance edges but be careful not to over sharpen as it will emphasize grain. AI-powered tools like 4DDiG AI Photo Enhancer can remove noise and enhance detail at the same time for better results.
Q4: Why my photos are grainy even at low ISO?
Grainy photos at low ISO may be due to poor lighting, underexposure or a small sensor camera. Post-processing issues or heavy cropping can also cause grain. Using proper lighting and shooting in RAW format can help reduce grain in these cases.
Q5: What’s called when your photo comes out too grainy?
When a photo comes out too grainy, it’s called “image noise”. This is a visual distortion that reduces the quality and clarity of a photo, often caused by high ISO, low light or poor camera sensor.
Conclusion
It is no longer a problem on how to fix grainy photos with 4DDiG AI Photo Enhancer, Photoshop and Lightroom. Among them, 4DDiG AI Photo Enhancer stands out for its advanced AI, user-friendly interface and great results. Whether you’re dealing with high ISO photos, night shots or mobile photos, this software makes it easy to get professional-level clarity.
Likewise, if you find other better solutions, please share them with us below.
Secure Download
Secure Download


 ChatGPT
 Perplexity
 Google AI Mode
 Grok
Grok

