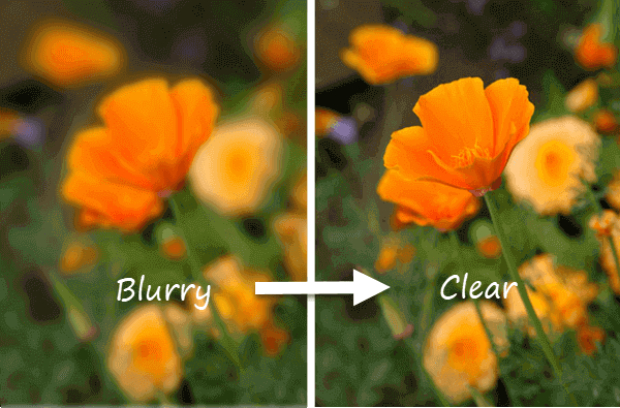
How to Enhance Image Quality in Photoshop 2026 [4 Ways]
Are you a photographer who's interested in learning how to enhance image quality in Photoshop ? Or perhaps you just want to increase some pictures' quality in Photoshop because you've heard so much about this tool? Photoshop includes some pretty powerful tools that would definitely enhance your image quality.
Here in this guide, we've shared 3 of them. Each of these serves a different requirement and skill level. Or in case you do not feel comfortable making manual adjustments in Photoshop, we have a newbie-friendly tool for you, which can automatically increase image quality.
- Part 1. Is It Possible to Improve Image Quality?
- Part 2. Increase Photo Quality Using Photoshop Super Resolution 🔥
- Part 3. Improve Quality of Photo in Photoshop Sharpen Tool
- Part 4. Resize Image in Photoshop to Increase Quality
- Part 5. Alternative to Photoshop: AI Photo Quality Enhancer
- Part 6. FAQs

Part 1. Can I Convert a Low Resolution Image to High Resolution?
Yes, it is. There are certain ways you can improve image quality such as adding pixels, enhancing details, and clarifying edges. You can also resize image dimensions so they can fit without distortion and adjust resolution (DPI) for clearer prints. However, overuse of these methods can introduce noise or artifacts.
That is not difficult to operate in Photoshop. The following content will tell you the details. Just read on. The following is how to enhance the quality of an image in Photoshop in 3 ways. Pick a method according to your preference and skill level:
Part 2. How to Enhance Image Quality in Photoshop Using Super Resolution
☞ What Is Super Resolution in Photoshop
Best For: Increase the pixel count and maintain & enhance details with AI technology. Ideal for preparing images for high-quality prints or enlargements.
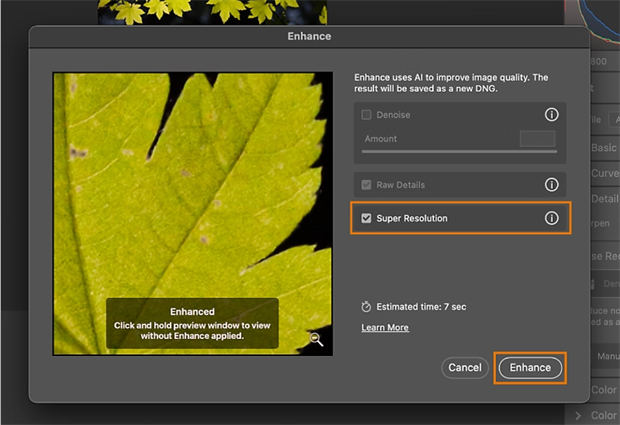
Super Resolution is a feature in Adobe Camera Raw 13.2 or newer and Lightroom 10.3. It doubles an image's width and height. Thus, increasing pixel count by four. You can upscale even a 12MP photo to 48MP with Super Resolution. That is why it is ideal for big prints such as 16" x 24".
This feature can also make old or low-resolution images print-ready by smoothening their clarity and sharpening edges. Here's how to improve image quality in Photoshop with "Super Resolution:"
✍ How to Use Photoshop Super Resolution
-
Open a raw image file in "Adobe Camera Raw" (opens automatically in Photoshop).
-
Then, right-click on pictures. Select "Enhance."
-
The Enhance Preview box will pop up, showing options and a preview. Enable "Super Resolution." This will also activate "Raw Details."
-
Hit "Enhance". A new DNG file will be created after processing.

Part 3. How to Enhance Photo Quality in Photoshop Using Sharpen Tool
☞ What Is Sharpen Tool in Photoshop
Best For: Comprehensive editing and high-quality enhancements for RAW files, including sharpening and denoising feature.
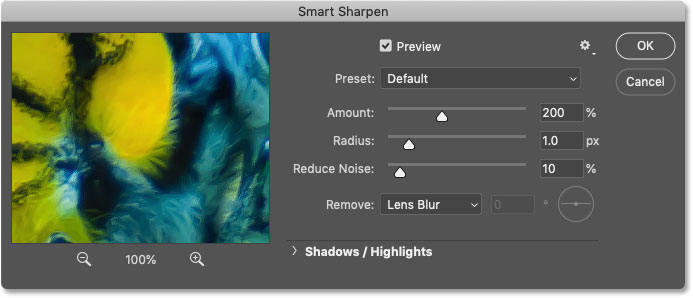
Photoshop offers a list of photo-sharpening tools. Among them are Smart Sharpen and Unsharp Mask. If you pick Smart Sharpen it gives an option to select a sharpening method. Furthermore, it provides flexibility for altering amount of sharpening applied to shadows and highlights in a picture. This feature also helps reduce blur and noise.
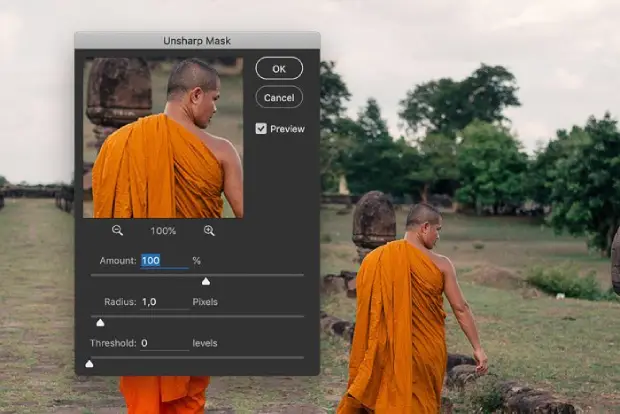
On other hand, Unsharp Mask sharpens pictures by boosting contrast along edges. It adjusts pixels that differ from nearby ones, making light pixels lighter and dark pixels darker. You can also set radius to control how wide sharpening effect spreads. Here's how to increase image quality in Photoshop using Smart Sharpen filter and Unsharp Mask:
✍ How to Use Sharpen Tools in Photoshop
Sharpen Tool 1: Unsharp Mask:
-
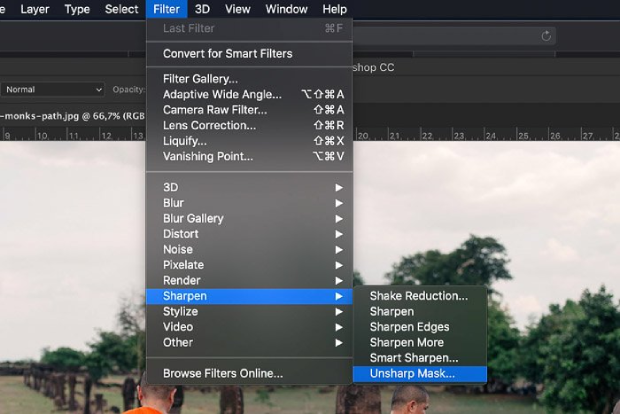
Open a photo you wish to sharpen in Photoshop. Then, head to "Filter" and pick "Sharpen" > "Unsharp Mask" from the drop-down menu.

On the popup "Unsharp Mask" panel, adjust "Amount", "Radius", and "Threshold" to increase the quality of image.
- Amount: For a sharper look.
- Radius: Set larger for a wider effect.
- Threshold: For sharpening effect

Sharpen Tool 2: Using Smart Sharpen:
-
Open a photo you wish to improve in Photoshop. Then, in "Layers" open "menu" icon. Pick "Convert to Smart Object."


-
Then choose the top "Filter" menu, tap "Sharpen", and next pick "Smart Sharpen".
-
On the "Smart Sharpen" panel, set a blur type from the "Remove" section and move slider next to "Amount", "Radius", or "Reduce Noise" to improve photo quality.
- Amount: Adjust contrast
- Radius: Control edge thickness of an image
- Reduce Noise: Reduce artifacts to unblur an image in Photoshop

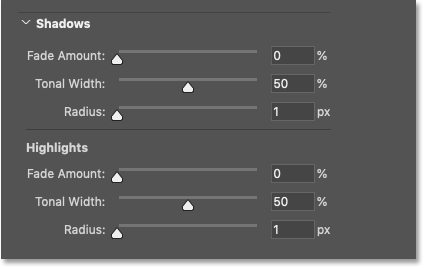
Besides, you can expand the "Shadows/ Highlights" controls for adjusting brightness levels, fading sharpening, etc.

-
Close preview box. Then, double-click "Blending Options" icon in "Layers" tab. Pick "Luminosity" next to "mode."


Part 4. How to Resize an Image in Photoshop to Improve Quality
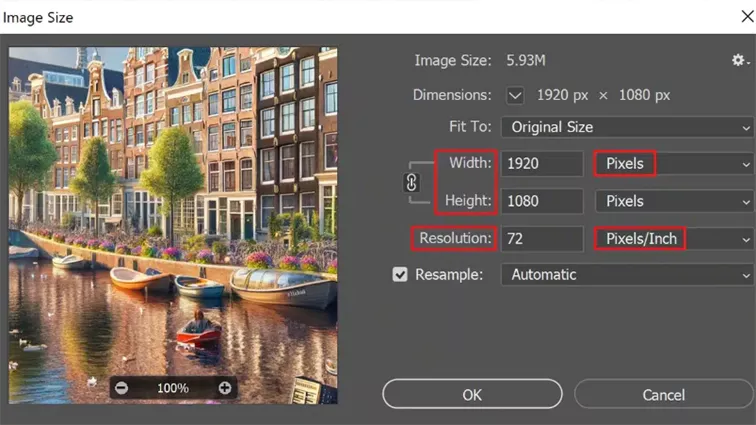
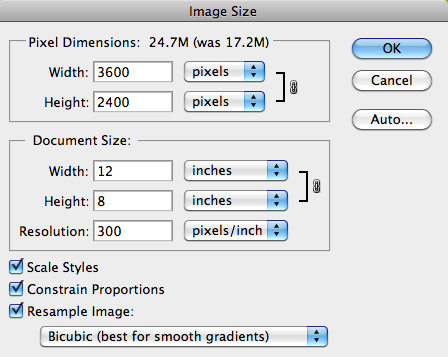
If you want to print an image adjusting its dimensions and resolution in Photoshop is necessary for best print quality. These features determine the total pixel count and file size. Here's how to enhance image quality in Photoshop by adjusting dimensions and resolution of a picture:
✍ How to Zoom or Enlarge Image
-
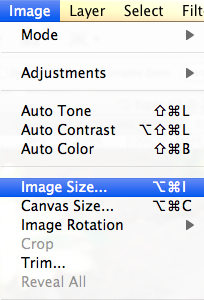
Open an image in Photoshop. Then, choose "Image." Pick "Image Size."

-
Next, adjust print dimensions, image resolution, or both. Here's how:
-
To change only dimensions or resolution and adjust total pixels, select "Resample Image" and choose an interpolation method.
-
To change dimensions and resolution without altering total pixels, deselect "Resample Image."
-
To keep width-to-height ratio, select "Constrain Proportions." This will adjust width automatically when changing height.
-
-
Input new values for height and width beneath "Document Size." Enter a new value for "Resolution" as well.

☞ Photoshop Too Expensive? 8 Photoshop Alternatives for Every Budget (2025)
Part 5. Easier Method to Upscale Image to 4K and Higher Using AI
Using Photoshop to improve image quality requires certain expertise that beginners lack. It's also time-consuming, especially if you've got many pictures to enhance. However, don't feel disheartened as you can automatically upscale picture resolution up to 8K through a powerful AI image upscaler.
That is 4DDiG AI Photo Enhancer, a AI-powered photo quality enhancing software we'd like to introduce as a easier alternative to Photoshop. It features customizable resolution options: X2, X3, and X4, which allows you to increase photo resolution to 4K and higher (up to 8K). It is designed with 4 AI Models (General/Face/Denoise/Colorize) for all users across any field, which can be available to any scene. Please check it main features below:
📌 Main Features of 4DDiG AI Photo Enhancer
- Can fix blurry, grainy, distorted, scratched, noise pictures.
- Convert low-resolution photos to 4K and higher
- Use AI model to enhance various types of photos.
- AI analyzes photo details and remove flaws from it
- Zoom and enlarge images without losing quality
- Batch repair multiple pictures at one go
- Easy to use for novices with 99% high success rate
- Correct color in old or faded photos for photo restoration with AI
📌 How to Enhance Image Quality Using 4DDiG AI
Here's how to upscale image resolution using the robust 4DDiG AI Photo Enhancer:
Secure Download
Secure Download
-
Download and install 4DDiG AI Photo Enhancer (the 4DDiG File Repair executable) on your computer. Then, execute it and head to "AI Enhancer." Next, pick "Photo Enhancer."

-
Click "Add Photos" to add pictures you wish to enhance. Afterward, select an AI Model (General, Denoise, or Face) and adjust resolution if needed. Hit "Enhance."


-
Wait while "AI Enhancer" improves photo quality. Preview, adjust if necessary, and click "Save" when satisfied.


Part 6. People Also Ask about Photoshop Improve Image Quality
Q1: How to upscale an image in Photoshop without losing quality?
When you go to "Image" > "Image Size" in Photoshop to adjust the pixel, please set the "Resolution" as "300 Pixels/Inch (DPI)".
Q 2: How do I fix bad-quality photos in Photoshop?
In Photoshop, open your image and use "Neural Filters" beneath "Filter" menu to enhance images and reduce JPEG artifacts. You can also adjust settings for restoration and face enhancement.
Q 3: How do I convert Photoshop to JPG high quality?
In Photoshop, open your image and head to "File." Then, pick "Save As," and select "JPEG." Set quality slider to 12 or higher.
Q4: Where is enhance in Photoshop CS6 or Express?
Adobe Photoshop CS6 is a professional version of image editing software while Express is a simplified version of Photoshop designed for quick and easy photo editing on mobile devices and the web. On Photoshop CS6, go to "Filter" > "Enhance" > "Adjustments". On Express, look for the "Adjustments" section for quick enhancements
Conclusion
Here are all about how to enhance image quality in Photoshop. With Photoshop Super Resolution, Smart Sharpen, Unsharp Mask, and resolution and dimensions features, you make make it a reality to upscale image quality. These methods, though very professional, are time-consuming, especially so if you have to improve quality of several pictures.
A simple option would be to learnusing an automatic tool like 4DDiG AI Photo Enhancer. It's beginner-friendly with 4 robust AI models and X4 level super resolution settings that can increase image resolution up to 8K and remove background artifacts without manual intervention.
By the way, if you have any suggestions or questions, never hesitate to share them with us in the following comment area!
Secure Download
Secure Download






 ChatGPT
 Perplexity
 Google AI Mode
 Grok
Grok


