How to Sharpen a Photo in GIMP [A Comprehensive Tutorial]
When it comes to photo editing GIMP (GNU Image Manipulation Program) is one of the most powerful and popular tools out there. This free, open-source software lets you edit photos with professional features. Among its many functions sharpening photos is a key tool to get image clarity and detail especially when dealing with blurry or resized images.
If you’re wondering how to sharpen a photo GIMP, then this full guide will walk you through the best ways. We’ll also show you an even easier way to use an AI photo enhancer, an AI-powered tool that simplifies photo editing.
Part 1: What is GIMP & Its Sharpening Methods
⭐ What Is GIMP?
Definition: GIMP (GNU Image Manipulation Program) is a free and open-source image editing software used by designers, photographers, and artists. This program has many tools for photo editing, graphic design, and creating artwork.
Function: Here is how it works
- Customizable Options - Allows you to add plugins and modify its features to suit your needs.
- Color Management - The color management is high quality so you get accurate reproduction across digital and print media.
- Come with Third-party Plugins - GIMP is flexible through third-party plugins and scripting support in languages like Python, Perl and Scheme. Whether you’re creating original artwork, designing UI elements or enhancing photos GIMP gives you powerful tools for professional and creative workflows.
Supported OS: Windows, macOS, and Linux
⭐ Sharpening Techniques in GIMP
Image sharpening is a key part of photo editing to get image clarity and detail. GIMP has several sharpening methods, the two most common are the Sharpen Tool and the Unsharp Mask filter. These methods cater to different needs and give you flexibility depending on what you want to achieve.
-
Sharpen Tool: This is for localized sharpening, like sharpening specific parts of a photo. You can control the effect by adjusting the strength slider and painting over the area you want to sharpen.
-
Unsharp Mask: Despite the name this method sharpens images by increasing contrast along edges. You can adjust parameters like Radius (sharpening area), Amount (strength) and Threshold (what to sharpen).
⭐ Comparison: Sharpen Tool vs. Unsharp Mask
- Feature
- Sharpen Tool
- Unsharp Mask
- Type
- Tool
- Filter
- Usage
- Brush-based, for specific areas
- Global sharpening
- Effect
- Increases edge contrast locally
- Amplifies pixel contrast across edges globally
- Control
- Rate slider; brush settings
- Parameters: Radius, Amount, Threshold
- Result
- Best for localized sharpening
- Best for overall sharpening with refined control
Both methods allow you to refine image sharpness according to your needs but the application and effect are different.
Part 2: How to Sharpen a Photo in GIMP
Sharpening a photo gets the edges and details and makes your image look clearer and more defined. GIMP, a free and open-source image editor has two ways to sharpen photos: using the Sharpen Tool and the Unsharp Mask filter. Let’s get started.
☞ Method 1: Use the Sharpen Tool of GIMP
The Sharpen Tool is like a paintbrush that allows you to sharpen specific parts of an image like eyes in a portrait or text in a document. For example, you can use it to make someone’s eyes in a portrait look clearer or enhance the texture of an object. This is for targeted adjustments.
Steps
-
Upload Photos: Open GIMP and go to “File” > “Open” to upload your photo.
-
Find Sharpen Tool: Find the Blur/Sharpen Tool in the left toolbox or press Shift + U. You can also access it by navigating to “Tools” > “Paint Tools” > “Blur/Sharpen”.
Note:
If you failed to find it, please access it by going to “Windows” > “Dockable Windows” > “Tool Options”.
-
Set Tool Options:
-
In the “Tool Options” panel, set “Convolve Type” to “Sharpen”.
-
Adjust brush settings like size, hardness and opacity to control the sharpening.
-
Use the Rate slider to set the sharpening strength. Start with a low value and increase as needed.

-
-
Sharpen the Image: Paint over the areas you want to sharpen.
-
Save the image: Go to “File” > “Save” As to save the sharpened photo.
Use smaller brush sizes for detailed work to avoid over-sharpening.
☞ Method 2: Use the Unsharp Mask in GIMP
For more advanced and controlled sharpening the Unsharp Mask is an option in GIMP. This Filter is a quick and automated way to sharpen the whole image. This filter enhances the entire image by increasing edge contrast, resulting in a sharper appearance.
Steps
-
Open Your Photo: Open GIMP and load your photo using “File” > “Open”.
-
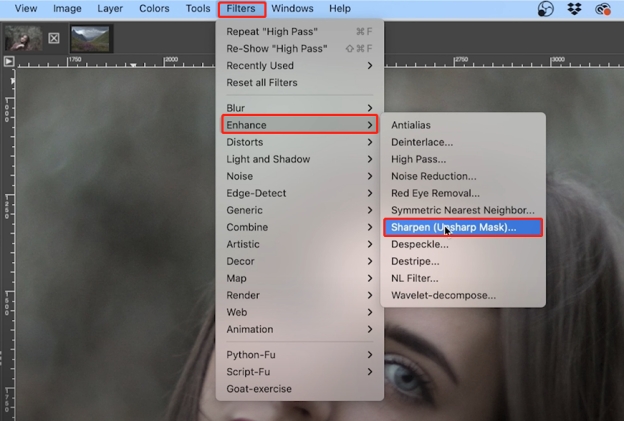
Apply Sharpen Filter: Go to “Filters” > “Enhance” > “Sharpen (Unsharp Mask)”.

-
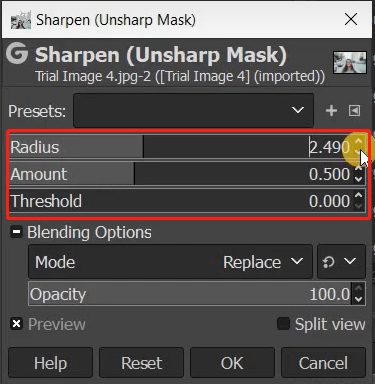
Adjust the Filter Settings: A dialog box will appear with the following settings:
-
Radius: The size of the area around each pixel to be sharpened.
-
Amount: The sharpening strength.
-
Threshold: The contrast level before sharpening kicks in.
-
Split View: Compare the before and after. Adjust until you get the desired sharpness.

-
-
Apply the Filter: Once satisfied, click “OK” to apply the filter.
-
Save the Image: Save the sharpened photo using “File” > “Save”.
When to Use Each:
-
Sharpen Tool is for detailed edits like sharpening specific parts of an image.
-
Unsharp Mask Filter is for quick and uniform sharpening across the whole image.
With these you can easily enhance your photos using GIMP. Whether you’re a beginner or advanced user these will make your images look sharp and professional.
- Don’t over sharpen as it can introduce halos and noise.
- Sharpen as the last step in your editing process after resizing and other adjustments.
- View the image at 100% to see the sharpening effect.
Part 3: An Easier Way to Sharpen Images with AI
While GIMP has great tools for sharpening photos, mastering them takes time. For a faster and more intuitive solution try the 4DDiG AI Photo Enhancer which uses AI to sharpen photos. It’s a powerful tool to sharpen images and get the best out of them. AI sharpening is perfect for turning blurry photos into sharp and vibrant masterpieces.
✨ Why 4DDiG AI Photo Enhancer?
- AI-Powered Precision: Automatically detects blurry areas and enhances.
- User-Friendly: No photo editing skills are required.
- Super Resolution: Upscale images to 4K or higher 8K resolution
- Noise Reduction: Cleans grainy images for a polished look.
- Color Adjustment: Restores natural tones and vibrancy.
- Face Correction: Refines facial details for stunning portraits.
- 4 AI Models: Face/Dnoise/Colorize/General Model.
- Old/Faded Photo Restoration: Colorize black-and-white or faded photos with natural hues
- Batch Processing: Enhance multiple images at once.
- Supports Various Formats: JPEG, PNG, HEIC, WEBP, and more.
✨ Steps to Sharpen Photos using 4DDiG AI Photo Enhancer:
-
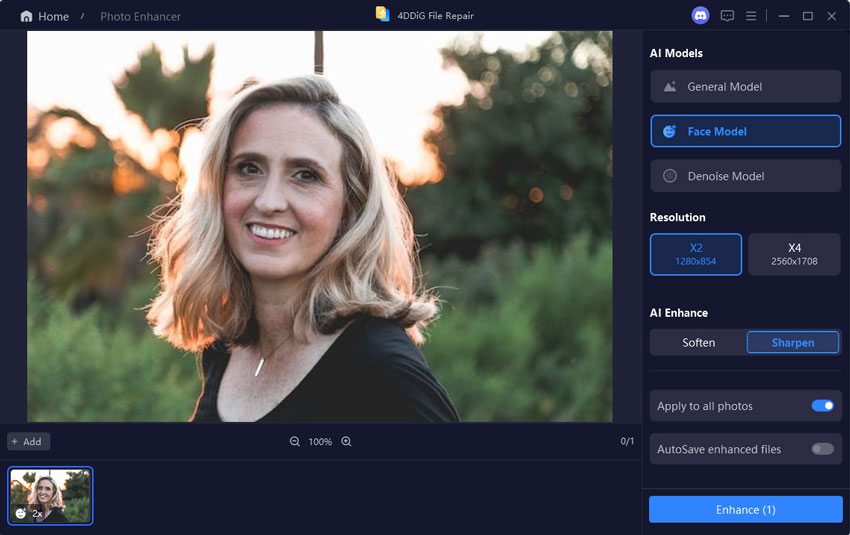
Install and open the AI Photo Enhancer (displayed as 4DDiG File Repair executable) and go to "AI Enhancer" on the left sidebar. Click on "Photo Enhancer".
FREE DOWNLOADSecure Download
FREE DOWNLOADSecure Download

-
Press the blue "Add Photos" button or drag and drop the images you want to sharpen.

-
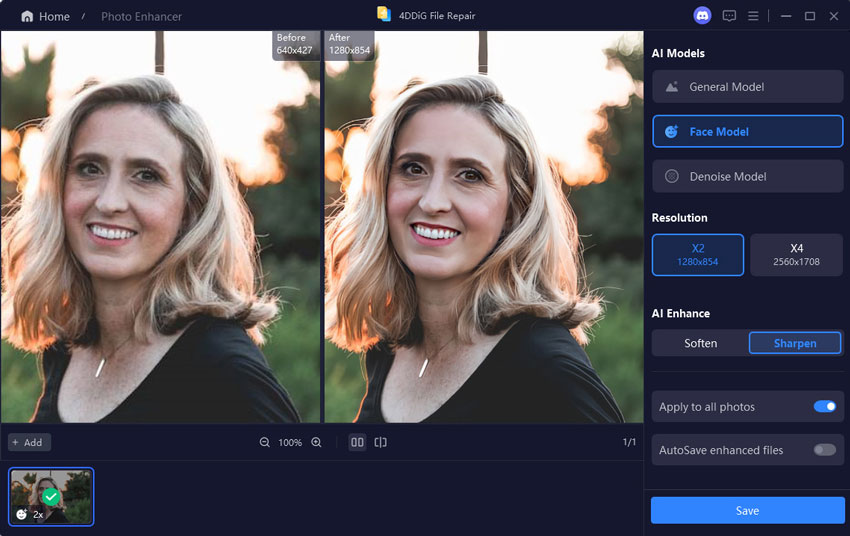
Select a preferred AI model (General Model is encouraged) and set the resolution. Then click “Enhance” to initiate the image sharpen process.

-
After completing, check and compare the photos before and after sharpening. Adjust if needed and click “Save” to export the sharpened photos.

With 4DDiG, sharpening photos is quick, easy, and delivers professional-quality results. It is perfect for anyone across all fields who are looking to enhance image clarity effortlessly.
Part 4. People Also Ask about GIMP Sharpen Image
Q1: How to fix a blurry picture in GIMP?
Use the Unsharp Mask filter to adjust the clarity and edges. Go to Filters > Enhance > Unsharp Mask and adjust the Radius, Amount and Threshold.
Q2: How to enhance photo quality in GIMP?
Combine sharpening with brightness, contrast and color correction tools under Colors > Levels or Curves.
Q3: How to reduce pixels in GIMP?
To reduce pixelation use the Scale Image and apply a smoothing filter to minimize distortion.
Q4: How to sharpen blurry text in GIMP?
Select the text layer and use the Unsharp Mask with precise settings to enhance text clarity.
Q5: How to make an image sharper in GIMP?
Use the Sharpen Tool for targeted edits or Unsharp Mask for global sharpening, adjust the settings to get the best results.
Conclusion
Now, you learn how to sharpen a photo in GIMP. It is a must skill for users to get image clarity. Whether you use the Sharpen Tool for local edits or Unsharp Mask for global edits GIMP has got great options to get you amazing results. But if you want an easier and more advanced solution 4DDiG AI Photo Enhancer is the game changer. AI technology makes sharpening easy and fast.
Ready to elevate your photo editing? Install the above tools and experience the power of AI-driven image sharpening today!
Secure Download
Secure Download



 ChatGPT
 Perplexity
 Google AI Mode
 Grok
Grok

