How to Fix Grainy Photos: 2 Effective Ways with AI Tool
Have you ever taken a photo and found it strewn with unwanted grain dots? Grain can sometimes give certain photos an artistic touch. In most cases, however, this can be frustrating, especially if you want to capture a clear and high-quality image. These annoying grain dots caused by inadequate lighting, incorrect camera settings, or other factors can affect the overall visual impression of your images. But don't worry! In this post, we will discuss the causes of graining in photos, show how to avoid them, and, most importantly, how to fix grainy photos using powerful tools.
Part 1: The Causes of Grainy Photos
You may sometimes be surprised that your photos look grainy or pixelated despite a good DSLR, SLR, or smartphone with the latest optics. There may be one or more reasons for this. Let's look at some of the most common reasons for grainy images:
1. Low Exposure
One of the main causes of grainy photos is poor exposure. Without enough light on your camera's sensor, it will have difficulty capturing clear images. This is often done in low light conditions, such as sunset or indoors. The camera tries to compensate for the lack of light by increasing the ISO (sensitivity) value, which can result in grainy images.
2. Brightness
Excessively bright scenes can also result in grainy photos. If bright light overshines the sensor, this can cause distortion and noise in the image. This is especially common for photos taken in direct sunlight or with flash. Balancing exposure and brightness is critical for a clear image.
3. Sensor Size
The size of your camera's sensor plays an important role in image quality. Smaller sensors often have problems in low light conditions and often produce grainy images. Larger sensors, such as those found in professional cameras, can capture more light and detail, resulting in sharper photos with less noise. If you use a smartphone or compact camera, you should pay attention to the sensor size.
4. High ISO Settings
When shooting in low light, many photographers increase the ISO setting to make the camera more sensitive to light. While this can help capture an image, a high ISO can also cause noise and grain. It's a balancing act: try using the lowest ISO setting and get a clear shot.
5. Improper Focus
Sometimes, graininess can be the result of an improper Focus. If a photo is not sharply focused, it may appear grainy, even if the exposure and lighting are perfect. Always make sure that your subject is sharp before taking the picture to avoid this problem.
Part 2: How to Fix Grainy Pictures with 4DDiG Photo Repair?
As you can see, there are several reasons for grainy photos. Also, there are several solutions that you can try to reduce the grain size and fix the problem. Below are some expert solutions to help you learn How to Fix Grainy Pictures and improve the quality of your grained photos.
Method 1. The All-in-One Choice: Use 4DDiG Photo Repair to Fix Grainy Pictures
If you don’t have Photoshop on your computer and need to fix grainy photos, don’t worry! The 4DDiG Photo Repair tool can help you. This handy software works as both a photo repair tool and an AI photo enhancer. With its advanced AI technology, it looks at your images and improves them, removing grain and making the overall quality better with just one click.

Here are some great features you can enjoy while using 4DDiG Photo Repair:
- Fix photos that are corrupted , damaged, blurry, or pixelated.
- Use AI to enhance photo quality, sharpen details, and eliminate noise.
- Automatically restore old photos that are faded, scratched, or damaged to their original beauty.
- Quickly colorize black-and-white photos with AI in just seconds.
- Supports a wide range of image formats, including JPG, JPEG, PNG, RAW, SRW, CRW, RAF, SVG, TIFF, CR2, DNG, HEIC, and more.
- Repair up to 3,000 images in a single batch.
Now, let’s explore how to fix grainy images with 4DDiG Photo Repair.
Secure Download
Secure Download
-
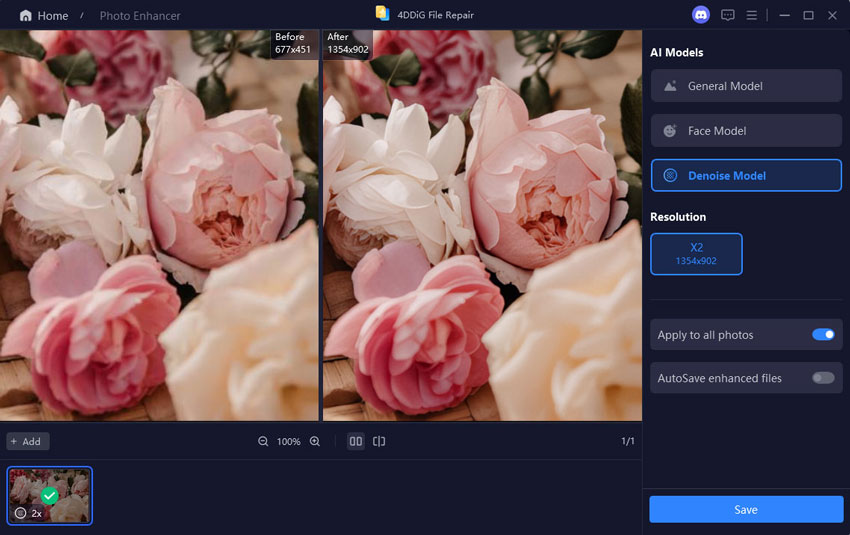
First, open 4DDiG File Repair on your computer. Click on the "Photo Repair" option, and then hit the Downloads button under Enhance Photo Quality. This will download the tools you need to fix your grainy photos.

-
After the toolkit downloads successfully, upload the grainy photo you want to improve into the software.

-
Once you’ve added the photo, you’ll see three AI options: General Model, Denoise Model, and Face Mode. Select the Denoise Model and pick the resolution you want for your image.


-
Click the Preview button to start the AI enhancement process. The software will take a few minutes to improve your grainy photo.
-
After the process is complete, just click the Export button to save the improved photo to your computer.
Method 2. Use Photoshop Photoshot to remove noise
You can't completely get rid of the grainy look in a photo, but you can improve a blurry image with Photoshop. It has a built-in feature that helps reduce noise and fix images a bit.
If you're just starting with Adobe Photoshop, try the CS6 version to learn the basics. It has helpful shortcuts that make photo editing easier. "Photoshop 7.0" is also a good choice for beginners to learn editing tools from scratch.
So, how to make photos less grainy? To make a picture less grainy, download the app. After it's installed, open it and follow the steps below.
-
First, duplicate the background layer by right-clicking on it in the Layers panel and selecting "Duplicate Layer." This will create a copy of the original image so you can work without affecting it.
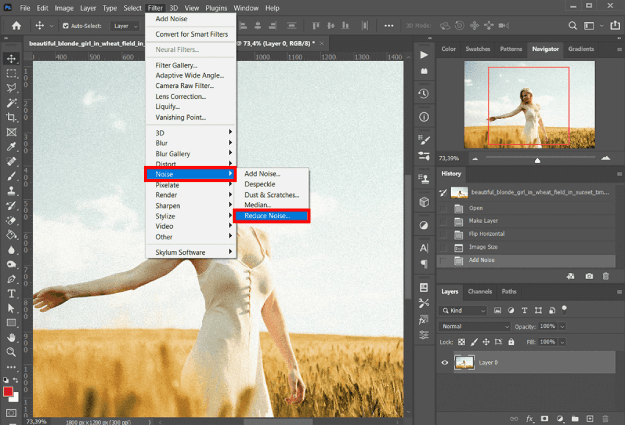
Next, go to the top menu and click on "Filter," then select "Noise," and choose "Reduce Noise."

-
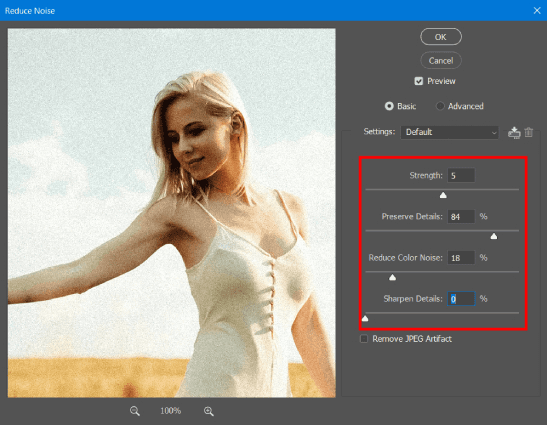
In the "Reduce Noise" dialog box, you'll see several sliders that let you adjust the noise reduction. Move each slider to suit your preferences and the details of your photo.

-
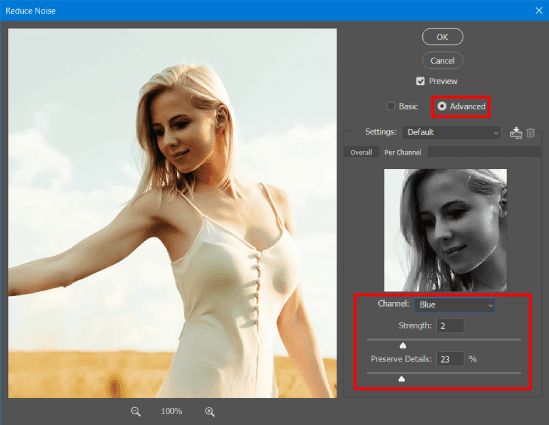
To see how the noise reduction works, check the box next to "Remove JPEG Artifact." This lets you compare the changes in real-time. If you want to make more adjustments, click on Advanced to fine-tune the results.

When you’re happy with the noise reduction settings, click "OK" to apply the changes to your photo. Don’t forget to save the image to keep the improvements you’ve made!
Method 3. Fix Grainy Pictures with Adobe Lightroom
The third way to fix grainy photos is by using Adobe Lightroom. It's a popular photo editing software that offers many tools to help improve and enhance your images.
Follow these steps to learn how to fix grainy photos in Lightroom:
-
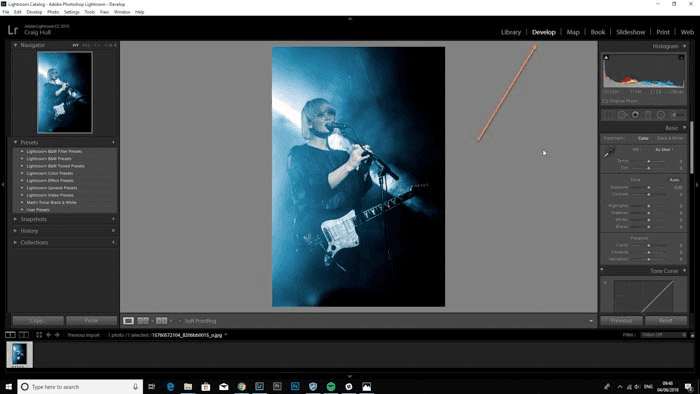
Open Adobe Lightroom and import the grainy photo you want to edit.
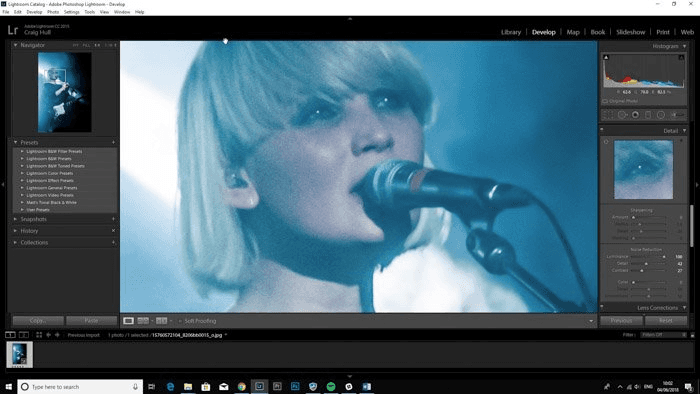
Go to the Develop tab in Lightroom, where you’ll find various tools to enhance your grainy photo.

-
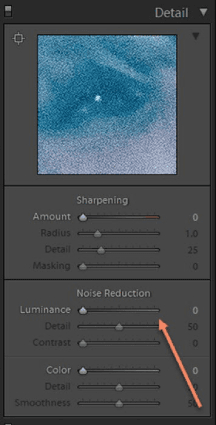
Find the "Detail" panel on the right side of the screen. Here, you'll see the Noise Reduction option.
Adjust the "Noise Reduction" sliders for Luminance and Color to reduce the grain in your photo. The Luminance slider reduces overall brightness noise, while the Color slider helps get rid of any color noise.

-
When you're happy with the noise reduction adjustments, click the Done button to apply the changes in Lightroom. Then, head to the Library module, select your photo, and choose the export settings to save your grain-free image to your preferred location.

Part 3: How to Prevent Shooting Grainy Photos?
Grainy photos can be avoided by making a few simple adjustments to your camera settings. Here are two easy ways to prevent it:
Method 1: Use a Low ISO
Grain often comes from using a high ISO, which makes the camera more sensitive to light but adds noise. To reduce grain, keep your ISO low—between 100 and 400 for daylight photos. In low light, only increase the ISO if needed.
Method 2: Slightly Overexpose Your Photos
Overexposing your photos a little can help reduce grain. If a photo is too dark, brightening it later can add noise. Letting in a bit more light when you take the picture will keep the image clearer and reduce noise.
FAQs about How to Fix Grainy Photos
1. Can Photoshop Fix Grainy Pictures?
Yes, Photoshop can help reduce the grain in photos. It has tools like "Reduce Noise" under the Filter menu that allow you to adjust the image and reduce the graininess. However, Photoshop may not completely eliminate all grain.
2. Why Do My Photos Come Out Grainy?
Photos can appear grainy for a few reasons:
- High ISO settings : Increasing the ISO makes your camera more sensitive to light but also adds noise, causing grain.
- Low light conditions : In darker environments, the camera struggles to capture enough light, resulting in grainy images.
- Small camera sensors : Cameras with smaller sensors (like those in phones) are more prone to grain.
3. What App Fixes Grainy Photos?
Several apps can help reduce grain in photos. Adobe Lightroom is a popular choice, offering noise-reduction tools to smooth out grainy areas. Photoshop also has noise-reducing features, such as the "Reduce Noise" filter.
4. How to Fix Grainy Photos on iPhone?
To fix grainy photos on your iPhone, you can use apps like Lightroom or 4DDiG Photo Repair . Lightroom has manual tools for reducing noise, while 4DDiG Photo Repair uses AI to automatically enhance photo quality. It’s a quick and easy solution for fixing grainy images without needing advanced editing skills. Simply upload your grainy photo to the app, let it enhance the image, and save the improved version.
Conclusion
In conclusion, grainy photos can be frustrating, but they don't have to ruin your shots. By understanding the causes, like high ISO settings and poor lighting, you can adjust your camera settings to prevent grain. If you still end up with grainy images, tools like Adobe Lightroom, Photoshop, and even smartphone apps can help reduce the noise and improve quality. For a hassle-free solution, 4DDiG File Repair is a great option. It uses advanced AI technology to quickly enhance your photos, removing grain and improving clarity with just a few clicks, making photo editing simple and effective.
Secure Download
Secure Download


 ChatGPT
 Perplexity
 Google AI Mode
 Grok
Grok


