How to Convert Image to JPG on Windows, Mac, iPhone, and Android

5 mins read

Updated on 2026-09-07 18:54:51 to Photo Tips

Have you ever tried to upload a profile picture or document and received a "file type not supported" error? The problem may be the image format. Photos saved as HEIC, PNG, BMP, or other formats may not work with every website or app.

One simple solution is to convert the image to JPG. JPG is widely supported across computers, smartphones, websites, and social media platforms. This article explores how to convert image to JPG on Windows, Mac, iPhone, and Android using built in tools and dedicated software.

convert image to jpg

Why Convert Images to JPG?

JPG, also called JPEG, is one of the most widely supported image formats. It works well on websites, social media platforms, email services, phones, and most editing programs. There are several reasons to convert an image to JPG:

  • Smaller file size: JPG files are often smaller than PNG or RAW images.
  • Better compatibility: JPG is supported by most websites and applications.
  • Easy sharing: Smaller images are easier to send by email or messaging apps.
  • Online uploads: Many websites accept JPG files more readily than other formats.
  • Storage savings: Converting large images can help reduce storage use.
  • Format requirements: Some forms and services require JPG or JPEG files.

Keep in mind that JPG uses lossy compression. Saving an image as JPG may reduce some image quality. For everyday photos and online use, however, JPG offers a useful balance between quality and file size.

Part 1. How to Convert Image to JPG Format on Windows

Windows offers several ways to convert images into JPG files. Paint is useful for individual images, while dedicated software is better for converting many files at once. You can use these methods to convert PNG, BMP, HEIC, and other supported image formats to JPG. Here is how to convert image to JPG format on your PC.

1. Convert an Image to JPG Format Using Windows Paint

Windows Paint remains one of the most accessible tools for a quick, one off conversion. It is built into every version of Windows and requires no internet connection or additional downloads.

Steps to Convert Using Paint:

  • Right click the image you want to convert, select "Open with", and then choose "Paint".

    windows open image with paint
  • Click the "File" menu in the top left corner.

  • Click "Save as" and select "JPEG picture" from the side menu.

    windows paint save image as jpg
  • Choose your destination folder, name your file, and click "Save".

💡 Pro-Tip:

If you are using Windows 11, the new Paint app may default to PNG when you press Ctrl+S. Always use the "Save As" menu to ensure you create a JPG copy rather than overwriting the original file.

2. Convert Multiple Images to JPG without Quality Loss Using 4DDiG

If you have a folder full of HEIC photos from your phone or raw CR2 files from a camera, Paint will take too long to process. This is where a dedicated JPG image converter like 4DDiG File Repair comes in. This software features a built-in Image Format Converter designed for efficiency and high fidelity results.

4DDiG Photo Repair comes with an excellent JPG image converter that supports converting BMP, PNG, HEIC, and CR2 images to JPG format in batch. This means you can select hundreds of photos at once and convert them in seconds. The software is known for its fast processing speed and a useful preview feature that lets you check the quality before you commit to the conversion.

FREE DOWNLOAD

Secure Download

FREE DOWNLOAD

Secure Download

Steps to Use 4DDiG Image Format Converter:

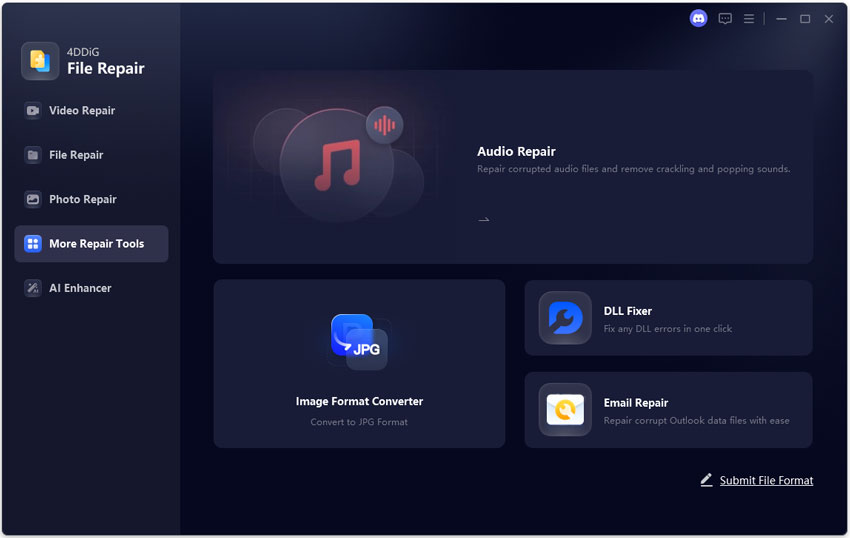
  • Open 4DDiG File Repair after installation. Select "More Repair Tools", then choose "Image Format Converter" to continue.

    open 4ddig image format converter
  • Click the "Add Files" button to import your HEIC, PNG, or BMP files. You can add up to 3,000 pictures at once.

    add images to 4ddig
  • Select the "Convert All to JPG" and click "Convert". Wait for the conversion process to finish.

    4ddig kick off jpg conversion
  • Preview the converted images to check the results. Click the "Save" button to save the JPG files to your computer.

    4ddig preview and save converted jpg files

Part 2. How to Convert Image to JPG on Mac

Mac users can convert images with Preview or use Finder Quick Actions for a faster workflow. These options make it easy to change image format to JPG without downloading a separate program.

1. Using the Mac Preview App

The Preview app is the default viewer for all images on Mac and includes a robust export engine. It is perfect for users who want to change image format to jpg without installing third party software.

Steps to Convert Using Preview:

  • Double click your image file to open it in Preview.

  • In the top menu bar, click "File" and then select "Export".

    mac preview export images
  • In the "Format" dropdown menu from the new panel, choose "JPEG".

  • Adjust the quality slider. Moving it toward Best will increase the file size but maintain more detail.

    mac preview convert image to jpeg
  • Click "Save" to save an image as JPEG.

Preview creates a separate JPG file, so you can keep the original image for backup. A higher quality setting generally produces a larger file. If you need a smaller image for a website, reducing the quality can help lower the file size.

2. Using Finder Quick Actions

Finder Quick Actions are convenient for converting an image without opening Preview. The option may appear as Convert Image in the right-click menu, depending on your macOS version and the file type.

Steps to Convert Using Quick Actions:

  • In Finder, click on the image you wish to convert.

  • Right click the selected file(s) to open the context menu.

  • Click "Quick Actions", then select "Convert Image".

    mac finder quick actions
  • Select "JPEG" as the format and choose your desired image size.

  • Click "Convert to JPEG".

    mac finder quick actions convert image to jpg

The converted JPG file will be saved as a new file in the same location. You can also select multiple compatible images before opening Quick Actions. This makes the method useful when you need to convert several files quickly.

Part 3. How to Convert Image to JPG on iPhone

Most recent iPhones use HEIC for photos because it saves storage space. HEIC offers good quality, but some websites and Windows programs may not support it. You can prevent future compatibility issues or convert existing photos.

1. Change Camera Settings to Most Compatible

The most compatible setting tells your iPhone to capture new photos as JPG instead of HEIC. You can prevent future compatibility issues by telling your iPhone to stop using HEIC and start using the standard JPG format for all new photos.

Steps to Change Settings:

  • Launch the "Settings" app on your iPhone or iPad.

  • Scroll down and tap "Camera", then tap "Formats".

  • Select "Most Compatible". Your iPhone will now use JPEG for photos and H.264 for videos.

    change iphone camera settings
Note:

While JPEG is more compatible, it uses more storage space than HEIC. If you are low on iCloud storage, you might prefer to keep the default settings and only convert images when necessary.

2. Convert Existing HEIC Photos to JPG Using the Files App

You can use the iPhone Files app to create a JPG copy of an existing HEIC photo. This is a useful built-in method when you do not want to install another image converter to JPG app.

Steps to Convert Existing Photos:

  • Open the "Photos" app.

  • Select the HEIC photo you want to convert.

  • Tap "Share" and choose "Copy Photo".

    iphone photos app copy photo
  • Open the "Files" app.

  • Open a folder, press and hold an empty area, and tap "Paste".

  • The pasted photo will be saved as a "JPG" file.

    iphone photos app save image in jpg

If the result is not JPG on your iOS version, use the Share menu to save the image to Files, or use a trusted online converter. Avoid uploading private documents or sensitive photos to an online service unless you understand its privacy policy.

Part 4. How to Convert Image File to JPG on Android

Android devices offer several ways to convert images. An online service is convenient when you do not want to install an app, while a dedicated app is better for regular or offline conversions.

1. Using an Online JPG Image Converter (Free Convert JPG Converter)

A free online image to JPG converter can convert PNG, HEIC, WEBP, BMP, and other formats directly in your mobile browser. FreeConvert JPG Converter is one example of this workflow. It is a free online tool that converts images to JPG format without requiring software installation. It supports more than 500 file formats and offers optional resizing, compression, auto-orientation, and metadata removal. The tool works directly in a web browser, with a maximum file size of 1GB for users without an upgrade.

Steps for Online Conversion:

  • Open the FreeConvert JPG Converter in your Android browser.

  • Tap "Choose Files" and select the image you want to convert.

  • Wait for the image to upload.

  • Tap "Convert to JPG".

  • Once the conversion is complete, tap "Download" to save the JPG image.

    android freeconvert online jpg converter

An online image converter is useful for one or two files, but avoid uploading private or sensitive images unless you trust the service and understand its privacy policy. Delete uploaded files from the service when that option is available.

2. Using the Convert Images to JPG JPEG App

For Frequent Conversions, You Can Use a Third Party Android App Such As Convert Images to Jpg Jpeg. the App Allows Users to Select Supported Images and Convert Them into Jpg Files Directly on an Android Device

Steps to Use the App:

  • Install the app from Google Play.

  • Launch the app on your Android phone and allow access to your photos when requested.

  • Choose the image you want to convert.

  • Choose the JPG quality or compression level if needed.

  • Tap the "Convert to JPG" button to start the conversion.

    android convert images to jpg jpeg
  • After conversion, the JPG image is saved to your gallery and can be opened, renamed, or shared.

💡 Tip:

The app also supports converting multiple images at once, which can save time when you have several files to convert.

FAQs About Converting Images to JPG

Q1: How do I convert an image from HEIC to JPG?

On Windows, use Paint or 4DDiG File Repair's Image Format Converter. On Mac, export the file as JPEG from Preview. On iPhone, choose Most Compatible for future photos or convert an existing photo. Android users can use an online converter or app.

Q2: How do I convert an image to a 50KB JPG?

Convert the image to JPG first. Then reduce its dimensions and lower the quality setting until the file is close to 50KB. Check the final size before uploading it. Very small files may look blurry, so keep the original as a backup.

Q3: Is JPG the same as JPEG?

Yes. JPG and JPEG are the same image format. Both extensions work on modern devices.

Q4: Can I convert an image to JPG for free?

Yes. Paint, Preview, Finder Quick Actions, the iPhone Files app, and many Android tools are free. A free online image to JPG converter is convenient, but review its privacy policy before uploading personal files.

Conclusion

The easiest way to convert image to JPG depends on your device and file type. Paint and Preview are convenient for single files, while Finder, Files, Android apps, and online converters support quick mobile workflows. For batch conversion of HEIC, BMP, PNG, and CR2 files, we recommend 4DDiG Image Format Converter because its preview and batch features simplify the process. Always keep your originals before converting.

FREE DOWNLOAD

Secure Download

FREE DOWNLOAD

Secure Download

Sawart Mashab (senior editor)

Sawart Mashab, the content writer for 4DDiG, is adept at creating informative and practical solutions related to Windows and macOS issues, data recovery, file repair, and RAID storage.

(Click to rate this post)

You rated 4.5 ( participated)