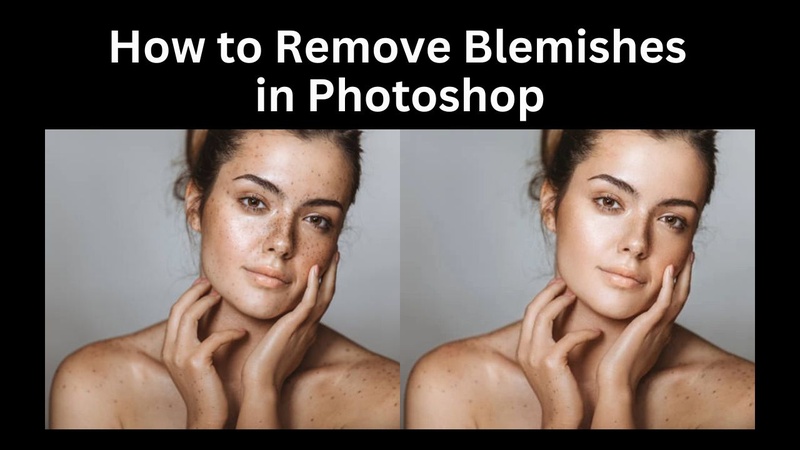
How to Remove Blemishes in Photoshop with 5 Tools
Blemishes like acne, pimples, zits, freckles, and other unwanted spots can easily distract from an otherwise beautiful photo. Whether you're working on a portrait or a close-up product shot, cleaning up patchy skin can bring a dramatic improvement. Fortunately, Adobe Photoshop offers powerful tools that allow you to edit out imperfections and smooth skin naturally.
This article will show you how to remove blemishes in Photoshop using five of the most effective tools. We’ll also introduce an AI-powered alternative for one-click enhancement that requires zero Photoshop skills.
Part 1: Commonly Used Tools to Hide Blemishes in Photoshop
Wondering how to correct blemishes in Photoshop? Photoshop provides several built-in tools for blemish correction, each suitable for different types of imperfections.
1. Spot Healing Brush Tool - hide blemishes Photoshop
The Spot Healing Brush Tool is one of the quickest and easiest ways to remove small blemishes. It automatically samples surrounding pixels and blends them over the selected flaw with a single click or stroke.
- Best for: Small imperfections like pimples, freckles, dust, and minor skin discoloration.
- When to use: When you need to erase blemishes in Photoshop quickly with minimal effort.
2. Lasso Tool + Content-Aware Fill
The Lasso Tool allows you to make a freehand selection around an area, which can then be filled using Content-Aware Fill. Photoshop analyzes the surrounding pixels and fills the selected space with a matching texture.
- Best for: Oddly shaped blemishes, distractions in the background, or irregular textures.
- When to use: When the blemish isn't a perfect circle or when it's surrounded by varied tones and textures.
3. Clone Stamp Tool
The Clone Stamp Tool gives you precise control by allowing you to sample a specific part of the image and paint over another area with it. Unlike healing tools, it doesn’t try to blend—it directly copies pixels.
- Best for: Textured areas, sharp edges, or when working near high-contrast details like eyes or lips.
- When to use: You need complete control over what’s copied and pasted. Also useful when healing tools cause unwanted blending.
4. Patch Tool
The Patch Tool is ideal for removing larger blemishes or entire areas of flawed texture. You draw around the blemish, then drag the selection to a clean area. Photoshop merges the textures to create a smooth, seamless correction.
- Best choice for: Those wondering how to clear pimples in Photoshop on broader areas.
- When to use: When the area is too big for the Spot Healing Brush Tool, and you want smoother, more accurate blending over a wider area.
5. Neural Filters (Photoshop 2021 and newer)
Neural Filters use artificial intelligence to perform advanced edits, including skin smoothing and blemish reduction. The Skin Smoothing filter is especially useful for quick, overall retouching.
- Best for: Quick and subtle full-face retouching. It works well for enhancing portraits at scale or creating natural-looking skin tones.
- When to use: When you want to improve skin appearance across the entire face without manual editing.
Part 2: How to Remove Blemishes in Photoshop
Now, let’s go through a step-by-step guide on how to remove blemishes in Photoshop using the tools mentioned above. Here, we will use the above mentioned 5 Photoshop tools to complete the process.
1️⃣ How to Clear Blemishes in Photoshop Using the Spot Healing Brush
This tool is perfect for quickly removing small imperfections like pimples or tiny spots. It automatically blends the corrected area with surrounding textures.
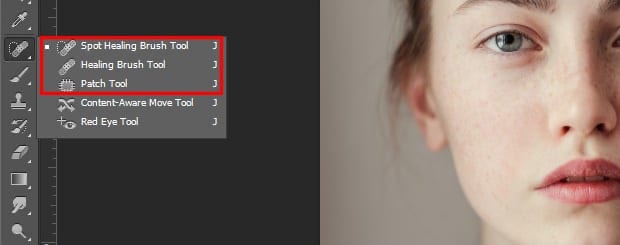
You’ll find the Spot Healing Brush Tool in the left toolbar (shortcut key J). If it’s not visible, right-click on the Healing Brush icon and select Spot Healing Brush Tool from the dropdown.
Steps:
-
Open your portrait in Photoshop by going to the “File” menu and choosing “Open”.
-
In the left toolbar, choose the “Spot Healing Brush Tool”, which looks like a band-aid icon.

-
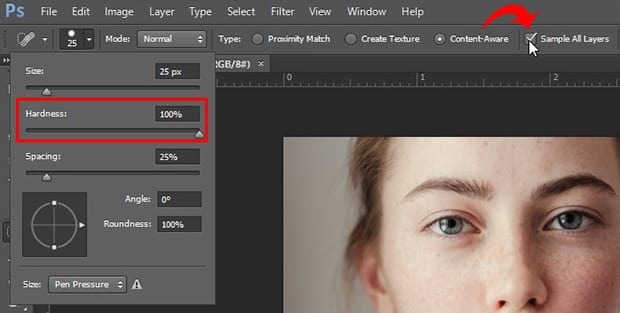
Set brush hardness to 100% and check "Sample All Layers".

-
Go to the Layer menu, select New, then choose Layer to create a transparent layer.
Click on the new transparent layer in the Layers panel.
Zoom into the photo for better precision.
-
Select the Spot Healing Brush, then click or drag over any blemishes to remove them.
For better results, zoom in on the skin and work with a brush just slightly larger than the blemish itself.
2️⃣ How to Edit Out Blemishes in Photoshop with the Lasso Tool
The Lasso Tool lets you manually select areas with more control. Use this method when you want more control over the area you're correcting—ideal for slightly larger or oddly shaped marks.
Steps:
-
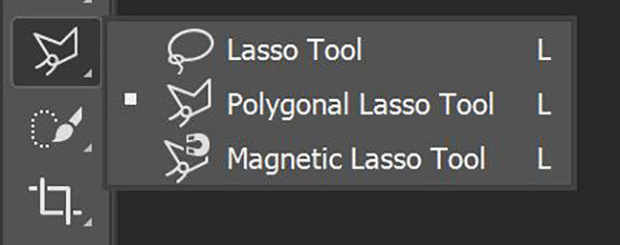
Choose the “Lasso Tool” from Photoshop’s left menu.

Circle the detective part in pictures using the Lasso tool.
-
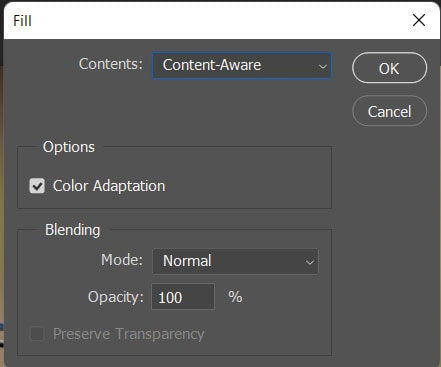
Right-click on the circled part and select “Fill” from the popup.
-
On the dialog, select “Content-Aware” from the Contents section and click OK.

Feather the selection slightly (via the right-click context menu) for softer blending.
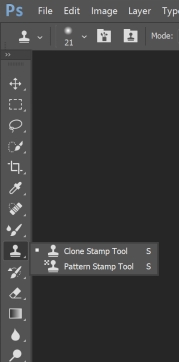
3️⃣ How to Erase Blemishes in Photoshop with the Clone Stamp Tool
The Clone Stamp Tool lets you copy pixels from one part of the image to another. Great for more stubborn blemishes. You can also reduce the Opacity of your brush for more subtle effects.
Steps:
-
Open your image in Photoshop and duplicate the background layer to work non-destructively.
-
Zoom in to 100% on the area where you want to fix skin imperfections.
-
Choose the Clone Stamp Tool from the left toolbar.

-
Hold Alt (Windows) or Option (Mac) and click on a clear skin area to set the clone source.
-
Change the brush mode to "Lighten" to target dark spots or "Darken" to target light spots.
-
Gently paint over the blemishes 2–3 times until they blend naturally with the surrounding skin.
Want to know how to correct blemishes in Photoshop around high-contrast areas like wrinkles? This is your go-to.
4️⃣ How to Fix Blemishes in Photoshop with the Patch Tool
If you’re dealing with larger imperfections, like scars or patches of uneven skin, the Patch Tool is ideal.
Steps:
-
Press Ctrl + Alt + Shift + E to merge all visible layers into a new one. This ensures the Patch Tool works non-destructively.
-
Choose the “Patch Tool” under “Healing Brush Tool” from the toolbar. Draw a selection around the blemished area.
-
Click inside the selection and drag it to a clean area of skin. Photoshop will blend the texture and tone naturally.
Photoshop will replace and blend the blemished area.
Use the Destination mode instead of Source if you want to clone clean skin to a different area.
5️⃣ How to Remove Zits in Photoshop with Neural Filters
Want a quicker, AI-powered solution? Neural Filters offer automatic retouching.
Steps:
Open your photo.
-
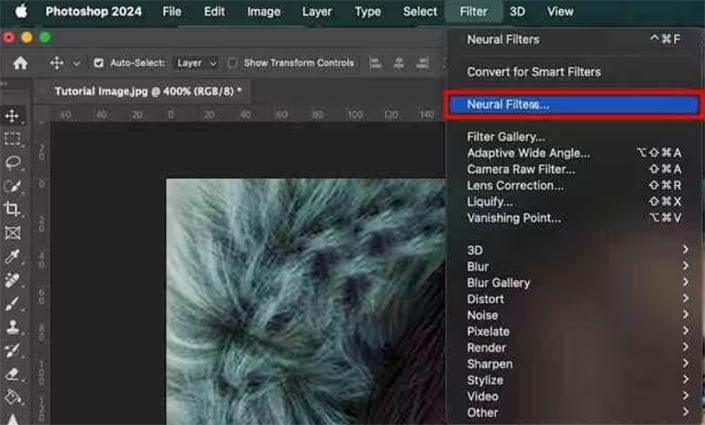
Go to “Filter” > “Neural Filters”.

Enable “Skin Smoothing”.
-
Adjust the “Blur” and “Smoothness” sliders until you're satisfied.
Apply the effect and export your image.
This method is perfect when you need to edit out multiple blemishes across the face at once, especially for portrait photography.
From quick spot fixes to full-face touch-ups, Photoshop gives you plenty of tools to erase, edit out, and correct blemishes. Beginners can start with the Spot Healing Brush, while professionals may combine methods like Lasso + Clone Stamp for more control.
Part 3: How to Get Rid of Blemishes on Face Images and Enhance Resolution with One Click
While Photoshop is powerful, it can be complex for beginners. If you want a faster, simpler way to clear blemishes and improve your photos, try 4DDiG Photo Enhancer—a one-click AI-powered tool.
4DDiG Photo Enhancer uses advanced AI facial models to retouch face images by removing skin flaws like acne, pimples, papules, dark circles, and wrinkles. It can even upscale the image resolution to 4K and higher for sharper results.
Key Features of 4DDiG Photo Enhancer
- AI Face Enhancement: Automatically detects faces and retouches skin.
- Blemish Remover: Clears up acne, zits, and patchy areas with zero Photoshop knowledge.
- One-Click Blemish Removal: No need for manual editing – just upload and enhance.
- Image Upscaling: Boosts clarity for printing or display. Increase image resolution to 4K.
- Easy for Everyone: No editing experience needed. It’s beginner-friendly.
- Advanced Format Support: Work with multiple image formats, like JPG, PNG, WebP, HEIC, SVG, and more.
- Colorize Image: Add color to black-and-white photos to restore old images.
Steps to Erase Blemishes with the 4DDiG AI Photo Enhancer
-
Download and install the 4DDiG File Repair software on your PC or Mac. Then go to “AI Enhancer” > “Photo Enhancer”.
FREE DOWNLOADSecure Download
FREE DOWNLOADSecure Download

-
Open the Photo Enhancer program and click "Add Photos" to upload your face image. Or, drag and drop them directly.

-
Select "Face Model" > “Soften” from the right sidebar and select a Resolution as “X2 or X4. Finally, touch “Enhance” at the bottom right to enable skin retouching and blemish removal.

-
Your photo will be ready after a few seconds. Zoom in and check the edited image. When everything looks good, click "Save" to download the final version.

If you've ever searched for how to delete pimples in Photoshop, this tool does it better and faster, with no learning curve.
Conclusion
Whether you're a pro or a beginner, knowing how to remove blemishes in Photoshop can drastically enhance your photos. You can quickly fix acne, pimples, freckles, and other skin spots with tools like the Spot Healing Brush, Clone Stamp, Patch Tool, Lasso Tool, and Neural Filters.
But if you want a faster and easier way to get professional results, try 4DDiG AI Photo Enhancer. Its AI Face Model allows you to erase blemishes, correct imperfections, and enhance resolution—all in a single click.
Secure Download
Secure Download


 ChatGPT
 Perplexity
 Google AI Mode
 Grok
Grok

