How to Preserve EXIF Data When Editing/Transfering/Uploading Images

Photo metadata was removed after editing, transfering, or sharing? Then never miss this guide to preserve EXIF data in different scenarios and a great method to recover stripped metadata.

5 mins read

Updated on 2026-08-17 18:59:58 to Photo Tips

Many people notice that important details (like taken, camera settings, device details, GPS location) disappear from their photos after editing, converting, or sharing. These hidden details are called EXIF data.

If you want to preserve EXIF data intact for photos, you first need to understand why it vanishes and how to check your files. This guide explains the common reasons behind lost metadata, shows you easy ways to keep photo metedata on your PC or phone, and most importantly, the possible solution to recover the lost EXIF data.

Part 1. Why EXIF Data Gets Removed or Lost

EXIF metadata is usually created by a camera or smartphone when a photo is taken. It may include the capture date, camera model, lens information, exposure settings, orientation, and GPS coordinates.

However, the main headache for many user is that their photos often lose the original information during everyday tasks. Understanding the causes helps you avoid the problem and better preserve EXIF data in the future.

Common Causes Behind Lost or Stripped EXIF Data

Several common actions can strip EXIF data from your images:

  • Photo editing and export settings: Some editors or enhancers remove metadata when exporting a new copy, especially if metadata options are disabled.
  • Image compression: Re-encoding an image to reduce its file size may discard some or all EXIF data to make the output smaller.
  • Format conversion: Converting between JPEG, HEIC, WebP, and other formats can change which metadata is preserved.
  • Messaging and social platforms: Uploaded images may be compressed or processed, which can remove EXIF fields.
  • Screenshots: A screenshot creates a new image rather than copying the original photo, so the original camera EXIF data is usually not retained.
  • Privacy tools: Some apps intentionally remove GPS coordinates and other personal metadata before sharing.

In most cases, the loss happens because the software creates a new version of the image rather than simply updating the existing one.

What Does "Keep EXIF Data" Mean

To keep EXIF data means keeping the metadata stored with a photo rather than saving only the visible image. This information may include the capture date and time, camera or phone model, lens, ISO, shutter speed, aperture, focal length, image orientation, and GPS location.

Keeping EXIF information can help you organize photos, review camera settings, and maintain useful details when editing or transferring images. For many users, preserving the original capture date is especially important when moving a large photo library. Keeping this field helps Apple Photos or Google Photos organize images by when they were actually taken rather than when the new file was created or imported.

Note

However, keeping EXIF data does not mean you must preserve every field. If privacy matters, you can selectively remove sensitive details such as GPS location (it will reveal where a photo was taken) before sharing images publicly while keeping useful camera settings like ISO, aperture, shutter speed, lens model, and focal length.

Part 2. How to Check If EXIF Data Was Preserved Still

Before you try to preserve photo metadata, it helps to confirm whether the information is still there, including date token, camera model, basic camera settings (aperture, shutter speed, ISO, etc.), file size and resolution, or location. Checking is quick and requires no special skills.

How to View EXIF Data on Different Devices

Here is the steps on how to get EXIF data from a photo:

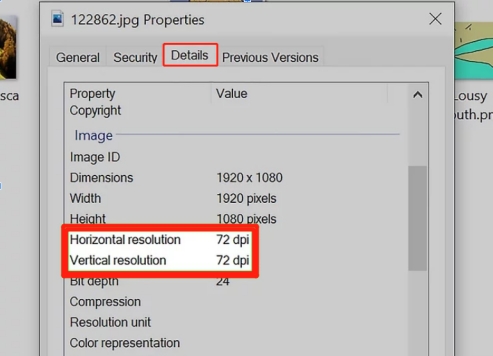
  • On Windows: Right-click the photo, select Properties, and open the Details tab. You will see fields such as date taken, camera model, and GPS if they remain.

    windows check photo exif data
  • On Mac: Open the image in Preview, go to Tools, and choose Show Inspector. Click the information icon to view the EXIF details.

    mac preview app check exif data
  • On iPhone: Open your image in the Photos app and swipe up on the photo or tap the ⓘ (info) button at the bottom. Apple Photos can display stored details such as date, time, location, and camera information.

    iphone photos app check photo exif data
  • On Android: Open your image in the Google Photos app and swipe up on the photo or tap the three-dot menu and choose Info / Details.

Tips:

You can also use free online EXIF viewers or a tool like Jimpl for a more complete look. Simply upload or point the tool at your file, and it will display all available metadata.

check photo exif data online with jimpl

If the important fields are missing or blank, the data has likely been removed.

Part 3. How to Preserve EXIF Data in Different Scenarios

Different actions can affect the metadata in your photos. Editing software, compressors, converters, AI tools, and messaging apps do not all handle metadata in the same way. The right method depends on what you are doing with the image. Below are practical ways to keep EXIF data safe in the most common situations.

When Editing or Resizing Photos in Photoshop, Lightroom, or Others

Professional editing programs such as Photoshop and Lightroom give you a lot of control, but metadata settings are often hidden in the export menu. Many people finish their edits and later discover the original details have disappeared. Taking a few extra seconds to see how to edit photos without losing EXIF data.

  • Always start by making a copy of the original photo.

  • Open the copy in your Lightroom or other editing software and make the changes you need.

  • Before exporting or saving, look for the metadata options and select "Include All Metadata", "Preserve EXIF", or similar choice.

    E.g., in Lightroom, choose "File" > "Export" to open the Export dialog,scroll down to the Metadata, and open the Include drop-down list. Then choose "All Metadata", "Copyright Only", or "All Except Camera & Camera Raw Info" when you want to keep the full record or remove some information separately if you only want to protect your privacy.

    lightroom keep photos exif data after editing
  • Save the new file, then reopen it and check the details to confirm that the date, camera information, and other fields are still present.

When Compressing or Converting Photos

Compression tools and format converters are useful for reducing file size or changing image types, but they frequently strip metadata by default. This happens because the software creates a completely new file rather than simply updating the existing one. A little extra care during the process can help you avoid losing important information.

  • Create a copy of the original image and keep the original untouched.

  • Look for options such as "Preserve Metadata", "Keep Metadata", or "Include Metadata" in the Photoshop or Lightroom tool. Turn it on if the option exists.

    xnconvert keep exif data after photo conversion
  • Run the compression or conversion on the copy and save the new version.

  • If the metadata is missing, use ExifTool to copy it from the original photo to the new version.

This approach helps you preserve image metadata even after changing the file size or format.

When Uploading, Sharing, or Transferring Photos

Social media platforms and most messaging apps remove EXIF information automatically to protect user privacy. Once a photo is uploaded, the public version usually no longer contains the original details. While you cannot always stop platforms from stripping the data, you can still protect your master files and choose safer transfer methods.

  • Store the original photo with complete metadata in a safe place on your device or computer.

  • When uploading to social media or sending through most messaging apps, understand that the public version will usually lose its EXIF data.

  • For transfers between devices such as transfer from iPhont to PC, choose direct methods such as a USB cable, AirDrop, or email whenever possible.

  • After transferring, quickly check the file to make sure the important details remain.

When Enhancing Photos with AI Tools

AI photo enhancers can greatly improve clarity, reduce noise, and restore details, but they often re-encode the image during processing. This re-encoding is one of the most common culprits behind photo metadata loss. The most reliable solution is to enhance a copy of the photo and then restore the original information afterward.

  • Make a duplicate of your original photo and keep the original untouched.

  • Open the copy in an AI tool to sharpen blurry images, reduce noise, restore facial details, and upscale photos with simple controls.

  • Enhance the copy and save the improved version.

  • Use digiKam, Exif Pilot, or ExifTool to transfer the full EXIF information from the original file to the enhanced version.

Part 4. Can You Recover EXIF Data After It Has Been Removed & How

Sometimes, but not in every case. Once EXIF data has been stripped from a photo, it cannot usually be recovered from that same file. The information is permanently removed during re-encoding or saving, not simply hidden. However, recovery is still possible in certain situations if you still have access to the original version.

You can restore the metadata when:

  • You still have the original photo that contains the complete EXIF data
  • A backup copy or cloud version of the original file exists
  • The photo was previously imported into software that stored the metadata separately

In most other cases, especially after social media uploads or heavy editing without a backup, the original details are lost for good.

How to Recover or Transfer EXIF Data with ExifTool

  • Go to the ExifTool official page to install and fire up the tool

  • Make sure you have both the original photo (with EXIF) and the version that is missing the data.

  • Open Command Prompt or Terminal and run: exiftool -tagsfromfile original.jpg -exif edited.jpg

  • Replace original.jpg with the source image and edited.jpg with the photo that needs the EXIF data. (ExifTool will automatically create a backup named edited.jpg_original.)

  • Run exiftool edited.jpg to view the metadata and confirm that details such as the capture date, camera information, and other EXIF fields were transferred successfully.

    exiftool transfer photo exif data
Note:

ExifTool supports copying metadata tags from one file to another through its -tagsFromFile function, making it useful when the original still exists. If no copy of the original metadata remains, you can manually add information you already know, for example, a known capture date or location, but that is re-creating metadata, not truly recovering the deleted EXIF.

Tips: How to Fix Blurry or Low-Quality Photos with 4DDiG Photo Enhancer

Preserving metadata protects useful information, but it does not fix the visual quality of a photo. You may still have an image that is blurry, noisy, pixelated, poorly colored, or too low-resolution for sharing or printing.

For this separate problem, 4DDiG AI Photo Enhancer provides AI-based tools for improving image quality. This powerful tool can batch upscale low-resolution images up to 4K or even 8K and includes tools for sharpening, noise reduction, color adjustment, face enhancement, and black-and-white photo colorization.

FREE DOWNLOAD

Secure Download

FREE DOWNLOAD

Secure Download

Here's how to use it to upscale your images to the next level:

  • Install 4DDiG File Repair and open its Photo Enhancer gadget by clicking AI Enhancer > Photo Enhancer.

    open 4ddig ai photo enhancer
  • Click Add Photos and import the image you want to improve.

    add blurry photos to 4ddig
  • Choose a suitable AI model based on the photo: the general model for overall clarity, the denoise model for grainy images, or the face model for portraits. And you can choose to upscale original image resolution by 2X or 4X.

    select ai model and resolution to enhance photos
  • Tap the bottom-right Enhance button to kick off the upscaling process. After previewing the enhanced result, you can save the improved version locally.

    preview and save enhanced photos

Afterward, transfer the full or selective EXIF data (like date time, GPS, etc.) from your original photo to the newly enhanced file by referring to Part 4.

FAQs about Keeping EXIF Data

Q1: How to add EXIF data to photos?

You can add or edit certain photo metadata with a metadata editor, Lightroom, Adobe Bridge, or a tool such as ExifTool. For example, you can enter known dates, locations, copyright details, or other supported fields. Adobe Bridge and Lightroom provide metadata editing controls, while ExifTool supports more detailed tag management.

Q2: How to transfer photos from iPhone to PC with metadata?

The most reliable ways are to use a USB cable, AirDrop to a Mac, or the official Apple Tools (such as the Photos app or Finder). These usually keep the information intact. Avoid messaging apps or certain cloud uploads, as they often remove the data. Check the files on your PC afterward to confirm.

Q3: Does Discord keep EXIF data?

In most cases, no. Direct image uploads are processed and stripped of EXIF. Sending the photo as a file attachment may preserve some data, but it is not reliable. Keep your own original copy if the metadata matters.

Q4: Does WhatsApp keep EXIF data?

WhatsApp normally removes EXIF when you send a photo as an image. Sending it as a "Document" gives a better chance of keeping the data. For important photos, always save the original version separately.

Q5: Should I save EXIF data?

Yes, if you want to organize photos, track settings, or keep ownership records. It is useful for personal archives and professional work. If privacy is a concern (especially location), remove the data before sharing publicly.

Conclusion

Protecting the hidden details in your photos does not have to be complicated. By understanding why metadata disappears and following simple habits, you can successfully preserve EXIF data in most situations. Please keep in mind, make the photo backups, check your files after editing, and restore information when needed. With the right approach, you can improve image quality and still keep the important details that make each photo complete.

William Bollson (senior editor)

William Bollson, the editor-in-chief of 4DDiG, devotes to providing the best solutions for Windows and Mac related issues, including data recovery, repair, error fixes.

(Click to rate this post)

You rated 4.5 ( participated)

You May Also Like