How to Fix Blurry Photos Online/Free/AI
In this era, using smartphones other than digital cameras is very common to capture, share, and upload photos. But, if the pictures are blurry, Android and iPhone users feel confused about whether the same methods will work on both OS or whether they will differ. And blurry or grainy photos can destroy your hard work.
Fortunately, in this guide, we’ve shared five ways to fix blurry photos, plus a bonus tip for preventing blurry pictures. So, let’s jump right into it.

- Why Is Photo Blurry & Can You Fix It
- Way 1. AI Fix Blurry Photos [for PC] 🔥
- Way 2. Fix Blurry Pictures Online Free [Top 4 Picks]
- Way 3. Fix Blurry Photos in Lightroom [for iPhone/Android]
- Way 4. Unblur an Image in Photoshop
- People Also Ask about Blurry Picture Fix
What Causes Photo Blur & Can You Fix Blurry Photos
There are multiple reasons behind the blurriness of photos. They include:
❓ Reasons Behind Blurry Pictures
- Camera Shake: If your hands are shaking or you have a wrong grip on the camera, it will result in blurry pictures. This is especially common in low-light situations where longer exposure times are needed.
- Motion Blur: Capturing moving subjects without a fast enough shutter speed can result in motion blur, where the subject appears streaked or unclear.
- Out of Focus: Zooming the camera in and out will impact the focal length, causing blurry photos. Also, if the autofocus system fails or if the photographer manually focuses incorrectly.
- Low Light Condition: In dim lighting, cameras may use slower shutter speeds to allow more light in, increasing the chance of shake or motion blur.
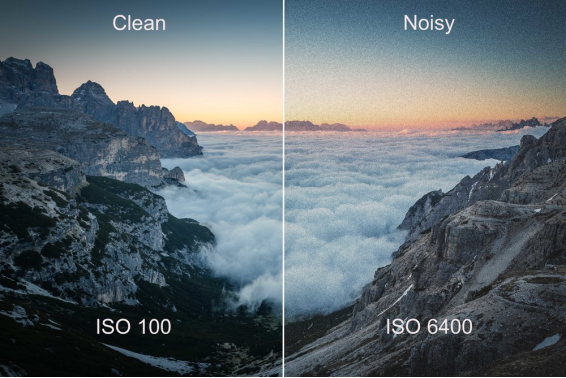
- Incorrect ISO Settings: Inappropriate camera settings (e.g. a very low ISO in low light) can lead to blurry images. Likewise, very high ISO settings can also introduce noise, which may also affect clarity.
- Zoom in Too Much: Excessive zooming can magnify camera shake and any focus issues, leading to a blurry image, especially if the camera is handheld.
- Post-processing Error: Over-editing a photo in software can introduce blur or artifacts that degrade image quality.
✅ You May Also Like: How to Reduce Photo Noise Generated by High ISO and Long Exposure
❓ Can You Fix Blurry Photos
Of course, you can. The professional-level software like Adobe Photoshop or Lightroom can achieve that. Besides, AI photo enhancers online or for desktop are also able to increase photo pixels and sharpen it. Just read on to explore those great tools!
Way 1. Best Way to Fix Blurry Photos with AI Technology 🔥
Sometimes, you are following the right steps and taking the necessary care to avoid any blur in pictures. But still, you can get blurred or corrupted photos. You may consider using professional-level software to unblur an image and increase its quality for clarity. In fact, the market teems with various tools claimed to enhance image resolution to 4K. However, it is a little bit difficult to find one that can really cater to all your needs.
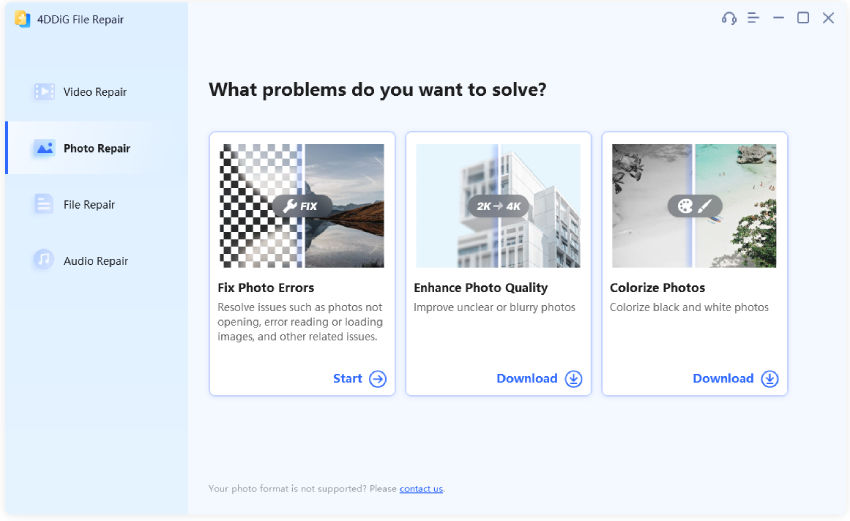
However, never fret! We have done those works for you, filtering and selecting the most practical image blur remover with robust additional features. That is 4DDiG AI Photo Enhancer, an all-around and easy-to-use desktop software. It is capable of removing blur, noise, as well as grain from images and sharpening them with AI technology, enhancing resolution to real 4K and higher. Plus, it comes with more photo-related functions. Please check that below:
✨ Why Choose 4DDiG AI Photo Enhancer
- Fix pictures that are blurry, noise, grainy, pixelated, distorted, scratched, corrupted, etc.
- Endows users with 4 excellent AI models (Face/General/Denoise/Colorize) that can be allied to any scenario.
- Use advanced AI to analyze images and correct details such as wrinkles, flaws, scratches, etc.
- Upscale image quality to 4K and higher (up to 8K) with AI
- Turn black-and-white photos to color and restore old faded photos
- Repair photos from internal and external drives, digital cameras, SD cards, and USBs.
- Bulk enhance, repair, and colorize up to 3000 photos simultaneously.
- Support a vast selection of photo formats: JPG, PNG, WEBP, TIFF, HEIC, and more.
- Suitable for all users across any field and easy for beginners
✨ How to Remove Blur from Image with 4DDiG AI [4 Steps Only]
Take a walkthrough at the following stepwise guide to use this blurry photo fixer and quality enhancer:
-
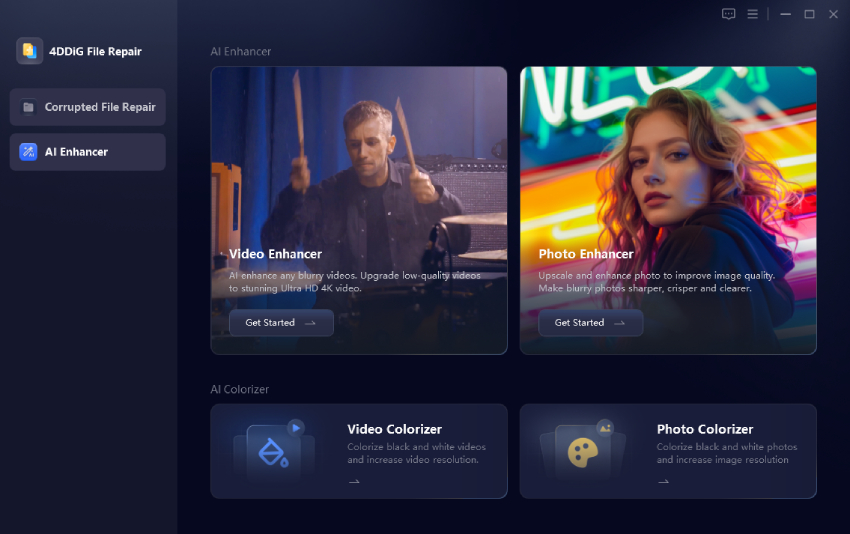
Get the 4DDiG AI Photo Enhancer (shown as "4DDiG File Repair) on your PC. Activate it and select the left "AI Enhancer" menu tab. Later, press "Photo Enhancer" to open a new screen.
FREE DOWNLOADSecure Download
FREE DOWNLOADSecure Download

-
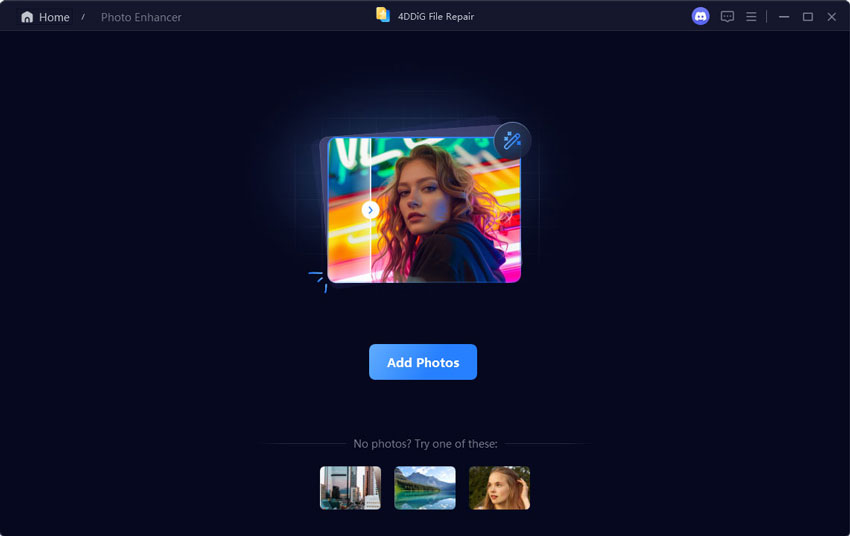
On the new screen, hit the large blue "Add Photos" button to choose and add your blurry or grainy pictures to this image blur remover.

-
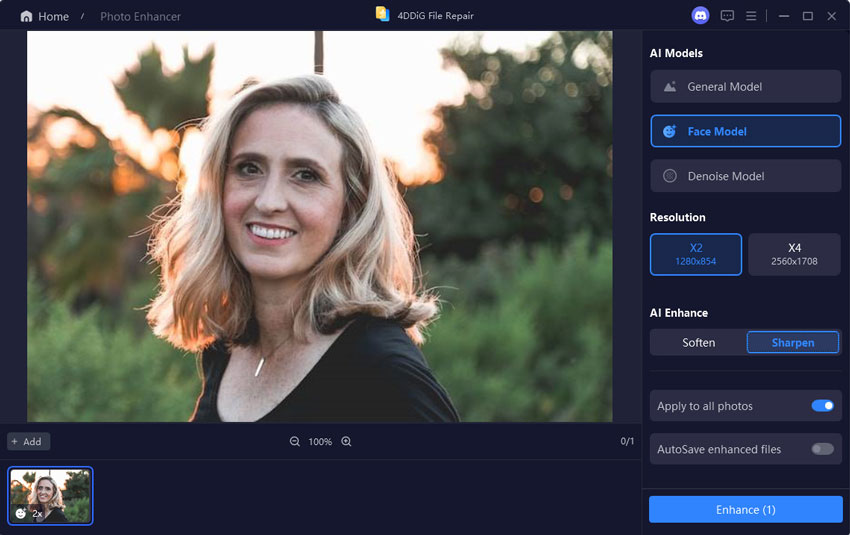
When added, customize the AI model, resolution, Width, or Height according to your preferences to unblur an image. The encouraged selections is to set the resolution as "4X", which can increase the resolution to 3840p and higher. Finally, tap "Enhance".

-
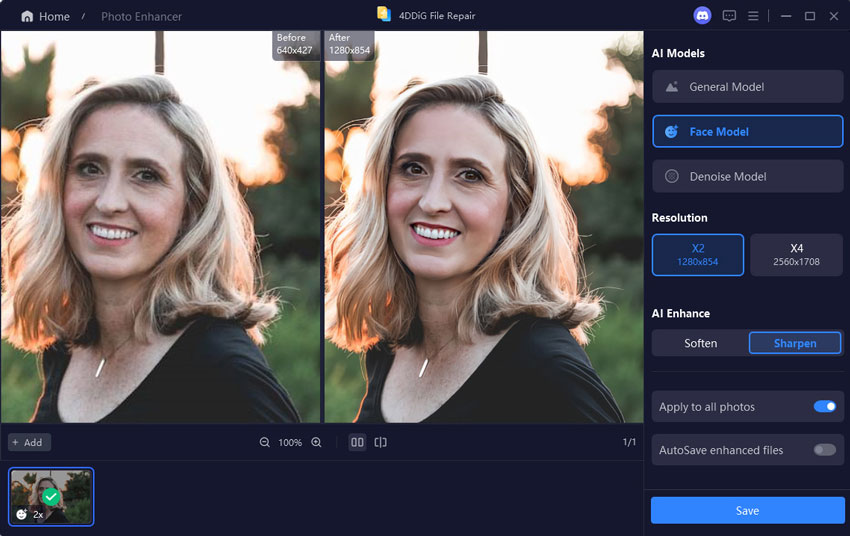
The AI tool will start to unblur pictures without watermark. Once done, check the result and export it by clicking "Save" in the bottom-right corner.

🎥 Video Guide:
Way 2. Top 4 App to Fix Blurry Photos
Considering that many users prefer to an online gadget without any software installed, we also tested and present some top-rated image blur remover online, which are free or paid as follows.
Tool 1: Unblur Pictures Online Free with Fotor
Fotor is a browser-based photo editor that you can use to repair your blurry or corrupted photos. You won’t need an account to fix pictures, but you’ll need to make one or sign in with your Google ID to save results. Here’s how you can fix blurry photos with Fotor:
Open the Fotor website from your browser, and tap "Upload Your Image" to browse and import your fuzzy picture you want to fix.
Once added, the picture will be enhanced and unblurred by Fotor automatically.
Just wait it to finish. Finally, tap the upper-right "Download" tab to export it.

Fotor is not completely free to use. Its free version only unblur image online free with watermark. And it requires you to pay for its subscription to unlock advanced editing functions.
Tool 2: Fix Blurry Pictures Online with PicsArt
Picsart is a comprehensive photo editing tool that uses AI to edit and repair photos. Its AI technology can fix blurry photos once you added them to this gadget with one click. Here’s how to fix a blurry picture with PicsArt:
- Navigate to the PicsArt AI Image Upscaler webpage and click "Browse files" to upload your unclear picture.
Then its AI algorithsm will process and enhance the added picture with unblurring automatically.
Check the result. If dissatisfied with it, you can tap "Edit Image" for further editing.
Afterward, click "Download" to save the unblurred image.

Similar to Fotor, PicsArt also comes with limited features on its free version. Most importantly, its unblurring effect is not as magic as 4DDiG AI Photo Enhancer and Photoshop.
Tool 3: Remove Blur from Image Online Free via Canva
Canva is a known visual content design platform including image editing and enhancing. It also has a web-based version with multiple photo-related features, such as the Image Upscaler, Sharpen, and Clarity. Here's how to use it to finish blurry photo fix online free:
- Head to the Canva's webiste and create a new design.
Then drag and drop the blurry image to Canva's screen directly.
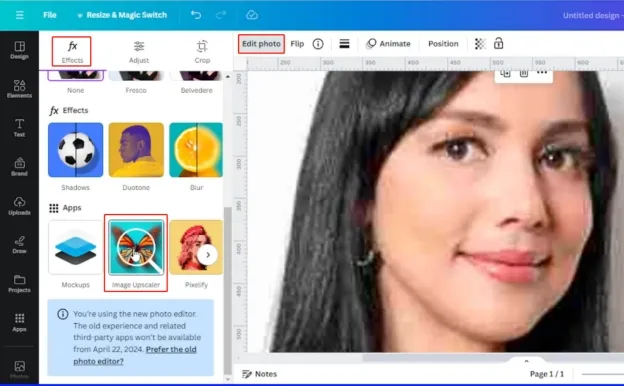
Later, click on the added image and tap "Edit photo".
Switch to the top "Filter" section and find the "Image Upscaler" app to open it. You can use this app to increase the quality of the blurry image.

If you are displeased with the result, just switch to the top "Adjust" section and move the slider of "Sharpness" and "Clarity" to higher values.
Canva's unblurring effect will make you disappointed. Whether use its AI Enhance, Image Upscaler, or manual adjustments, the picture seems the same as the original.
Way 3. How to Fix Blurry Photos in Photoshop
Photoshop is an industry-leading software for photography. But you can also use it to repair blurry or corrupted photos. Here’s what to do:
On Photoshop, click "File" > "Open" to transfer the blurry picture for unblurring.
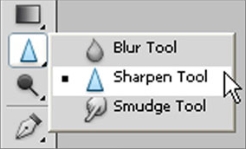
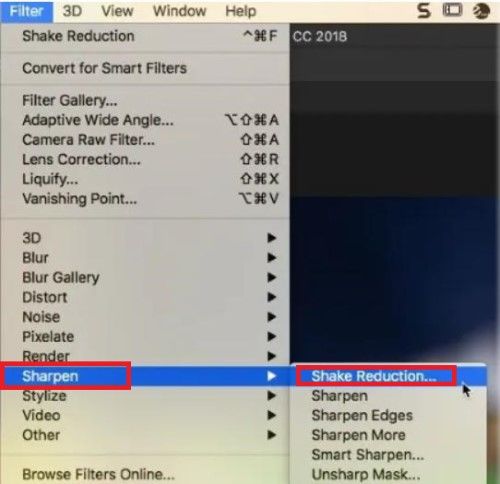
Open Photoshop and go to the “Filter” option in the above menu bar. Then choose “Sharpen” from the Filter menu.
Choose the “Shake Reduction Filter” to automatically scan and repair the blurry picture. The progress bar will show the scanning process. Once the scanning is complete, Photoshop will display a clear image.

Apart from "Shake Reduction Filter", Photoshop also features other tools to remove nlur from an image. To learn more tips, please go to this guide: How to Unblur an Image in Photoshop? Step-by-step Guide in 2025
Way 4. How to Unblur an Image on iPhone/Android Using Lightroom
If you are an Android or iOs user and don’t want to use the above methods to fix blurry pictures, we have an preparatory solution for you. That is to use the Adobe Lightroom mobile app, an expert app like Photoshop. Follow the steps on how to fix blurry photos on android and iPhone below:
Open the Lightroom mobile app and upload the unclear image to it.
From the toolbar, tap on the Adjust icon and click the "Detail" option.
From the pop-up menu, switch to the "Sharpening" section and drag the slider of "Amount", "Radius", and "Detail" to adjust the image till you are content with it.

A Complete Guide to Denoise Multiple Photos Lightroom | Stepwise
Bonus Tip: How to Prevent Blurry Pictures?
Above, you read the methods of fixing blurry photos and what causes them. But do you know that there are some excellent ways to capture good-quality images without blurring them? Here’s how to make a picture not blurry:
- Hold the camera in a firm and steady grip and position it correctly. Your hands should not be shaky.
- You’ll have to be creative and have an excellent aesthetic sense to take photos.
- If you need to capture sharp pictures, choose a fast shutter speed.
- Focus the camera on the object correctly.
- Consider the distance from where you are taking photos. A larger distance from the object will cause blurriness in photos.
- A good-quality lens is vital to capture a high-quality image. Also, clean the lens properly to prevent blurriness.
People Also Ask about Blurry Picture Fix
Q1: How do I unblur a very blurry image?
It depends on what software you choose. Tools like 4DDiG AI Photo Enhancer, Lightroom, and Photoshop that is specifically desinged for photo enhancer can fix blurry photos with better result.
Q2: How to unblur image online free without watermark?
The online tools require users to pay for its Pro version to remove watermark.
Q3: Can ai fix blurry photos?
Sure. In fact, AI even can do better that manual actions. It can analyze, identify, and correct any inperfect parts of the photo.
Q4: How to fix blurry Instagram photos?
You can get those works done to ensure a clear Instagram photo:
- Upload high-quality image (at least 1080 pixels wide).
- Avoid over-editing
- Use the above tools: 4DDiG AI Photo Enhancer or Adobe photo editors to unblur and sharpen your image.
- Recommend: 1080x1080 pixels for square photos, 1080x1350 for portrait, and 1080x566 for landscape.
- Go to "Settings" > "Account" > "Cellular Data Use" and toggle on "High-Quality Uploads".
Q5: Is there a free app to fix blurry photos?
Then you can give Snapseed and Remini Photo Enhancer a shot. You can use 4DDiG AI Photo Enhancer to unblur images and increase pixels for free but download the fixed pictures with the full version.
Conclusion
Whether you capture pictures for fun or your business, blurry photos can be annoying. But repairing them is possible. The main aim of our guide was to help you learn ways to fix blurry photos, what causes blurriness, and how to prevent it. Providing that you want to get better results, we recommend Photoshop, 4DDiG Photo Enhancer, or Lightroom.
However, if you don’t want to go into the hassle of using a photo editor to fix blurry photos manually at the same time, 4DDiG AI Photo Enhancer is a great shot. Firstly, it is designed to repair photos and videos from all kinds of storage devices. Secondly, it can repair photos in bulk regardless of their condition in just 3 steps. The whole process is automatic, so you won’t have to fix each picture manually.
Secure
Download
Secure
Download




 ChatGPT
 Perplexity
 Google AI Mode
 Grok
Grok

