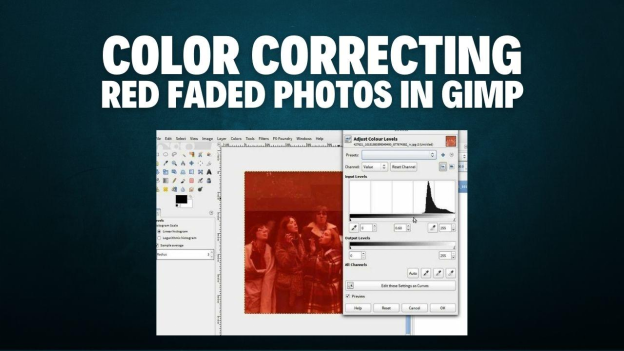
A Step-by-Step Guide to Color Correcting Red Faded Photos in GIMP
Did you know that red fading in photos is often caused by light exposure and chemical reactions in old prints? This common issue can distort the natural balance of your images, but fortunately, it's fixable with free software like GIMP.
This article will walk you through the process of color correcting red faded photos in GIMP, restoring their original vibrancy and clarity. Whether you're preserving cherished memories or reviving vintage prints, GIMP's powerful editing tools make the process straightforward. Follow along to bring your photos back to life with professional-quality results!
Part 1: What Causes Red Faded Photos?
Red fading in photos is caused by the degradation of the chemical compounds used in photographic prints, mainly due to environmental exposure and aging. Here’s a breakdown:
➤ Chemical Degradation
Photographic prints use organic dyes to produce colors. Over time these dyes break down due to chemical instability. Among the three color dyes—magenta, cyan, and yellow—cyan is the least stable. As it fades, magenta and yellow become more prominent and that’s why we see the red tone in faded photos.
➤ Environmental Factors
- UV Radiation: Sunlight exposure breaks down cyan dyes and leaves a red tone in the image.
- Temperature and Humidity: High temps and moisture accelerates oxidation and fading of dyes and makes the red more prominent.
- Airborne Pollutants: Ozone and nitrogen dioxide react with the chemicals in the photo paper and speed up the fading process.
Knowing these factors is key to choosing the right restoration techniques, like using photo editing software like GIMP or AI powered alternatives like 4DDiG AI Photo Enhancer. By counteracting the environmental and chemical influences, you can get vibrancy back in your faded photos.
Part 2: Key Tools in GIMP to Restore Faded Photos
GIMP, a versatile and free image-editing software, offers a range of tools to restore faded photos. These tools help correct color imbalances, adjust tones, and bring life back to old or damaged photos.
1. Hue-Saturation
The Hue-Saturation tool allows you to manipulate the intensity of specific
colors in an image. You can select specific color ranges, like red, and
adjust their hue, saturation, or lightness to neutralize excessive tones or
restore natural colors.
✌ Best for: Reducing the red hue in faded photos and
restoring old photos
while maintaining the vibrancy of other colors.
2. Levels & Curves
These tools precisely control an image's brightness and contrast by
adjusting its tonal range. Balances the highlights, midtones, and shadows of
an image. It allows you to modify the histogram to correct faded or
washed-out areas. Enables more detailed tonal adjustments by manipulating
the image’s RGB curve. You can fine-tune specific brightness ranges for a
natural color restoration.
✌ Best for: Correct overall tonal imbalances and restore faded color
photo details.
3. Selective Color
Selective Color focuses on editing specific color channels within the photo.
You can isolate colors such as reds, greens, or blues and adjust their
composition (cyan, magenta, yellow, and black sliders). This makes it easier
to neutralize excess red or boost muted tones.
✌ Best for: Adjusting specific colors without affecting the entire
image, ideal for detailed restoration work.
4. Color Balance
Color Balance enables you to adjust the color tones in the shadows, mid
tones, and highlights. This tool enables targeted adjustments to bring
warmth or coolness back into an image. You can balance cyan and magenta for
red-faded photos to reduce the overpowering red tones.
✌ Best for: Fine-tuning overall color harmony and achieving a balanced
look.
These techniques make GIMP a robust solution for restoring faded photos, even for beginners. With a bit of practice, you can bring your old, faded memories back to life!
Part 3: How to Color Correct Red Faded Photos in GIMP
Color-correcting photos with a red fade can restore their original look and bring back lost vibrancy. GIMP is a powerful, free tool that simplifies this process. Here’s how you can restore the colors step by step:
1. Use Hue-Saturation
The Hue-Saturation tool allows you to adjust specific color ranges effectively.
✍ Steps to Use Hue-Saturation to Restore Faded Color Photo in GIMP:
-
Press “File” > “Open” to upload the red faded photo to GIMP
-
Go to the top “Colors” tab and pick “Hue-Saturation” from the draw-down menu.
Select “R” (means Red) from the “Master” section.
-
Adjust the sliders:
- Hue: Shift the reds to another color if needed.
- Saturation: Lower this to reduce the strong red tone.
- Lightness: Make reds lighter or darker.
-
Make sure the "Preview" option is checked so you can see the changes in real-time on your image.
-
Click “OK” when you’re happy with the changes.

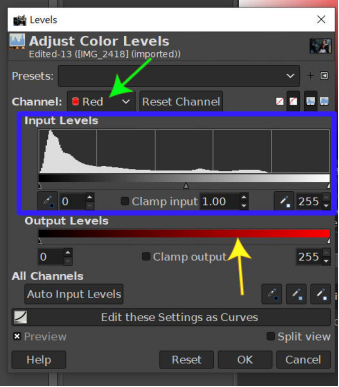
2. Adjust Levels and Curves
This method adjusts the tonal range and contrasts to fix red dominance.
✍ Steps to Use Color Levels & Curves to Change Color in GIMP:
Adjust Color Levels:
Go to “Colors” in the top menu bar and select “Levels”.
-
Under the “Channel” menu (usually set to "Value" by default), switch to “Red”.

-
Adjust the “Input Levels” sliders:
- Black Point: Move the left slider (black) to the right to increase the dark tones.
- White Point: Move the right slider (white) to the left to reduce the bright tones.
Once donw, click OK and export it.
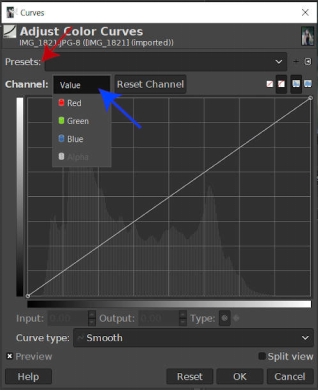
Adjust Color Curves:
Likewise, head to “Color” > “Curves”.
Select “Red” from the “Channel” section
-
Drag the point on the left slightly down to reduce excess red in the darker areas.
-
Raise the points on the right side (highlights) to enhance the red in the brighter areas.
Adjust “Green” and ‘Blue” curves for balance.
-
Click “OK” to apply.

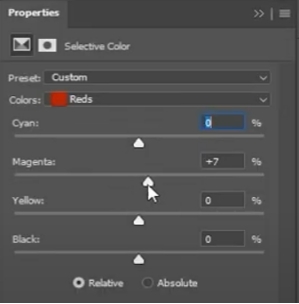
3. Use Selective Color
Selective Color lets you modify individual color components and color correcting red faded photo in GIMP.
✍ Steps to Restore Faded Color Photo in GIMP Selective Color:
-
On GIMP’s top menu bar, tap “Color” and pick “Selective Color”.
Select “Reds” from the “Color” option.
-
Adjust the sliders:
- Increase “Cyan” to reduce red tones.
- Adjust “Magenta” and “Yellow” to make colors look more natural.
-
Preview the changes and click OK.

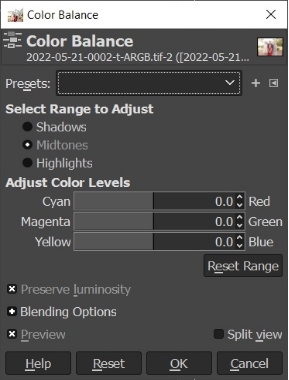
4. Use Color Balance
This tool helps balance the colors in highlights, midtones, and shadows.
✍ Steps to Recolor in GIMP Color Balance:
-
Likewise, touch on the top “Color” tab and then choose “Color Balance”.
-
Adjust for three sections:
- Shadows: Move the Cyan-Red slider to reduce red.
- Midtones: Adjust for natural tones.
- Highlights: Fix lighter areas with too much red.
-
Check the box for Preserve Luminosity to keep brightness the same.
-
Click OK to save changes.

Part 4: How to Color Correct Image Faded/B&W with AI Precisely [Alternative Ways]
While GIMP is a great tool for color correcting faded photos, it does have some limitations. For example, when using the gradient tool in GIMP, you might end up with two solid colors, and bright colors can lose detail. Additionally, GIMP’s colorization process may not always yield the most precise results, especially for black-and-white photos.
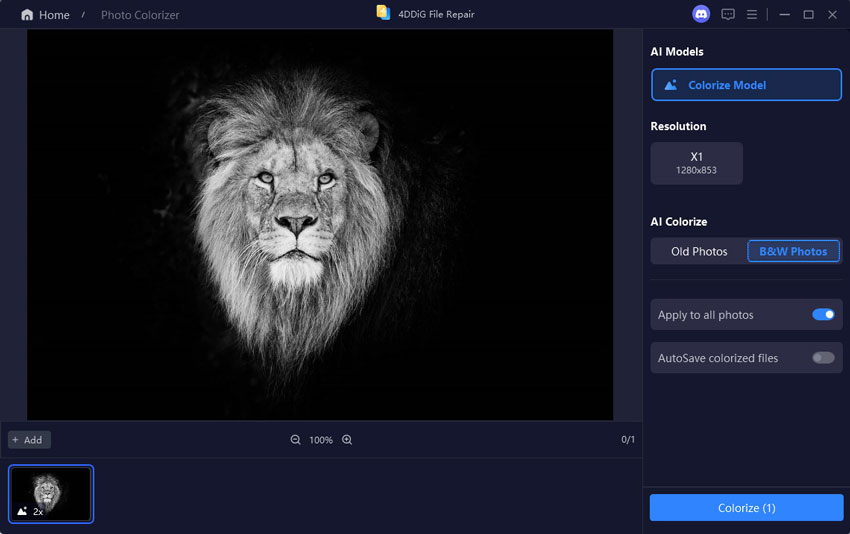
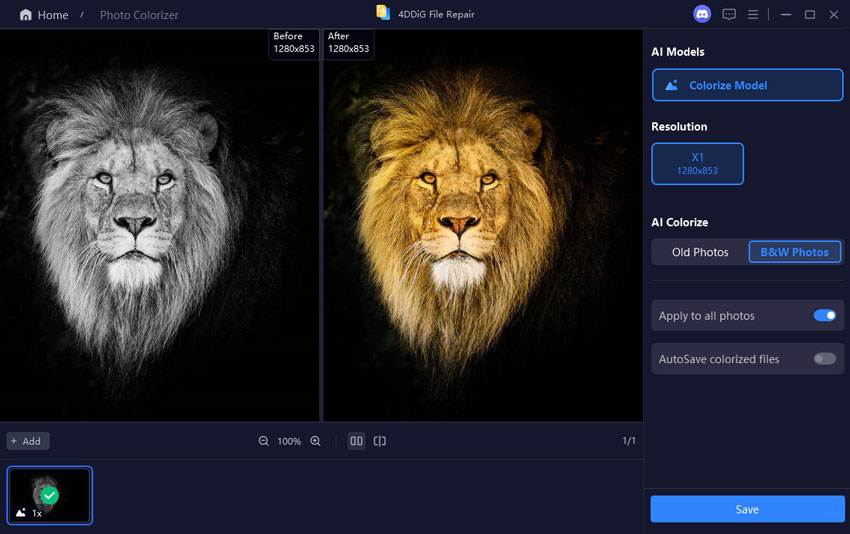
In these cases, you can use an alternative method for better results: 4DDiG AI Photo Enhancer. This powerful tool uses AI-driven technology to restore old and faded photos with exceptional precision. The Colorize Model is designed to restore vibrant colors and even colorize black-and-white photos with remarkable accuracy.
Secure Download
Secure Download
Features of 4DDiG AI Photo Enhancer
- Old and Faded Photos: Get details and color back in aged or deteriorated images.
- Colorize Black and White Photos: Turn monochrome images into life-like color with AI.
- Batch Processing: Enhance multiple images at once.
- Easy to use: For everyone.
- AI accuracy: Detects details and applies color while preserving texture.
- Multiple Formats: JPG, PNG, WEBP, and more.
Step to Use 4DDiG AI Photo Enhancer for Colorizing Images
-
Launch 4DDiG AI Photo Enhancer (also called 4DDiG File Repair) and navigate to the “AI Enhancer” tab. Here, find and click on the “Photo Enhancer” box

-
Drag and drop the noisy images into the software. Or, upload them by clicking “Add Photos”.

-
Choose the AI model designed for photo colorization, like Colorize Model, General Mode, etc. and choose resolution as “X4”. Then tap “Enhance” to let the software automatically color correct the image with AI.

-
Review the results and export the enhanced photo in your preferred format.

If you want a more simple, precise way of restoring faded or black-and-white photos, 4DDiG AI Photo Enhancer might be the right choice for you. It saves you time and effort while producing superior results.
Part 5: People Also Ask About GIMP Photo Color Grading
Q1: How Do I Remove Redness in GIMP?
Use the Hue-Saturation Tool to target the red channel and reduce its intensity. Alternatively, adjust the red curve in Colors > Curves to neutralize redness.
Q2: What Are the Best Programs for Color Correcting Images?
Besides GIMP, Adobe Photoshop and AI tools like 4DDiG AI Photo Enhancer are excellent choices for color correction.
Q3: How to Change Color in GIMP?
In GIMP, you can change colors using Hue-Saturation, Selective Color and Color Balance. These allow you to adjust the hues, saturation and balance of different colors in your image.
Q4: How to Not Color on Transparent Parts in GIMP?
Use the Alpha Channel Lock option to ensure transparent areas remain unaffected.
Conclusion
Restoring faded photos, especially those with a red hue, requires patience and the right tools. GIMP offers powerful features for color correcting red faded photos in GIMP, but mastering them takes time.
For a quicker and more efficient solution, consider 4DDiG AI Photo Enhancer. Its advanced AI algorithms ensure precision and professional-grade results, making photo restoration effortless. It’s an excellent option for anyone who wants a fast, professional solution to photo color grading.
Secure Download
Secure Download
💡 Summarize with AI:
You May Also Like
- Home >>
- Photo Tips >>
- A Step-by-Step Guide to Color Correcting Red Faded Photos in GIMP



 ChatGPT
 Perplexity
 Google AI Mode
 Grok
Grok


