How to Use Rufus to Create Bootable USB, Install Windows, Format & More
Whether you are planning to install a new OS or fix a non-booting PC, you must have heard about Rufus. How to use Rufus to accomplish it? You must know how to build a bootable USB device, format volumes, and even bypass Windows 11 hardware checks, and it is proof of the power in the utility despite its light weight. This tutorial is designed to help you understand how to make good use of Rufus and reveal an alternative you can use instead when it falls short.
Part 1. What Is Rufus Used For?
Rufus is a free and open-source utility that aids users in bootable media creation, formatting USB disks, and designating USB flash disks. It is portable, lightweight, and runs on Windows. It is also very flexible and fast. Therefore, Rufus enjoys popularity, particularly among IT professionals and advanced users.
Key Usages of Rufus:
Here are the key things you may do with Rufus:
- Make a bootable USB with Rufus as it supports Windows, Linux, or rescue utilities.
- Make Windows 11 USB installation media with Rufus.
- Using Rufus to install Windows 11 on unsupported hardware and bypass TPM secure boot.
- Make bootable media for BIOS/UEFI systems.
- Format USB and eliminate errors.
- Write, burn, or make ISO.
- Run personalized operating systems.
Rufus can handle most of the jobs of system administrators as well as regular users in the installation of OS.
Rufus Software Download:
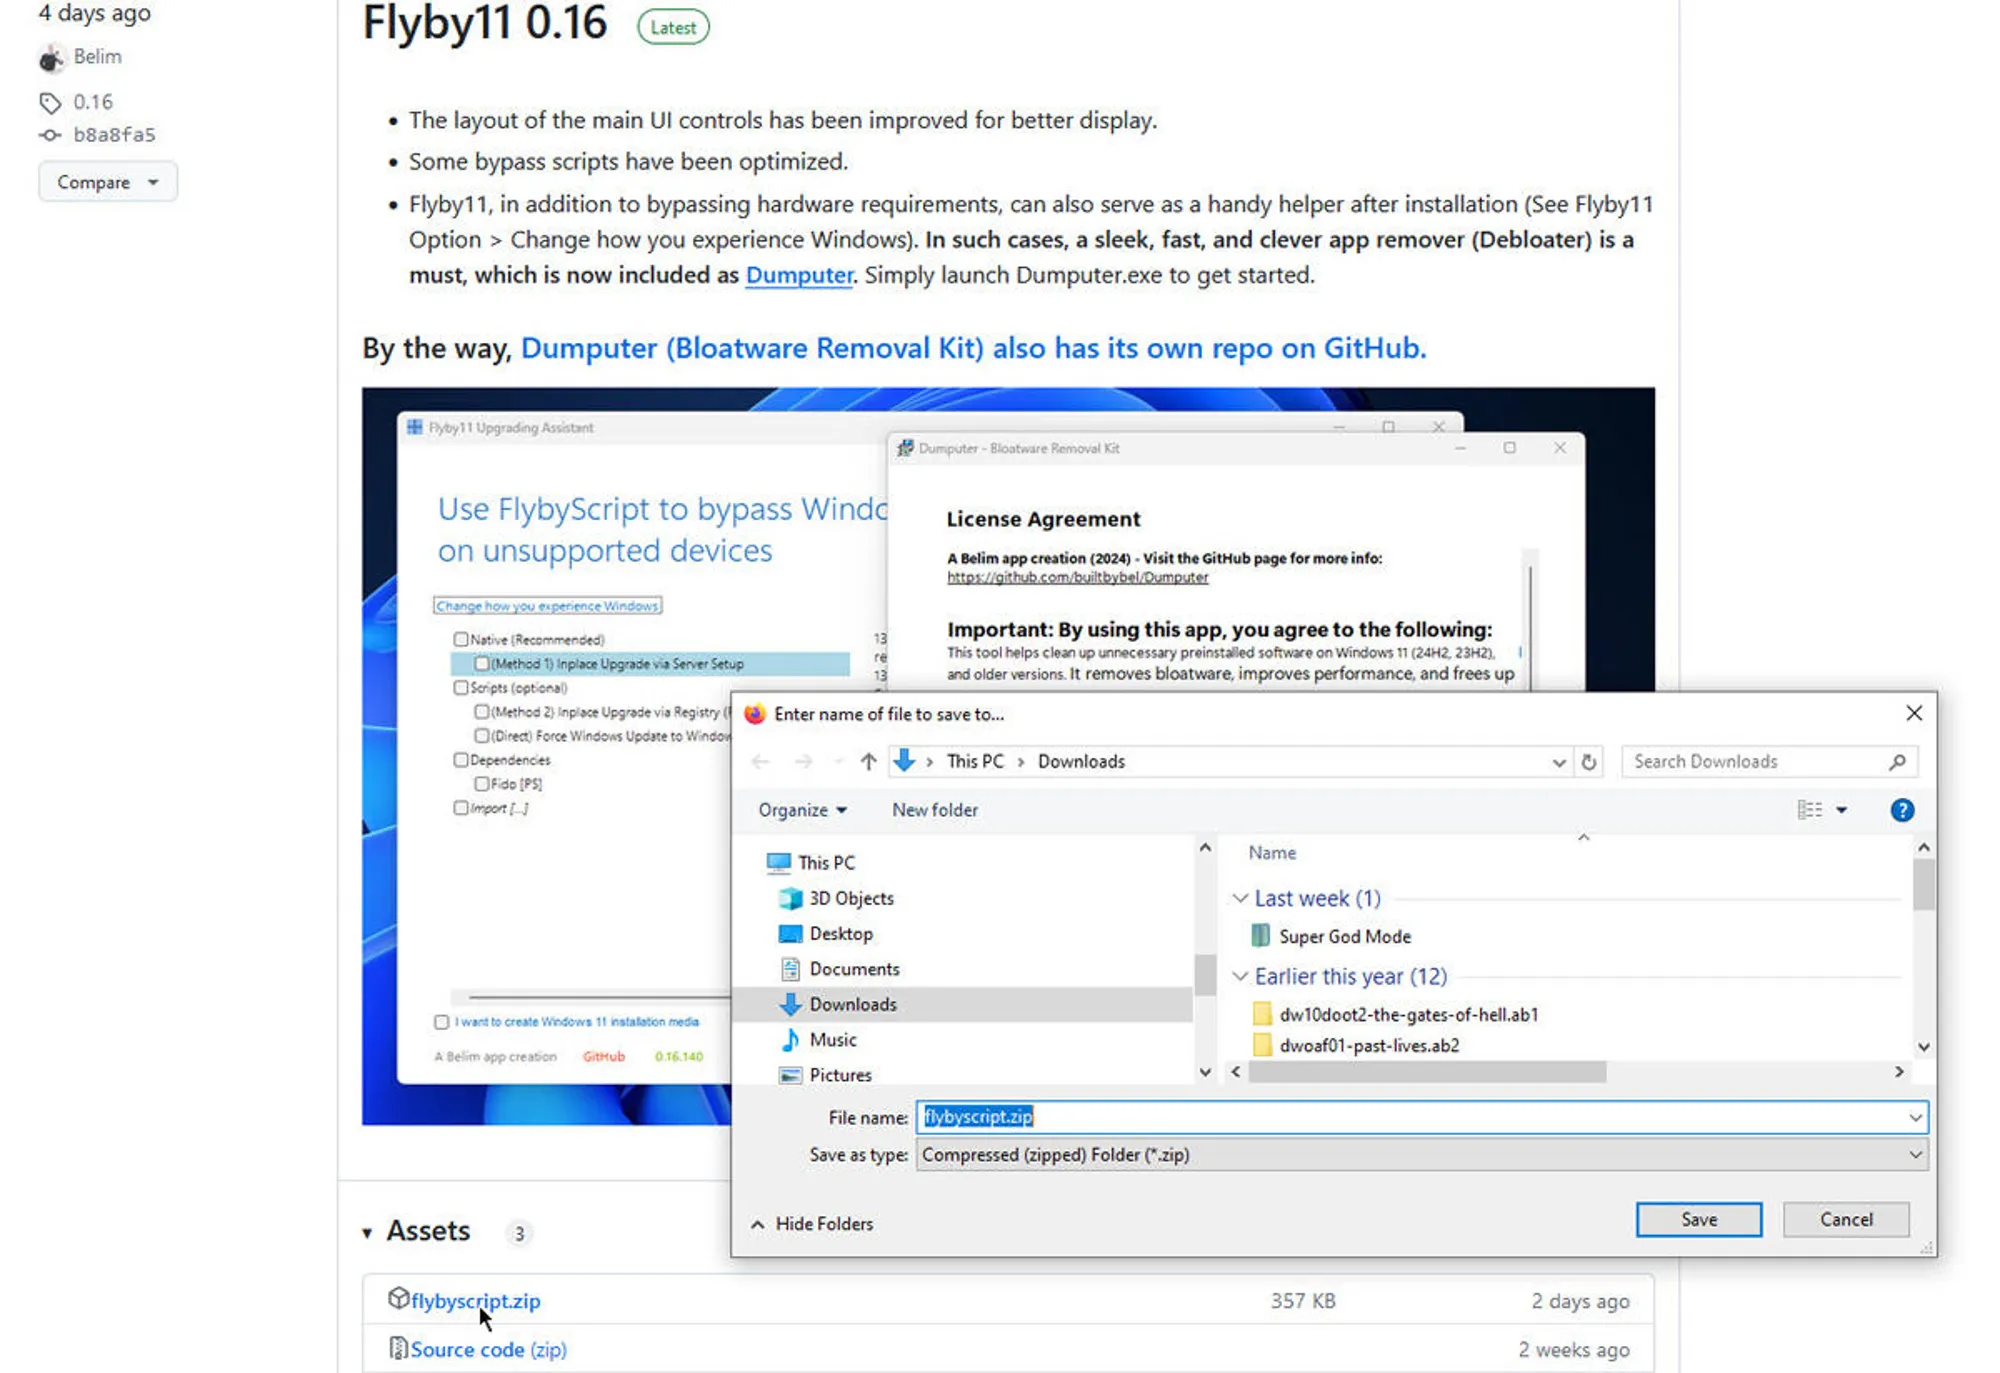
The safest option to download Rufus is from the official website. With the following steps:
Go to the official Rufus website.
Scroll down to the latest version under "Download."
-
Double-click the .exe file to run it.

Part 2. How to Use Rufus Software | Step-by-Step Guide
Rufus gives you the flexibility of doing what you need. Whether you want to make a bootable USB, you need to install Windows on unsupported hardware, or you simply want to format a USB storage device, they have the right tools to fit any need and skill level.
Usage 1. How to Create a Bootable USB Using Rufus
One of the most frequent usages of Rufus is to create a bootable USB. With this tool, you can convert ISO into a portable system installer, setting up Windows, Linux, or rescue systems on any PC with a flash drive.
Here is how to use Rufus to create Windows 11 USB.
-
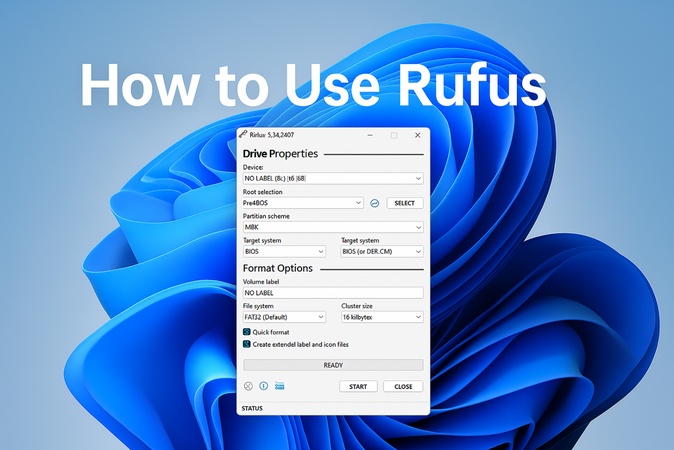
Plug in your USB drive (16GB+) and run Rufus as administrator, letting it detect your USB drive.
-
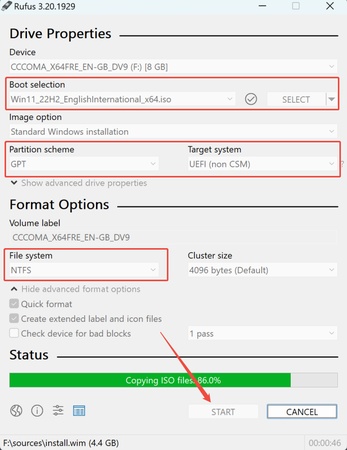
Use Rufus to create a bootable USB: Under "Device", select your USB.
-
Under the "Boot selection" tab, click "SELECT" and choose an ISO file, such as Win11 24H2 ISO file.
-
Choose the desired partition scheme: Set the partition scheme to "GPT" for UEFI systems or "MBR" for legacy BIOS, and choose the file system as "FAT32" or "NTFS".
-
Click “Start,” and Rufus will format the USB and copy the ISO contents. Once done, safely eject the USB.

If you encounter Rufus ISO Image Extraction Failure during this process, here is the fix: How to Fix Rufus ISO Image Extraction Failure on Windows 11/10?
Usage 2. How to Use Rufus to Install Windows 11/10
One can prepare a USB installer with Rufus, which otherwise passes Windows 11 TPM and Secure Boot checks. This can be very suitable where the users know how to bypass Windows 11 requirements using Rufus. Also, when they require installing Windows in older systems or unsupported systems, it increases compatibility to the extent that the installation is not allowed by Microsoft.
Below are the steps to install and download Windows 11 using Rufus:
-
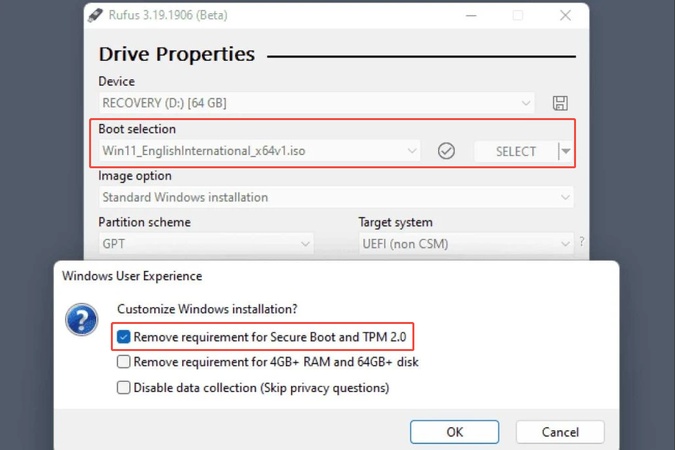
Insert a 16GB+ USB drive to your computer and select your ISO file from “Boot selection” on Rufus.
-
In customization dialog, check the box saying “Remove requirement for Secure Boot and TPM 2.0".
-
Click OK to save the selection and tap “Start”.

-
Once done, insert the USB again. Restart your PC, enter the BIOS/UEFI settings (usually by pressing F2, Del, or Esc)
-
Set the USB as the first boot device. Save changes and reboot. Your PC should boot from the USB.
Usage 3. How to Use Rufus to Format USB
If you are thinking, can I use Rufus to format USB, the answer is Yes. Besides building bootable drives Rufus is also able to format USB flash drives to various file systems.
This option can be useful for clearing data, repairing damaged storage, or getting the drive ready to be used in a particular scenario, including data transfer or boot disk.
Here is how to use Rufus to clear USB:
-
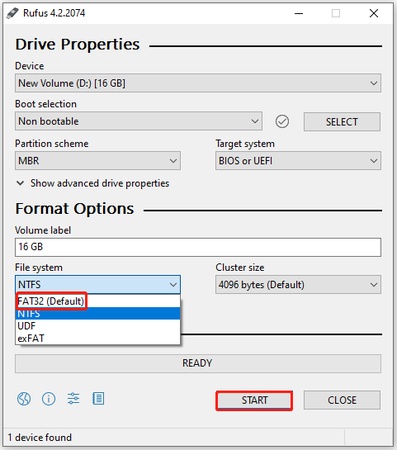
Launch Rufus in administrator and select your USB from the Device tab.
-
Leave the "Boot selection" set to "Non bootable" since you're only formatting, not creating a bootable drive.
-
Choose your preferred file systemand enter a volume label to identify your formatted drive.
-
Upon choice, click "START" to begin the formatting process.

Part 3. Best Alternative to Rufus When Rufus Errors Occur
Rufus is basically a popular software to help in the creation of bootable USB, yet it has its weaknesses too. Quite a few users face frequent challenges that may stall the process and bring unwanted frustrations even when they know how to use Rufus, such as the following items:
Common Rufus Errors and Causes
- Rufus not detecting USB: Rufus can struggle to identify the USB drives sometimes because the format does not match, or there is a hardware compatibility issue.
- Rufus ISO image extraction failure: Normally caused by the ISO file corruption, insufficient USB space, or antivirus software interferes.
- Rufus cannot install Windows 11 on older incompatible PCs: Older PCs lacking TPM 2.0 or Secure Boot support may fail installation, as Rufus’s bypass options sometimes don’t fully resolve these hardware restrictions.
These restrictions prove the existence of a more effective and comprehensive tool, which is the 4DDiG Partition Manager, the most suitable replacement for Rufus. It not only supports all Windows versions, but it also does not need a lot of manual work because it auto-bypasses hardware checks in Windows 11. So, even on unsupported devices, it can also be installed easily. Moreover, it provides such sophisticated capabilities as disk duplication, OS upgrading, drive formatting, and testing, as well as a very user-friendly graphical interface.
Secure Download
Hence making it an all-in-one piece that is both more useful and simpler to use than Rufus.
Steps to install Windows 11 on unsupported hardware using 4DDiG Partition Manager
If you were unsuccessful with using Rufus to install Windows 11, here is how you can easily achieve that with 4DDiG:
-
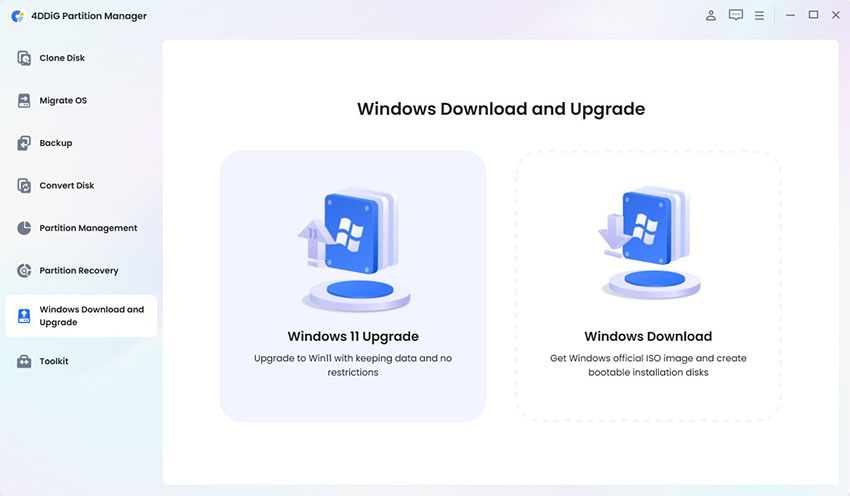
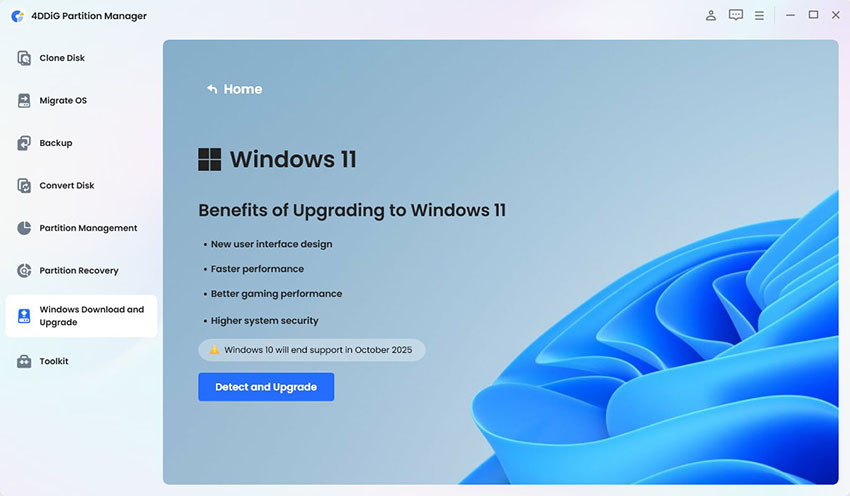
Start the 4DDiG Partition Manager software, and choose the "Windows Download and Upgrade" option. Here, you will click the "Windows 11 Upgrade" option.

-
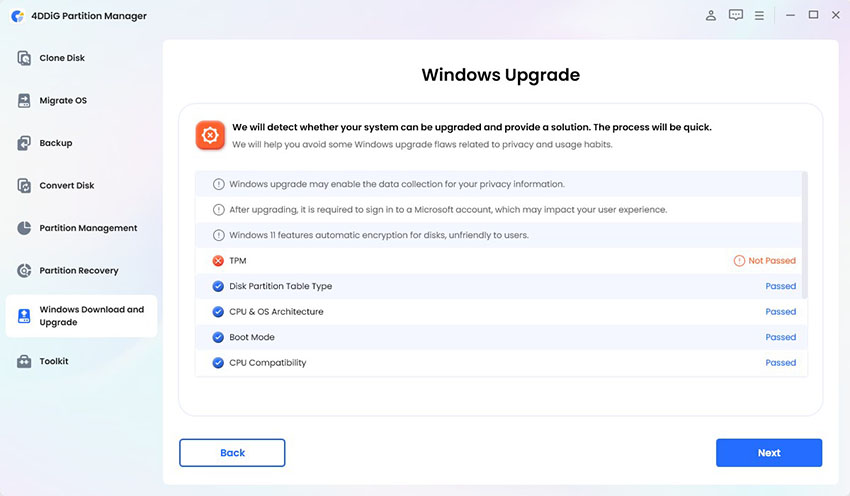
Now, click "Detect and Upgrade" to start verifying your computer’s specification.

-
Once done, you can see which requirements are not met by your PC and click "Next" to bypass them effortlessly.

-
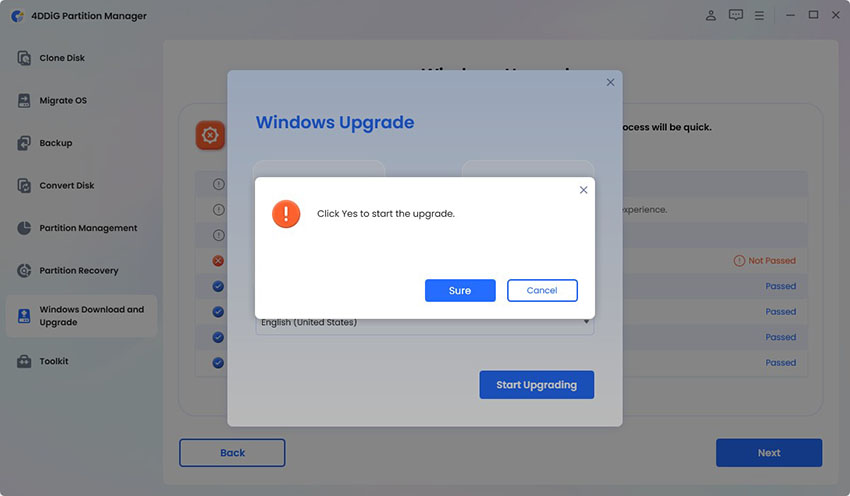
Choose "Windows 11" and the desired language, then click "Start Upgrading" > "Sure".

-
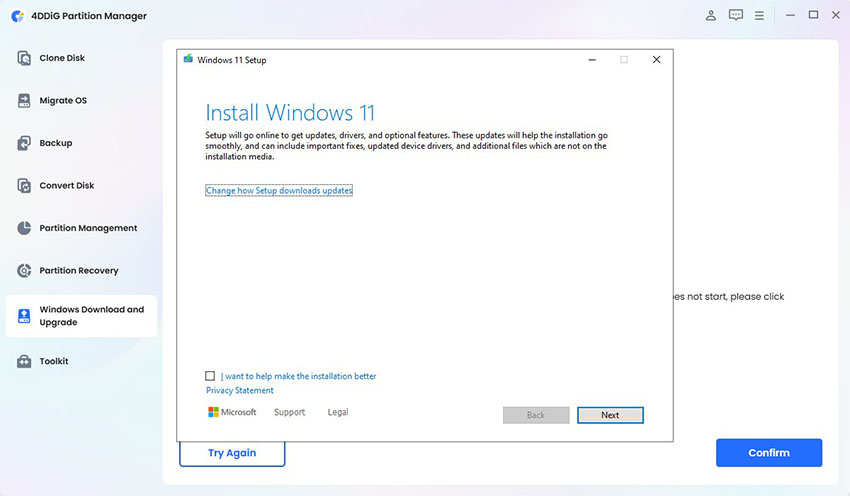
Now, simply follow the on-screen steps for installing Windows 11 like normal.

Part 4. People Also Ask about Using Rufus
Q1: Is Rufus safe?
Yes, it is a legitimate tool, harmless to use in case of downloading it on an official site.
Q2: Will booting via a Rufus iso start Windows 10
Yes. By making a bootable USB stick with a Windows 10 ISO using Rufus, when you boot your computer, you will launch Windows 10 setup.
Q3: Does Rufus work on Linux or Mac?
No. Rufus is a strictly Windows thing. When using Linux or macOS, you must look for alternative options.
Q4: Does Rufus work with an SD card?
Rufus can indeed support SD cards, what you want, is that the card is recognized as a standard storage device.
Conclusion
Rufus is a flexible and fast tool perfect for users who need to create bootable USBs, format drives, or install Windows. We’ve walked through how to use Rufus for each task, including creating a bootable USB, bypassing Windows 11 restrictions, and formatting flash drives.
However, when errors occur, especially on unsupported PCs, 4DDiG Partition Manager stands out as a powerful, all-in-one alternative. It lets you install Windows 11 without TPM or Secure Boot checks and offers robust disk management features.
Secure Download
💡 Summarize with AI:
You May Also Like
- Home >>
- Windows Fix >>
- How to Use Rufus to Create Bootable USB, Install Windows, Format & More
 ChatGPT
 Perplexity
 Google AI Mode
 Grok
Grok

