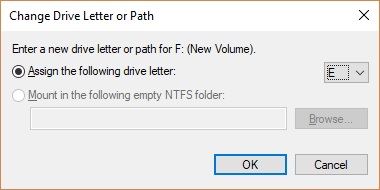
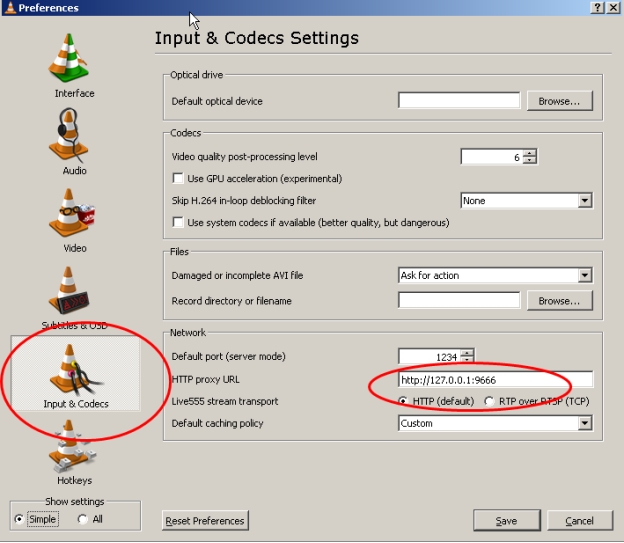
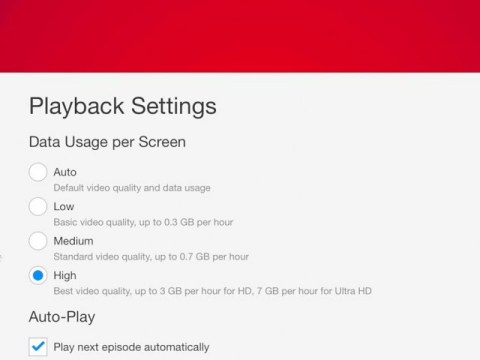
How to Change Dynamic to Basic Disk on Windows?

5 mins read

Updated on 2026-03-10 16:04:20 to Windows Fix

If you're now looking to simplify your setup and wondering how to change dynamic to basic disk, you've come to the right place. In this guide, we'll walk you through everything you need to know — from understanding the difference between disk types, to safely converting your disk step-by-step using built-in Windows tools.

1. What is a Dynamic Disk & Basic Disk?

What are dynamic disks? Dynamic Disk is an advanced disk type introduced by Microsoft that supports volumes spanning multiple physical disks. It enable features like spanned volumes, striped volumes (RAID-0), mirrored volumes (RAID-1), and RAID-5. These are especially useful in enterprise or server environments where performance, redundancy, or large storage pools are need

Basic Disk is the standard disk type used by most Windows systems. It organizes storage using traditional partition, either MBR or GPT. Basic disks support primary partitions, extended partitions, and logical drives. They are simpler to manage, widely compatible, and are the default format for most computers out of the box.

Dynamic Disk vs Basic Disk

Feature Basic Disk Dynamic Disk
Partition type Primary / Extended / Logical Volumes
Can extend volume No (without deleting) Yes, even across disks
RAID support No Yes (striped, mirrored, RAID-5)
OS compatibility Almost all OS Only Windows (Vista/7/8/10/11 Pro/Enterprise)

2. What Does Convert to Dynamic Disk Mean?

When Windows asks if you want to convert to dynamic disk, it means you're about to change the disk's storage management model from the traditional partition-based system to a more flexible, volume-based system managed by Windows' Logical Disk Manager (LDM).

Here's what actually happens during the conversion:

  • Partition table is replaced: The MBR/GPT partition structure is replaced by a private region database that Windows uses to track volume information.
  • Existing data is preserved: Converting from basic to dynamic does not erase your data — your files remain intact.
  • Advanced volume features unlock: Once converted, you can create spanned, striped, or mirrored volumes across disks.
  • OS compatibility narrows: The disk becomes less portable. Other operating systems (like Linux or macOS) may not recognize dynamic disk volumes.

⚡ 3. How to Change Dynamic to Basic Disk?

Now let's get to the core of this guide: how to change dynamic to basic disk safely and effectively. Before you begin, you'll need to do some preparation to avoid data loss.

🔥Preparation: Prevent Losing Important Files before Converting Disks

Both Disk Management and CMD require you to delete all volumes on the dynamic disk before converting, which means data loss if you're not careful. You can use Windows Backup to create a safe copy of your files.

  • Once you have downloaded and installed 4DDiG Windows Backup, launch it and choose "Create a backup task" to get started.

    FREE DOWNLOAD

    Secure Download

    create backup task
  • Choose the disk or partitions you wish to back up, then click the file icon at the bottom to specify the destination where the backup will be saved.

    select disk to back up
  • Then, hit "Start Backup" and confirm by clicking "Confirm" in the pop-up window to begin the process.

    confirm backup disk
  • The duration will vary depending on your data size and the read/write speed of your disk. Now, your disk has been backed up successfully!

    backup disk successfully

Now that your data is safely backed up, it's time to convert your dynamic disk to basic. Let's walk through the methods below.

Method 1: Convert Dynamic Disk to Basic via Disk Management

Windows' built-in Disk Management tool can convert dynamic disk to basic, but it requires you to delete all volumes first.

  • Press Windows + X and select Disk Management from the menu. In the Disk Management window, locate your dynamic disk.

  • Right-click on each volume on the dynamic disk and select Delete Volume. Repeat this for every volume on the disk.

    delete disk volume
  • Once all volumes are deleted, right-click on the disk label on the left (e.g., "Disk 1") and select Convert to Basic Disk.

    convert dynamic disk to basic
  • The disk will now show as Basic. You can then create new partitions and restore your backed-up data.

Note:

The "Convert to Basic Disk" option will be grayed out if there are still volumes on the disk.

Method 2: Convert Dynamic Disk to Basic via CMD

If you prefer a command-line approach, you can use Command Prompt to change disk in CMD. Again, all volumes must be deleted before the conversion can proceed.

  • Press Windows + S, type cmd, right-click Command Prompt, and select Run as administrator.

  • Type diskpart and press Enter. Next, type list disk and press Enter. Note the number of your dynamic disk (e.g., Disk 1).

  • Type select disk 1 (replace 1 with your disk number) and press Enter.

  • Type detail disk to see all volumes on the disk.

  • For each volume, type select volume [number] then delete volume until all volumes are removed.

    run command to delete volume
  • Once all volumes are deleted, type convert basic and press Enter. Diskpart will confirm the conversion.

    run command to covert disk
  • Type exit to close diskpart.

Your disk has now been successfully converted. You can verify by opening Disk Management, the disk should now show as Basic.

More FAQs about Dynamic to Basic Disk Conversion

Q1. Can I convert a dynamic disk to basic?

Yes, you can convert dynamic disk to basic using Windows Disk Management, the diskpart command in CMD. The key caveat is that you must delete all existing volumes first, which erases data.

Q2. What are the disadvantages of dynamic disk?

While dynamic disks offer advanced features, they come with notable drawbacks, such as imited OS compatibility, Complex management, and not supported on removable media.

Q3. Will I lose my data if I convert to a dynamic disk?

No, converting from a basic disk to dynamic does not cause data loss. Windows preserves all existing files during this process. However, reverting a dynamic disk to basic disk using Disk Management or CMD does require deleting all volumes.

Q4. How to check if a disk is dynamic?

The easiest way is through Disk Management. In the lower panel, each disk shows its type next to the disk number. Alternatively, you can use diskpart: open CMD as administrator, type diskpart, then list disk. Disks marked with an asterisk in the "Dyn" column are dynamic disks.

Q5. How to create a basic disk?

New disks are basic by default in Windows. When you attach a new hard drive or SSD, Windows initializes it as a basic disk. If you need to create one from scratch, simply initialize a new disk via Disk Management and choose MBR or GPT. It will automatically be set up as a basic disk.

Conclusion

Understanding how to change dynamic to basic disk is an important skill for any Windows user who wants full control over their storage setup. Make sure to back up your data first, as built-in tools require you to delete all volumes before converting. If you want to change dynamic disk to basic without losing data, 4DDiG Windows Backup is a good tool for you.

FREE DOWNLOAD

Secure Download

William Bollson (senior editor)

William Bollson, the editor-in-chief of 4DDiG, devotes to providing the best solutions for Windows and Mac related issues, including data recovery, repair, error fixes.

(Click to rate this post)

You rated 4.5 ( participated)