[Complete Guide] How to Disable BitLocker on Windows 10/11?
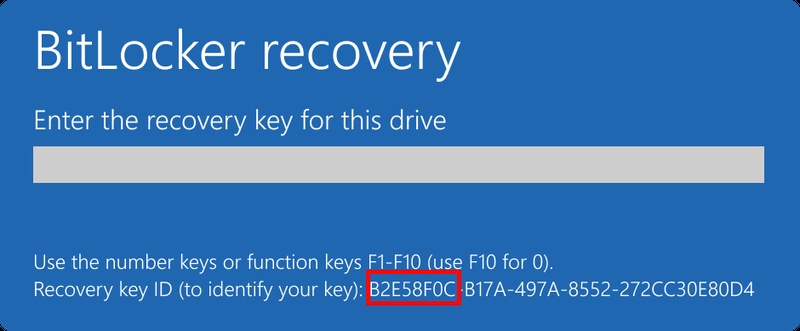
Are you struggling with how to disable BitLocker on your Windows computer? Whether your system keeps prompting you for a recovery key or you simply want to remove BitLocker encryption, knowing how to turn it off properly is essential.
BitLocker protects your information by encrypting your hard drive. Still, there are situations where you may need to turn it off, such as when reinstalling Windows, facing boot issues, or simply because you no longer need drive encryption. Let’s follow step-by-step instructions to disable BitLocker on Windows 10/11 safely.
Things to Consider Before Disabling BitLocker
Before you learn how to disable BitLocker, it’s essential to understand what happens afterwards. Your files and programs will remain fully accessible, but once the decryption process is complete, BitLocker will no longer protect your drive.
These are some key points to be taken into consideration:
- Decryption of larger drives is a long process, and it should be continuous.
- In case you are on a laptop, you should use a charger when decrypting.
- Back up essential files whenever possible, particularly before altering the BIOS, reinstalling Windows, or formatting the drive.
- Check whether your organization manages BitLocker, as work or school laptops may require permission to turn off encryption.
Always save your BitLocker recovery key before starting any process. Although you may not intend to disable BitLocker immediately, it is good to have this key on hand in case of a disaster, such as a system failure or a lockout that occurs without prior notice.
Once the key is saved, you can use several methods to disable BitLocker; choose the one that suits your needs.
How to Disable BitLocker on Windows 10/11?
If you’re wondering how to disable BitLocker on Windows 10 on most laptops and desktops, including HP, Lenovo, Asus, Dell, and Acer, follow these methods to turn off BitLocker while keeping your data protected.
Method 1: Disable BitLocker via Control Panel
This is the most straightforward and accessible method, especially if you are asking how to disable BitLocker or turn off BitLocker drive encryption without using complicated software.
-
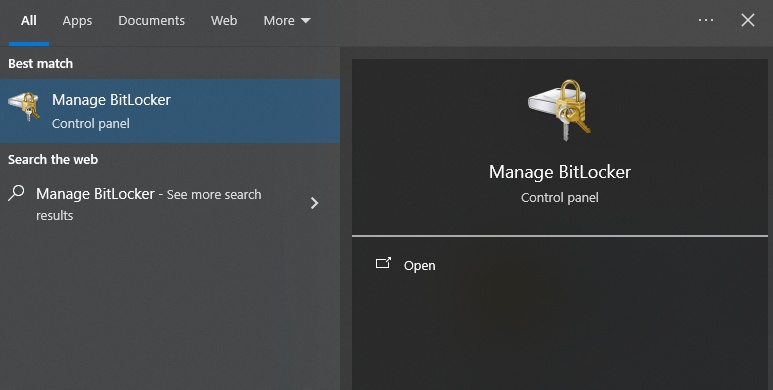
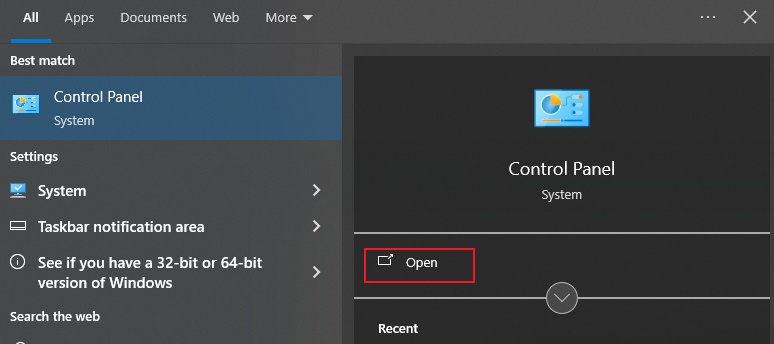
Press “Win + S” to open the search bar, type “Control Panel”, and hit “Enter”.

-
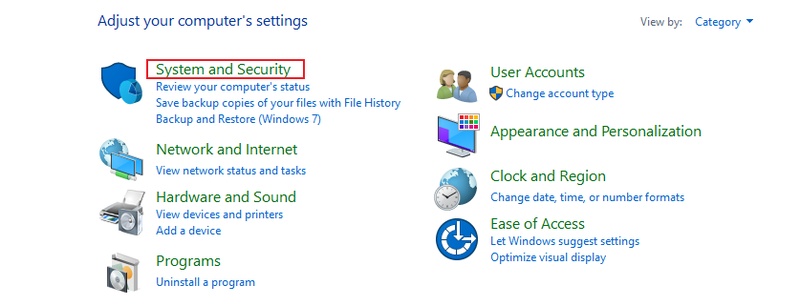
Go to “System and Security.”

-
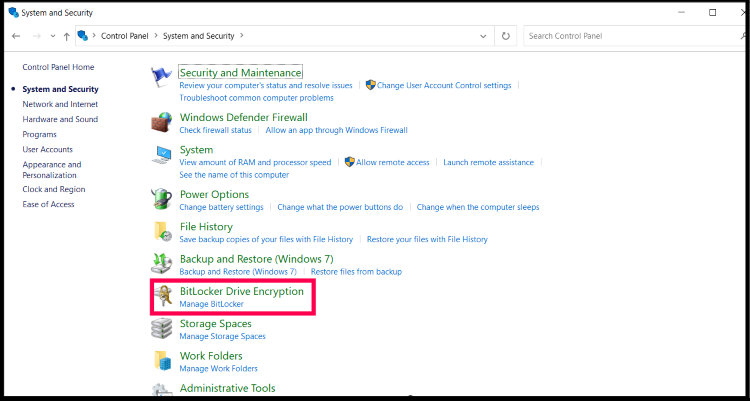
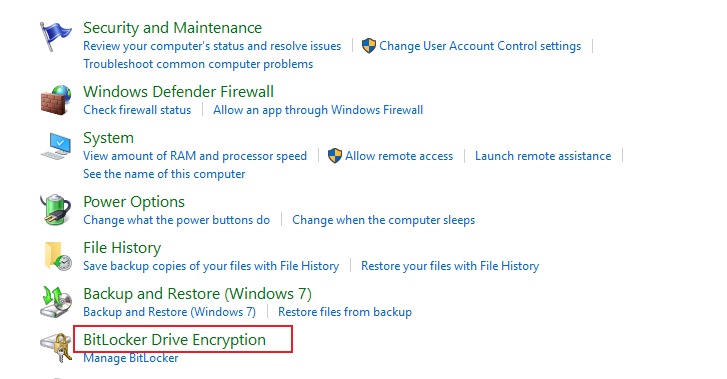
Select “BitLocker Drive Encryption.”

-
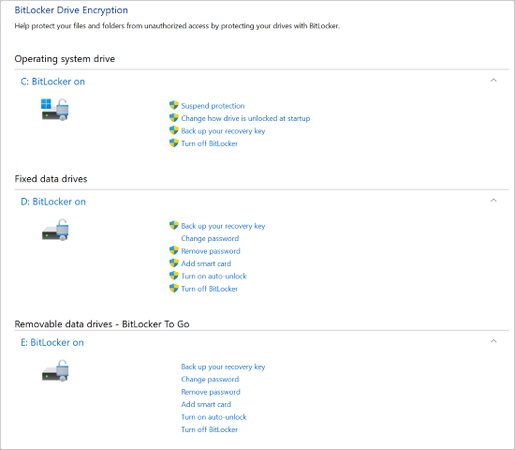
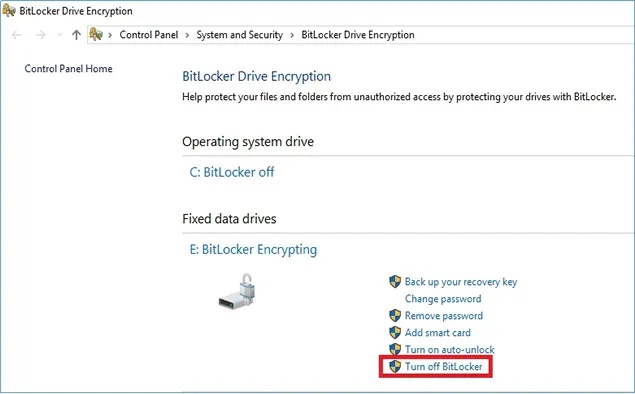
Find the drive that is encrypted with BitLocker, click on “Turn off BitLocker” next to the drive.

Confirm your choice and allow Windows to decrypt the drive.
You don’t need to do anything else. Just keep using your computer, typically while the decryption process completes in the background. A progress bar will show how far along it is.
Method 2: Disable BitLocker via Local Group Policy Editor
If BitLocker keeps turning itself back on after restarts or updates, you must try this method. This approach lets you permanently prevent BitLocker from automatically re-enabling on your device.
But please note that Local Group Policy Editor is not available in Windows Home Edition.
-
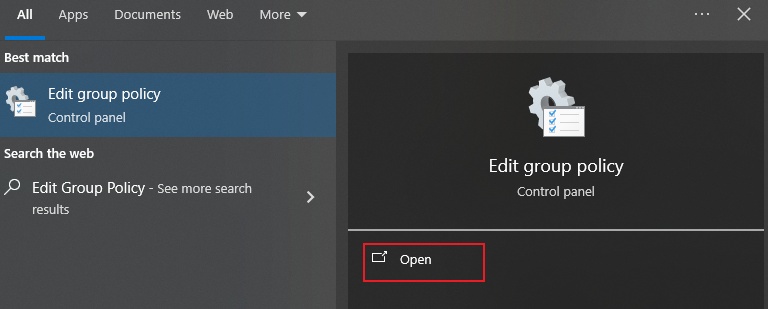
Open your Start Menu and search for “Edit Group Policy”.

-
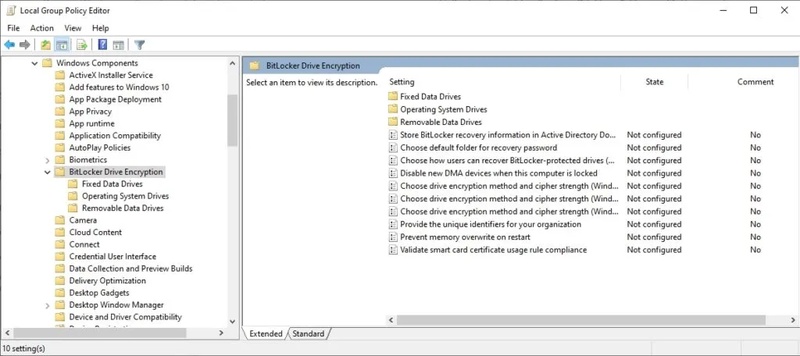
Navigate through the security policies until you find the settings related to BitLocker encryption and startup authentication.

-
Adjust the preferences to enable Windows to boot without requiring BitLocker authentication.
Implement the changes and reboot your computer.
This approach prevents Windows from automatically re-enabling BitLocker in the future.
Method 3: Disable BitLocker Using Command Prompt
If the Control Panel isn’t responding or the usual options are greyed out, you can turn off BitLocker command prompt style. You don’t need to memorize complex commands, just follow these steps to disable BitLocker with command prompt:
-
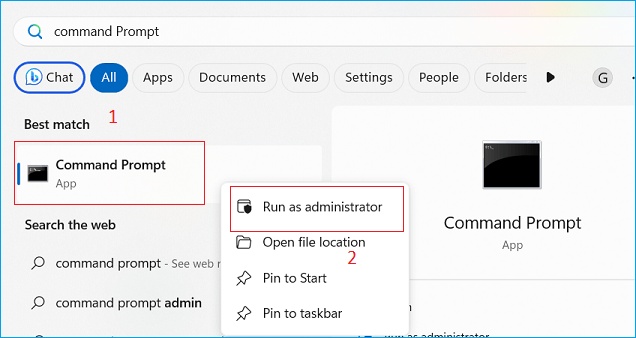
Open the Start menu, search for “Command Prompt”, and run it as Administrator.

-
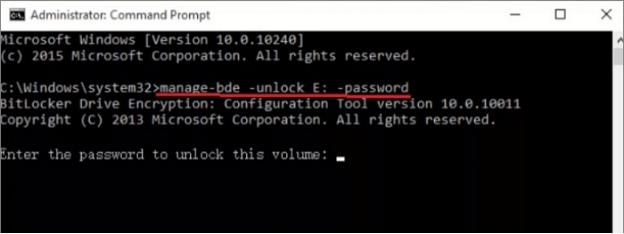
Enter the following command into the Command Prompt: manage-bde -unlock E: -password (Make sure to replace E: with the drive letter of your BitLocker encrypted drive).

-
Enter your BitLocker password when prompted and press "Enter". If the password is correct, your drive will be unlocked.
-
Wait until the process completes. Decryption time depends on drive size and system speed.
If your drive is encrypted by BitLocker and you can’t unlock it with recovery key, you can try 4DDiG to one-click unlock BitLocker and recover all the data at any time.
Method 4: Disable BitLocker in BIOS
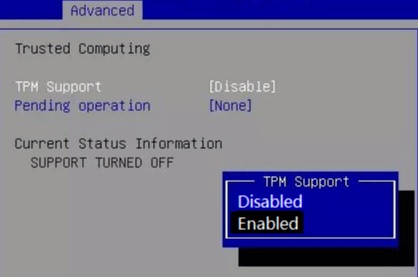
BitLocker may sometimes be activated by the Trusted Platform Module (TPM) in the BIOS. This is common following hardware changes. Accessing the BIOS settings lets you turn off TPM-based BitLocker activation and regain full control over your drive encryption.
Here is how to disable BitLocker in bios:
-
Reboot your computer. As soon as it starts booting, repeatedly press the BIOS/UEFI key — usually F2, Del, Esc, or F10 (the key varies by brand).
-
Once inside the BIOS/UEFI setup, go to the “Security, Advanced, or Boot” tab.
-
Find TPM, Trusted Platform Module, or Security Device Support and set it to “Disabled”.

-
Locate Secure Boot under the Boot tab (or similar section) and set it to “Disabled” as well.
-
Press F10 (or follow the on-screen instructions) to “Save Changes” .
The computer will restart with TPM and Secure Boot disabled.
It is essential to remember that disabling TPM may require you to use your recovery key later.
Method 5: Disable BitLocker through Windows PowerShell mode
If you want to manage multiple drives or external storage, you can disable BitLocker using PowerShell. This approach is similar to the Command Prompt method but allows more flexibility.
Press “Windows + X” and select “Windows PowerShell”.
-
Type the following command to check the BitLocker status of all drives: “Get-BitLockerVolume.”
-
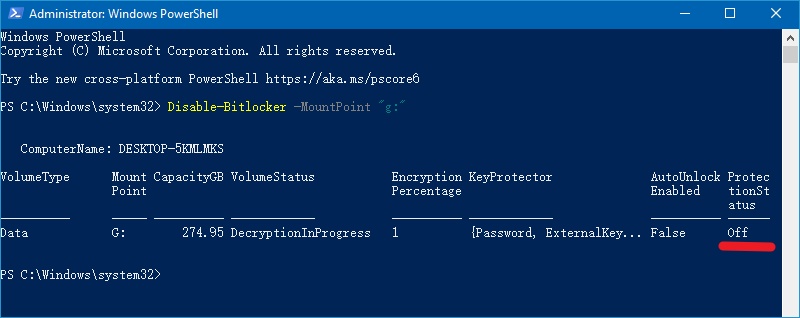
Identify the drive you want to decrypt, then type the following command to disable BitLocker on that drive: Disable-BitLocker -MountPoint "C:".

Wait until the decryption process completes.
This method works on Windows 10 and Windows 11, especially on systems that have multiple drives or external encrypted storage devices. So, if you're looking to learn how to disable BitLocker on Windows 10/11, try this one!
Method 6: Disable BitLocker from the Background Task Window
Sometimes BitLocker is already decrypting or waiting to resume the process. You can open the BitLocker management window to check the status. From there, you can pause, resume, or turn off BitLocker as needed to complete the decryption safely.
If the decryption process is paused:
- Resume it manually to allow the drive to continue decrypting.
- Avoid shutting down your PC until it completes.
This is useful when you notice your system slowing down or when decryption stops after a restart.
Method 7: Disable BitLocker by Formatting the Encrypted BitLocker Drive
If other methods fail or you want to remove BitLocker from a drive permanently, formatting the BitLocker drive is an effective solution. Keep in mind that formatting will erase all data on the drive, so back up your important files first.
This method ensures that BitLocker encryption is entirely removed, returning the drive to its original unencrypted state.
Steps to disable BitLocker by formatting:
-
Copy all essential files from the BitLocker-encrypted drive to another secure location.
-
Press “Win + E” and locate the BitLocker-encrypted drive you want to format.
-
Right-click the drive, then select “Format” from the context menu.
-
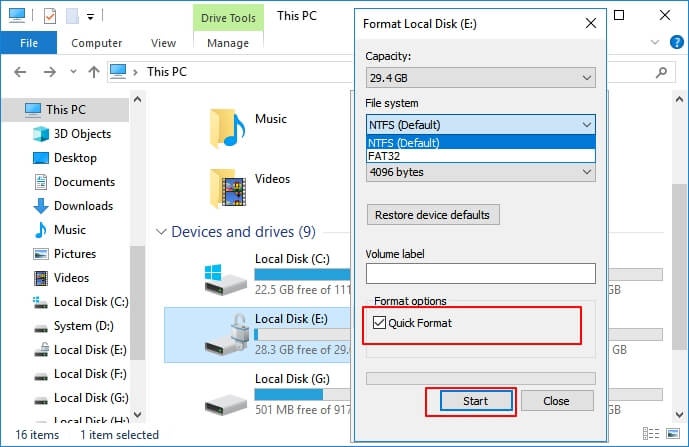
In the Format window, select the desired file system (e.g., NTFS) and allocation unit size. Ensure Quick Format is checked for faster processing.

-
Click “Start”, then confirm when prompted. The process will erase all data and remove BitLocker encryption.
-
Once formatting is finished, your drive is decrypted and ready for use.
How to Recover Data When a BitLocker Drive is Formatted?
If you formatted an encrypted drive or lost access during decryption, worry not; the data can still be recovered with the right tool. This is where 4DDiG Windows Data Recovery comes into play.
When BitLocker encryption is interrupted, Windows may block access to the file system, but the underlying data may remain. 4DDiG scans deep into disk memory to recover lost folders, documents, photos, videos, system files, and more, even when the drive appears empty or inaccessible.
Whether you formatted your drive by mistake or experienced an unexpected system crash, 4DDiG helps you bring back what matters most with just a few clicks.
Secure Download
Secure Download
How to use 4DDiG Windows Data Recovery to recover lost data:
-
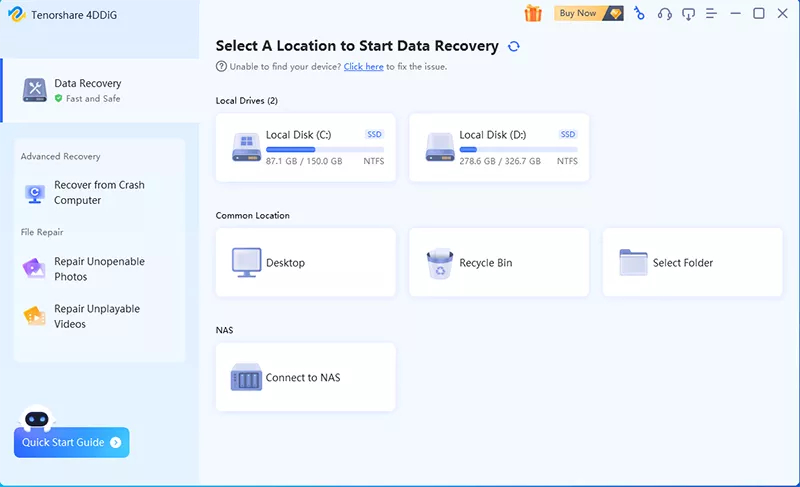
Download and install 4DDiG on your computer. Launch the program and select the drive where you want to recover data from.

-
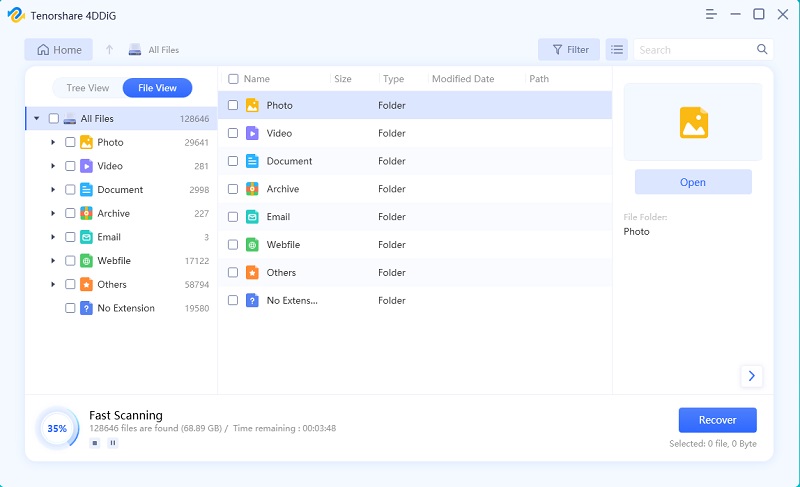
4DDiG will automatically scan the drive to identify all recoverable files. You can pause or stop the scan at any time if you spot the files you need.

-
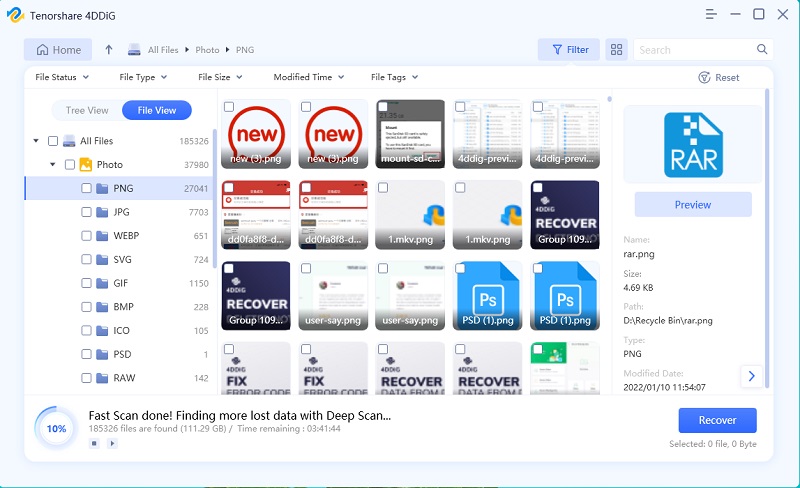
When the scanning process is complete, you can have a quick preview. Next, select the files you want to recover, then click "Recover".

-
Finally, choose a safe location to save them, preferably on a different drive to avoid overwriting any remaining data.

Temporarily Suspend BitLocker vs Disable BitLocker
Before finishing, it’s essential to understand the difference between suspending and disabling:
- Suspending BitLocker keeps encryption but temporarily lifts protection. This is helpful during BIOS updates, hardware changes, or troubleshooting. The drive remains encrypted.
- Disabling BitLocker obliterates encryption. The drive is fully decrypted, and BitLocker will no longer protect data.
If your goal is short-term convenience, suspension is enough. If you want to remove encryption, permanently disabling it is the correct action.
The Bottom Line
Knowing how to disable BitLocker gives you complete control over your device. Whatever the method you choose, the key is to move step by step and let the system finish the decryption process.
If the process gets interrupted and your files suddenly disappear, stay calm. There is still a way to retrieve them before anything is overwritten. Tenorshare 4DDiG can perform an in-depth scan of your drive and restore the files that matter most with precision and ease.
Secure Download
Secure Download
FAQs About Disabling BitLocker
Q1: Can I disable BitLocker drive encryption service?
Yes, you can. If you are wondering how to disable the BitLocker Drive Encryption service, here’s a simple method:
- Press Win + R on your keyboard.
- Type services.msc and press Enter.
- Look for BitLocker Drive Encryption Service.
- Right-click it and choose Properties.
- Change Startup type to Disabled, then click Stop.
- This prevents Windows from automatically managing BitLocker.
Q2: Can I disable BitLocker in Windows Recovery Environment?
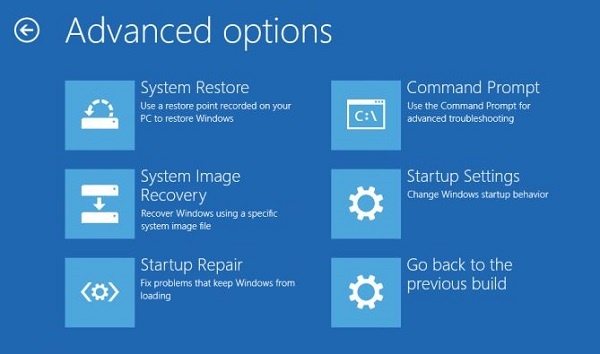
Yes, you can disable BitLocker in Windows Recovery Environment using Command Prompt, though the process must be performed only in cases when the system cannot boot normally.
Q3: How long does it take to disable BitLocker?
This is based on the drive's size and speed. A small SSD can be decrypted in minutes, whereas a large hard drive can take hours.
Q4: Is it safe to disable BitLocker?
Yes, it’s safe. Just keep in mind that once BitLocker is turned off, your files are no longer protected by encryption. Everything on the drive remains accessible, but without that security shield, anyone with access to your device can view the data.
Q5: Why would I want to disable BitLocker?
Some of the most common reasons are when:
- Your computer keeps asking for the recovery key and won’t start normally.
- You’re upgrading or changing hardware.
- You want your system to run a bit faster without encryption running in the background.
- You’re selling or giving away the device and wish to remove encryption.
💡 Summarize with AI:
You May Also Like
- Home >>
- Windows Update >>
- [Complete Guide] How to Disable BitLocker on Windows 10/11?

 ChatGPT
 Perplexity
 Google AI Mode
 Grok
Grok

