What Is & How to Bypass BitLocker Recovery Blue Screen?
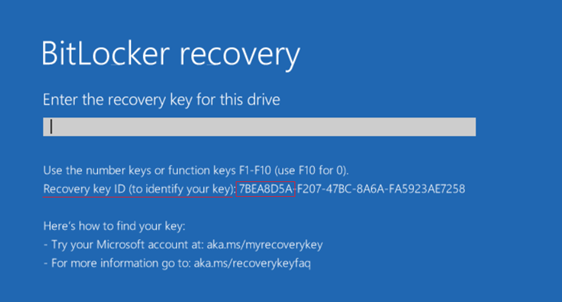
If your computer has suddenly started booting to a BitLocker recovery blue screen, don’t panic. This problem has been encountered by many Windows users, and it is more common after updates or any hardware modifications.
The system requires a recovery key, which will not allow a normal start-up unless you learn how to bypass BitLocker recovery blue screen. This guide will describe the cause of this issue and how to avoid it on Windows 10 and 11 systems, including Dell, HP, and Lenovo computers.
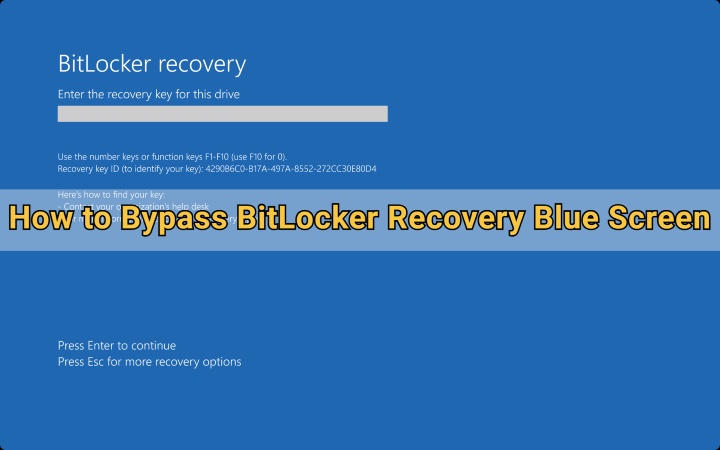
Why My Device Stuck on the BitLocker Blue Screen?
If your PC is frozen on the BitLocker blue screen, it usually means the system has detected a security risk or configuration change that prevents normal access.
BitLocker is a drive encryption feature, and it automatically locks your data to prevent unauthorized access. Here are the most common reasons:
- System or BIOS Update: A recent Windows or BIOS update can alter the boot configuration, causing BitLocker to request verification through the recovery screen.
- Hardware Changes: Replacing hardware like the motherboard, SSD, or TPM chip can make BitLocker believe the device’s security has been compromised.
- TPM Malfunction: If the Trusted Platform Module (TPM) fails or becomes reset, the encryption system cannot authenticate the drive, triggering the recovery screen.
- Corrupted Boot Data: System file damage or improper shutdowns can corrupt the boot configuration, leading to the BitLocker blue screen of death.
- Misconfigured Secure Boot Settings: Inconsistent BIOS settings, especially with Secure Boot or UEFI configurations, can cause Windows 10 BitLocker blue screen issues.
Understanding these causes helps you choose the best method to bypass the screen and disable the BitLocker safely.
How to Bypass BitLocker Recovery Blue Screen?
In case you are locked at the BitLocker screen, it is possible to bypass it in a safe way. All these methods can be used on the devices of Dell, HP, and Lenovo, and can be applied both with Windows 10 and Windows 11.
1. Find the Recovery Key
If your system requests a recovery key, this is the most direct way to unlock your drive and bypass the screen.
-
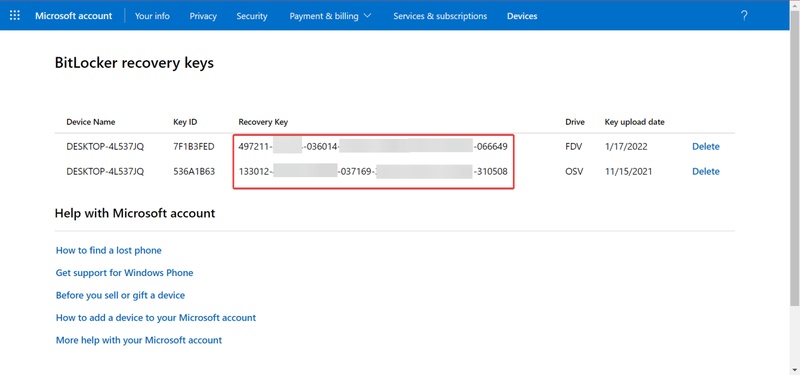
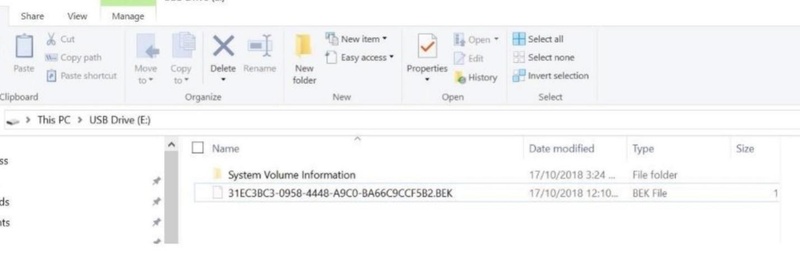
If you saved your key in an external drive, then access that drive on another computer and find the file with a 48-digit key. Otherwise, go to Microsoft and log in with the same account, and go to "Devices," then locate the one for your computer.
-
If you have no external options to get this key, press “Escape" two times and then click “Skip this drive”.
-
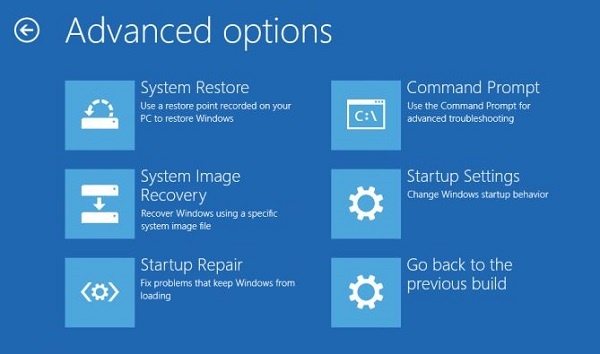
Now, click "Troubleshoot” to select “Advanced Options” and open “Command Prompt”.

-
Run the command "notepad" and in the notepad app, click "File" then "Open".
-
Now you can connect your external drive to your PC and use the file explorer window to find the BitLocker recovery key in the drive.
2. Boot into BIOS to Disable Secure Boot
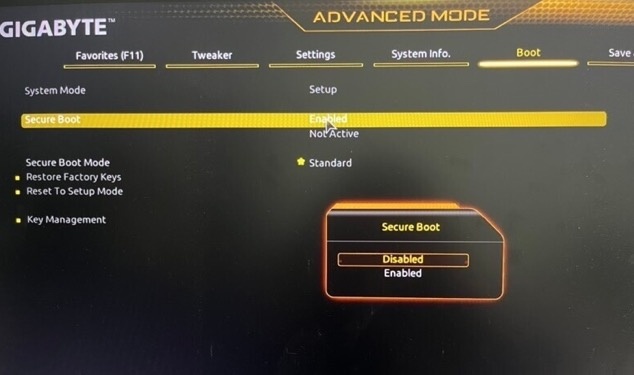
When updates modify system configurations, Secure Boot may conflict with BitLocker authentication. Disabling Secure Boot in BIOS can often bypass the BitLocker blue screen of death and allow the system to boot normally.
-
Restart the computer and keep pressing the BIOS key within the initial boot sequence to open the BIOS menu. It can be the Del, F2-F10 key, based on your manufacturer.
-
In the BIOS screen, select "Advanced Mode" and go to the "Boot" Tab to select the Secure Boot” option.

-
Open it and select the “Disabled” option against “Secure Boot”. Now you can save changes and exit the BIOS menu.
3. Try Command Prompt
If you can access the Command Prompt via advanced startup options, it can help you suspend or disable BitLocker manually. This approach is useful if you’ve recovered access temporarily but want to prevent future Windows 10 BitLocker blue screen errors.
-
On the BitLocker recovery screen, press “Esc” and click “Skip this drive”, then choose "Troubleshoot", then “Advanced options”.
-
Select “Command Prompt” and run the command “manage-bde -unlock C: -password” and enter the correct password.
-
Now, run the command “manage-bde -protectors -Disable C:” and hit “Enter”. Now you can boot into your computer normally.

4. Try PowerShell
PowerShell offers another way to manage BitLocker if you prefer a more advanced and script-based method. You can unlock or suspend BitLocker protection directly from this interface.
-
Type “PowerShell” in Windows Search and right-click to select "Run as Administrator".

-
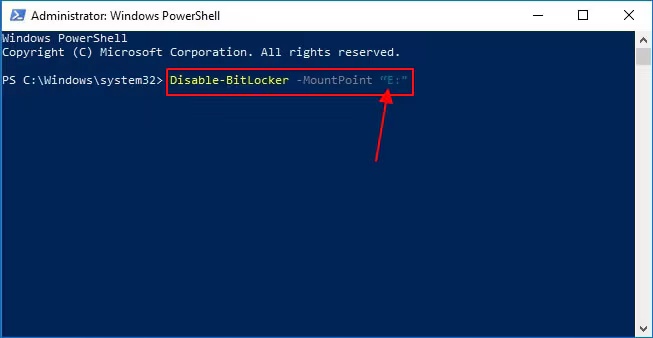
Run the following command: “Disable-BitLocker –MountPoint "Drive Letter”.
5. Clean Install Windows
If all else fails and the system cannot recognize your BitLocker key or boot settings, reinstalling Windows may be the last option. This fixes BitLocker recovery screen and ensures a fresh system environment.
Here is how to bypass the BitLocker recovery blue screen Windows 11 with a clean install:
-
Back up all important files to an external drive or cloud storage, since a clean installation will erase everything on your computer.
-
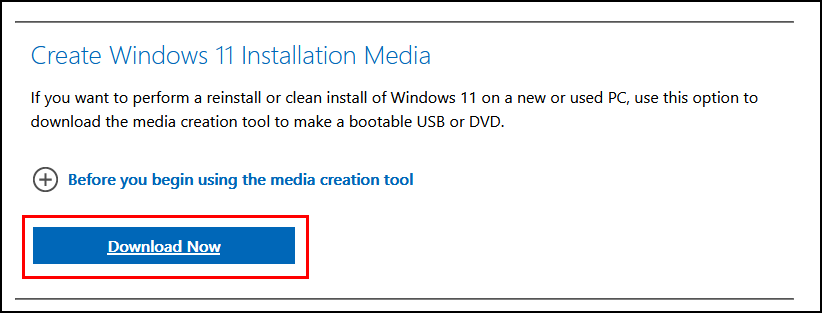
Go to the Microsoft Windows 11 download page and click “Download Now” under “Create Windows 11 Installation Media.” Run the tool and follow the prompts to create a bootable USB drive (at least 8GB).

-
Insert the USB drive into your PC and restart it. Press the boot key (usually F2, F12, Esc, or Del) when your computer starts, then select the USB drive from the boot menu.
-
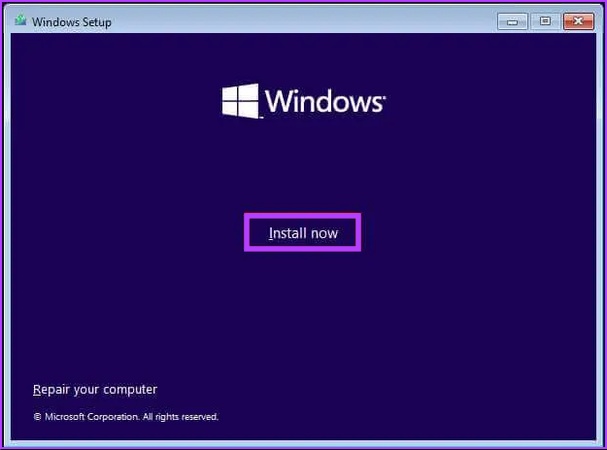
When the Windows Setup screen appears, choose your language, time, and keyboard layout, then click Next. Click Install Now, and enter your product key or select I don’t have a product key to continue.

-
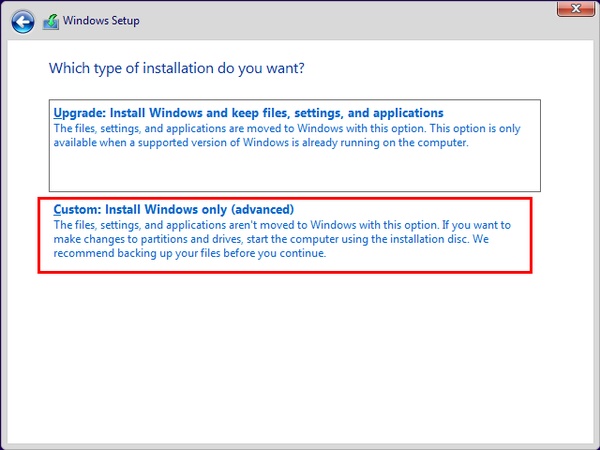
Choose Custom: Install Windows only (advanced). Delete all existing partitions to remove the old system, then select the unallocated space and click Next to begin the installation.

-
Wait for Windows 11 to install. Your PC will restart several times. Follow the on-screen instructions to finish setup, choose your region, and create your user account.
-
Once you’re on the desktop, open Settings > Windows Update to install the latest updates. Then visit your PC manufacturer’s website to download and install any missing drivers.
How to Recover Files from a BitLocker-locked Drive?
If you are unable to enter your encrypted drive using the above procedures, do not panic, as you can still recover your files without any harm. 4DDiG Windows Data Recovery will come in handy.
Though users are worried that they will lose all their data when confronted with the blue screen BitLocker problem. 4DDiG is created to be able to recover BitLocker-encrypted drive even without requiring booting your computer system.
The advantage of 4DDiG is that it is accurate and reliable for retrieving files including photos, videos, audio and document in one scan. It has a user-friendly design that makes recovery easy for anyone.
Secure Download
Secure Download
-
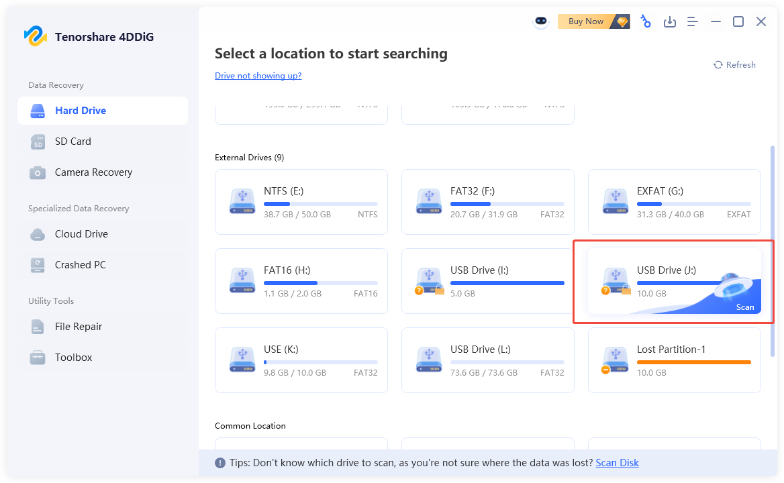
Open 4DDiG after installing it. On the main screen, you’ll see all your drives. Look for the BitLocker-encrypted drive with a lock icon and click on it to start scanning.

-
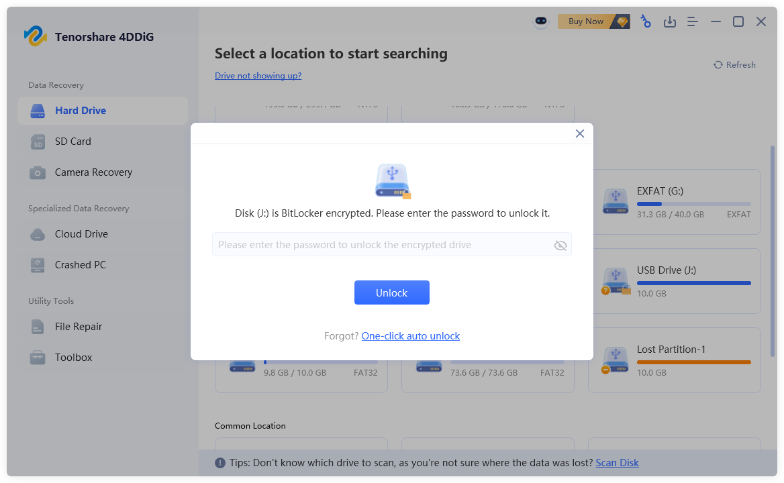
A window will appear asking for the drive password. If you don’t have it, choose “One-click auto unlock.” This option automatically finds your recovery key from your PC and unlocks the drive for you.

-
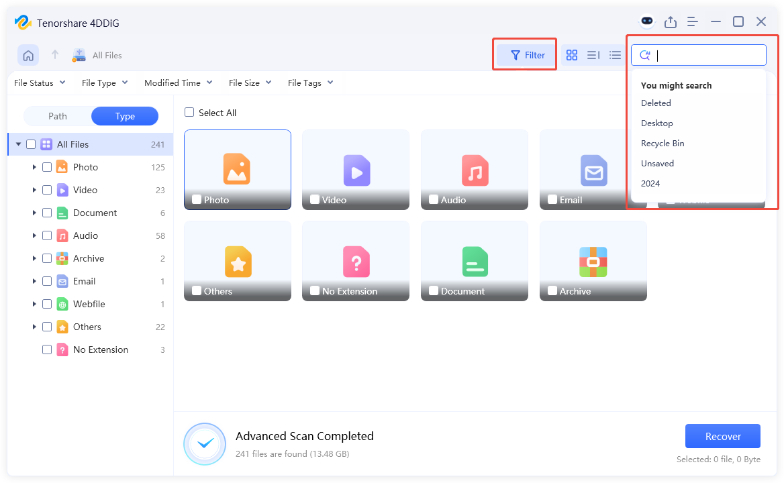
4DDiG will scan the BitLocker drive to locate all lost files. When the scan is complete, use the filters or search tools to quickly find the files you want.

-
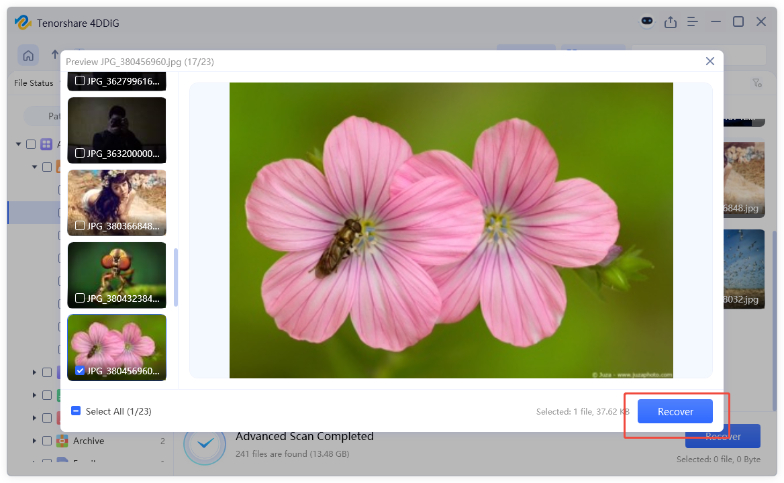
Click “Recover” to restore your selected files and save them to a safe location on your computer or cloud storage.

How to Prevent Future Windows 10/11 BitLocker Blue Screen Issue?
After fixing your device, it’s smart to take preventive measures to avoid similar issues in the future.
- Save your BitLocker key in multiple locations, like your Microsoft account, a USB, or a printout.
- Avoid Sudden Hardware Changes and always disable BitLocker before upgrading hardware components.
- Keep Drivers Updated, as outdated drivers can interfere with BitLocker’s boot process.
- Regularly update Windows because timely updates fix bugs that cause BitLocker issues.
- Use a Reliable Power Source, as power failures during updates can lead to boot corruption.
By maintaining these habits, you can prevent another BitLocker blue screen scenario.
FAQs about BitLocker Recovery Blue Screen
Q1: Can I bypass the BitLocker recovery screen without the key?
No, you cannot get direct access if you do not have the key. However, 4DDiG allows you to recover data from such drives with Windows Data Recovery software.
Q2: What triggers the recovery blue screen prompt after a recent update?
System or BIOS updates may change boot configurations, causing BitLocker to demand authentication as a security measure.
Q3: If I cannot recover the key, can I still retrieve my files?
System or BIOS updates may change boot configurations, causing BitLocker to demand authentication as a security measure.
Conclusion
The BitLocker recovery blue screen may appear unexpectedly and prevent access to your files and operating system. Luckily, you are now aware of the number of trusted ways on how to bypass BitLocker recovery blue screen by restoring the key, modifying the BIOS parameters, or simply reinstalling Windows.
If something goes wrong in the process and data is lost, you can always use Tenorshare 4DDiG. It helps to get all the valuable files retrieved safely and within a short time.
Secure Download
Secure Download

 ChatGPT
 Perplexity
 Google AI Mode
 Grok
Grok

