How to Fix BitLocker Recovery Key Not Working in 10 Ways?
When your BitLocker recovery key not working and does not allow access to your encrypted drive, there is no need to panic. Such an issue normally occurs following a system upgrade, hardware replacement, or TPM failure.
In this guide, you will learn why BitLocker rejects valid keys and how to fix it using 10 proven methods, from simple checks to advanced solutions and data recovery.
Why BitLocker Recovery Key Does Not Work on Windows 10/11?
When BitLocker fails to recognize your recovery key, it often indicates system inconsistencies, configuration mismatches, or hardware-related issues. Here are the most common reasons behind it:
- Incorrect key entry: Even a single character mismatch or spacing error can cause BitLocker to reject your key.
- Keyboard layout mismatch: Entering your key with a different input language or layout can lead to incorrect entries.
- Hardware damage: If your TPM chip or storage drive has been damaged, Windows may not correctly validate the recovery key.
- TPM firmware update: After BIOS or TPM updates, BitLocker sometimes fails to match the recovery key with the system’s stored identifiers.
- File system corruption: Damaged BitLocker metadata or corrupted partitions can trigger a recovery key not valid message.
- Disabled Secure Boot or changed boot order: BIOS misconfigurations can prevent BitLocker from recognizing the device’s encryption signatures.
How to Fix BitLocker Recovery Key Not Working? [4 Easy Ways]
If your recovery key isn’t being accepted, start with these four quick fixes. These methods work for most cases on Windows 10 and 11 before moving on to advanced troubleshooting.
1. Double-Check the Recovery Key
It might sound obvious, but in many cases, the issue lies in a mistyped key. The BitLocker recovery key is a 48-digit numerical sequence, and entering even one wrong number will invalidate it. Below are the steps to easily double-check your recovery key from different sources.
-
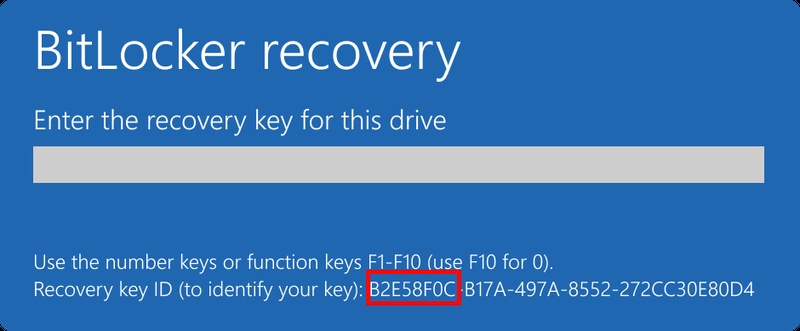
On the BitLocker recovery screen, carefully read the message. It will show the "Key ID," and you need to note this down.

-
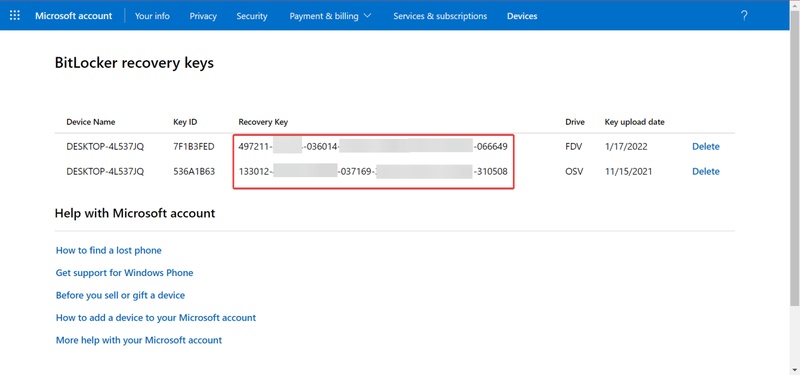
Locate your recovery key from your Microsoft account or look in the printouts or USB drive where you previously saved it.
-
Match the Key ID from the screen with the one listed online or on your printout.
-
Once confirmed, re-enter the 48-digit key carefully and ensure you are entering only numbers within the right format.
If BitLocker still rejects it and you can't get BitLocker recovery key with Key ID, move to the next method.
2. Check for Keyboard Layout Issues
Sometimes BitLocker refuses your key simply because of keyboard layout mismatches. For example, “2” and “@” may switch places between US and UK keyboards. Switching your keyboard layout and switch to your normal input language can often fix the BitLocker recovery key not working on Windows 11 problem quickly.
3. Use the Correct Key from Active Directory or Azure
Organizations and businesses often store recovery keys in Active Directory (AD) or Azure Active Directory (AAD). Using the wrong key (from another device) will result in an error stating that the BitLocker recovery key does not work.
If you are an individual, then you can follow the steps for Azure below; otherwise, contact your admin to check their Active Directory.
-
Go to “Azure Active Directory" and click "Devices", then go to "All Devices".
-
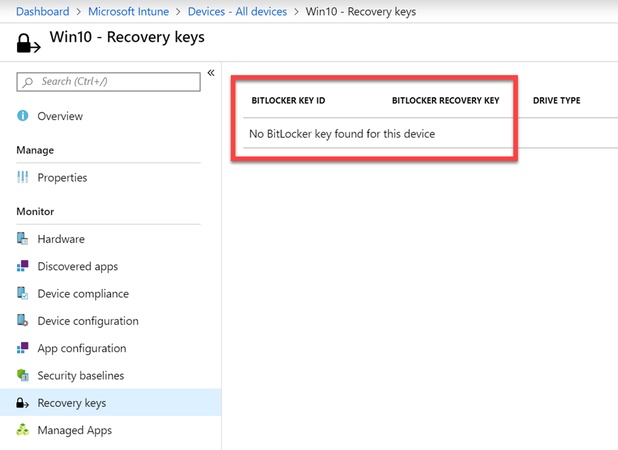
Click your device name and select “Recovery Keys.”

-
Find the recovery key ID and copy the key. Enter this key on your locked device to unlock the drive.
This method ensures that you’re using the correct enterprise-managed key.
4. Use Another Recovery Method
If none of the above works, Windows provides multiple ways to store and access your recovery key. Try locating it from alternative sources. Try locating it from alternative sources. Different sources that you may have your BitLocker recovery key saved are USB, printouts, and Microsoft account.
Check your Microsoft account if you saved your key there.
-
If you backed it up to a USB drive, check the USB for recovery key files.
-
If your organization manages your device, contact your IT administrator to retrieve the key.
-
You can also check your printed document labeled “BitLocker Recovery Key” if you printed it when enabling BitLocker.
If you still face the BitLocker recovery key not available issue, move on to the advanced methods below.
How to Fix BitLocker Recovery Key Does Not Work? [6 Advanced Solutions]
When basic troubleshooting fails, more complex solutions may be needed. These methods work across different brands like HP, Lenovo, Dell, Acer, and Surface devices, where BitLocker recovery errors are common after firmware or TPM changes.
1. Bypass the Recovery Screen Using Command Prompt
If the BitLocker recovery key is not available or keeps asking for the key even when it’s correct, you can use Command Prompt to check drive status and unlock it.
Windows allows opening Command Prompt from your recovery screen. Here is the detailed guide with commands that you need to run.
-
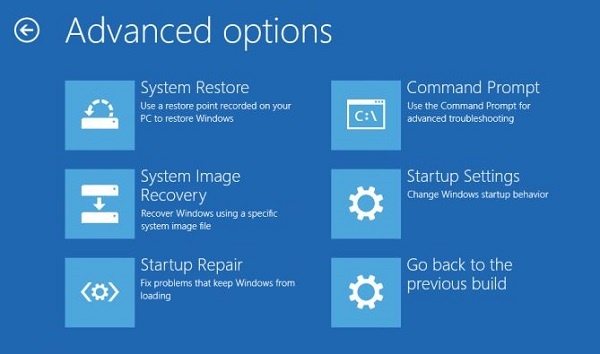
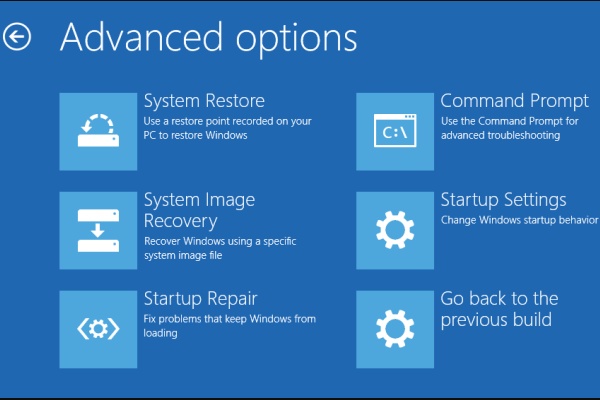
On the “Choose an option” screen, select “Troubleshoot> Advanced options”, from where you can see the “Command Prompt”.

Type the following commands and press Enter:
- manage-bde -status
- manage-bde -unlock X: -RecoveryPassword YOUR-KEY-HERE (Replace X: with your drive letter and paste the full 48-digit key.)
- manage-bde -protectors -disable X:
This temporarily disables protection so you can access the drive.
2. Check for Corrupted BitLocker Metadata
If your BitLocker metadata is damaged, Windows may fail to validate your recovery key even if it’s correct. Checking for corrupted metadata can fix the problem. Hence, allowing you to fix the issue with the steps below:
-
Hold down the “Shift” key on your keyboard. While holding it, click “Restart” from the login screen. Keep holding “Shift” until you see the recovery options screen to boot into WRE.
-
Press “Shift + F10” to open “Command Prompt” then run the following command: “manage-bde -status” to check the encryption status of all drives.

-
Type the following command “repair-bde C: X: -rk D:\RecoveryKey.bek”. If metadata is corrupted, repair-bde will show an error.
3. Enable or Disable the Secure Boot Option
Changes in BIOS security settings often cause BitLocker to fail. Resetting Secure Boot can resolve mismatched system identifiers. You just need to toggle it from off to on or vice versa and here is how to do it:
-
Restart your PC and press the BIOS key (usually F2, F10, or DEL).
-
Go to the “Security” or “Boot” tab. then locate “Secure Boot” and toggle it:
If it’s enabled, set it to Disabled.
If it’s disabled, set it to Enabled.

-
Save changes and reboot then try entering your recovery key again.
4. Upgrade Windows System
Sometimes BitLocker issues are caused by outdated Windows builds or buggy updates. Upgrading or reinstalling your OS can re-sync encryption modules. You need a USB with Windows ISO and upgrade the OS from there.
-
Download the latest Windows 11 ISO from the official Microsoft website.
Mount the ISO and double-click “setup.exe.”
-
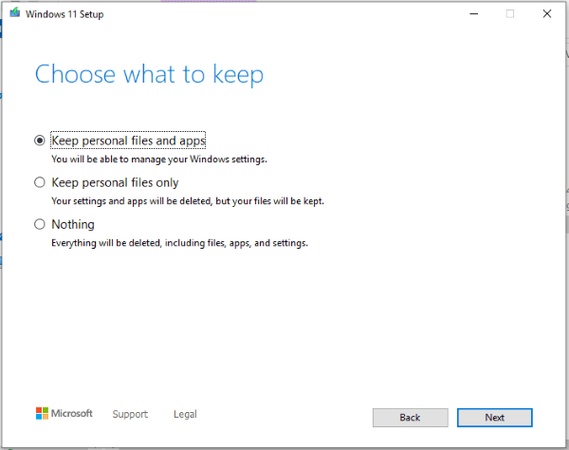
Choose “Keep personal files and apps” when prompted.

Follow on-screen instructions to complete the upgrade.
After reboot, check if BitLocker accepts your recovery key.
5. Check for Hardware Issues
If BitLocker not accepting recovery key across all methods, the root cause might be a physical hardware failure. If there is a hardware issue then you will need professional assistance to fix it. So, it is best to consult your manufacturer after following the steps below:
-
Shut down your PC and check the physical connection of your drive (for desktops).
-
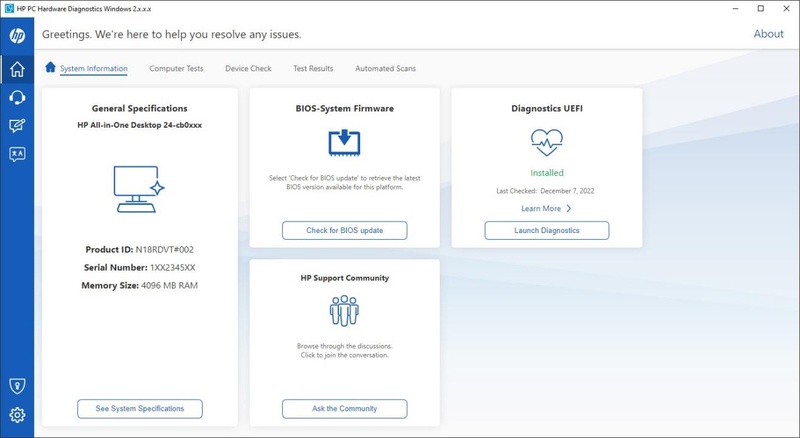
If you’re on a laptop, run a hardware diagnostic using BIOS tools (HP PC Hardware Diagnostics, Lenovo Vantage, etc.).

-
If you recently replaced your motherboard or TPM, re-link the TPM via BIOS.
-
After ensuring hardware stability, re-enter the recovery key.
6. Reformat the BitLocker-encrypted Drive
As a last resort, when your BitLocker recovery key does not work, if none of the fixes work, and data recovery is not a concern, you can try to format the BitLocker drive.
This will wipe the whole drive and install fresh OS. So, make sure that you have nothing important on the drive or there are data backups available.
-
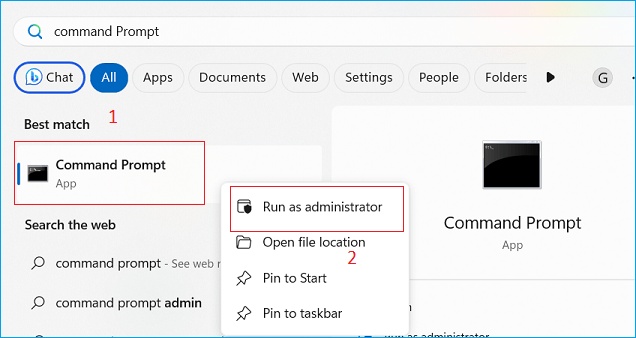
Press the Windows key, type “cmd”, right-click “Command Prompt”, and choose “Run as administrator” to get permission to run commands.

-
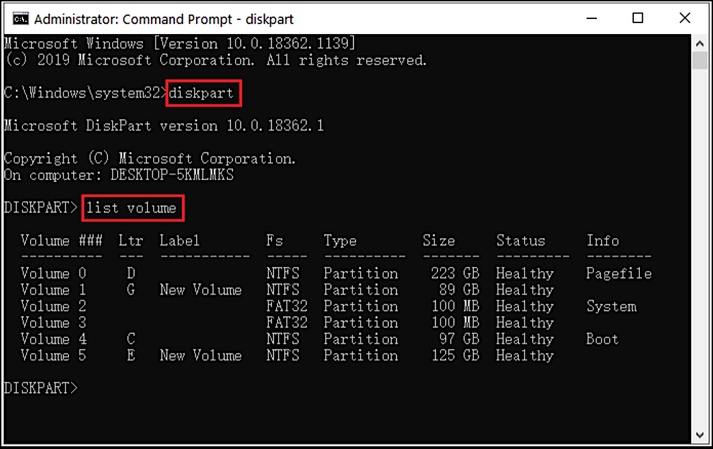
Decide which BitLocker-encrypted drive you want to format. In Command Prompt, type “diskpart” and press “Enter”, then type list volume to see all available drives.

-
Unlock the drive before formatting by typing manage-bde -unlock X: -RecoveryPassword YOUR-KEY, replacing X: with your drive letter and YOUR-KEY with your BitLocker recovery key.
-
Format the drive by typing “format X: /FS:NTFS”, replacing X: with your drive letter. You can also use FAT32 instead of NTFS if you prefer.
-
Type “list volume” again to confirm the drive’s file system now shows as NTFS or FAT32.
This erases all files on the encrypted drive. Only use this if other recovery methods have failed and you have backups.
How to Unlock & Recover Data from BitLocker Drive?
In case BitLocker continues to deny you access to your drive, but your files are worth salvaging, you can try to salvage them with 4DDiG Windows Data Recovery. This utility has been created to scan encrypted or damaged drives and recover lost files even with an inaccessible recovery key.
It works with external drives as well as external hard drives, SSDs, USBs, and SD cards, and recovers more than 2000+ file types such as photos, videos, documents, and emails.
Secure Download
Secure Download
See how to use 4DDiG to unlock and recover data from the BitLocker drive:
-
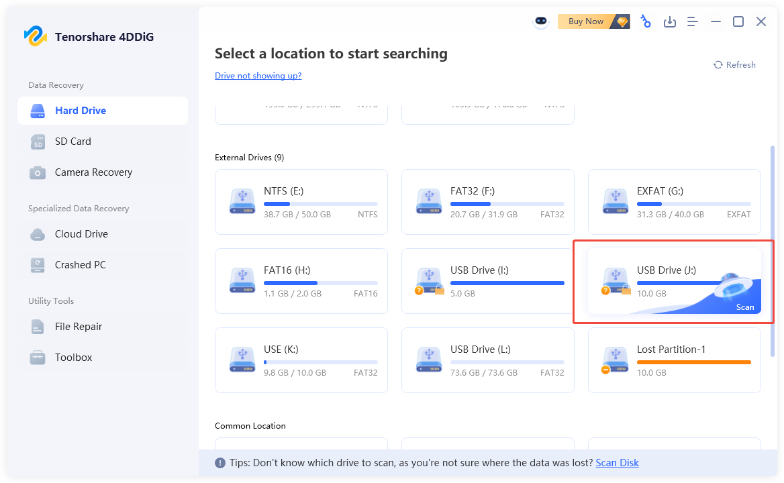
Open 4DDiG and you can see all the available drives on the screen. Find the BitLocker-encrypted drive and click on it.

-
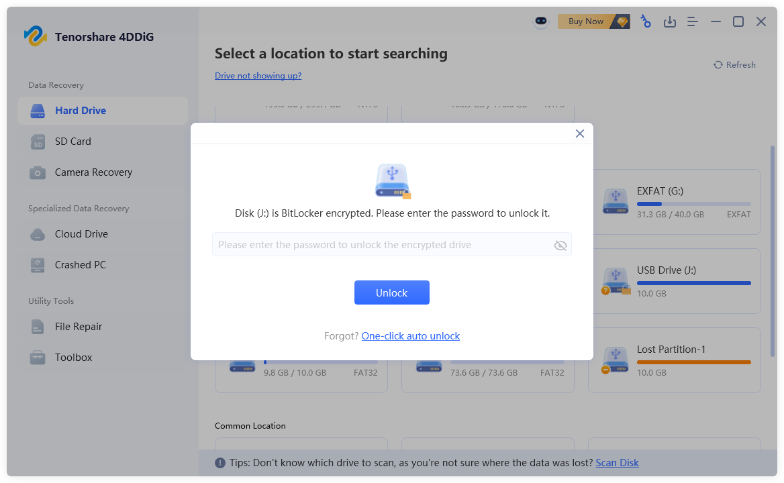
Since the drive is encrypted, the software will ask you to unlock it first. If you don’t have the recovery key, you can use the “One-click auto unlock.” feature, which automatically searches for your recovery key from your computer and unlocks the drive instantly.

-
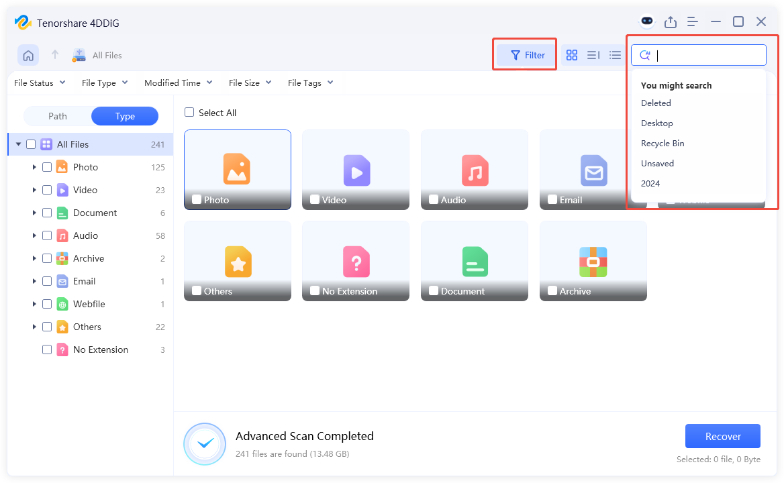
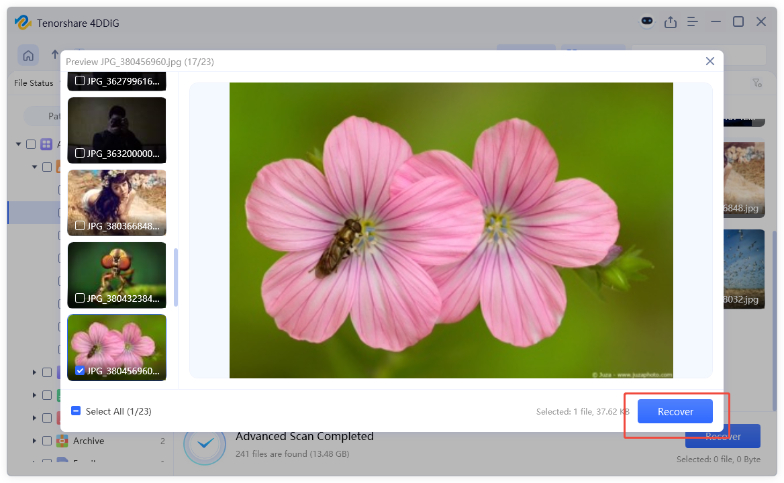
4DDiG will then scan the BitLocker drive to find all your lost files. Once the process is complete, you can preview and decide what to recover.

-
Finally, click “Recover” to restore all your hidden files from the BitLocker drive, and save them safely to your local disk or cloud storage.

Conclusion
It is a stressful situation when the BitLocker recovery key not working, yet, as this guide shows, it is not impossible. Whether it is to verify your key and check your keyboard layouts or go as far as repairing metadata and updating Windows, most users can have access to their data without any data loss.
To recover lost files in encrypted or corrupt drives in which manual recoveries do not work, Tenorshare 4DDiG is a secure and safe means of recovering lost files in a short time.
Secure Download
Secure Download
💡 Summarize with AI:
You May Also Like
- Home >>
- Windows Update >>
- How to Fix BitLocker Recovery Key Not Working in 10 Ways?


 ChatGPT
 Perplexity
 Google AI Mode
 Grok
Grok

