3 Effective Ways to Clear Windows Update Cache for Faster Updates and PC Performance
Are you frustrated with slow updates or a computer that crawls after installing Windows updates? The culprit might be your Windows Update Cache. Over time, these cached files accumulate, causing storage bloat, errors and even update failures. The solution? Clear Windows Update Cache to give your system a fresh start and boost performance. This article explains what the update cache is, why you should delete it and shows you 3 ways to clear the Windows Update cache on Windows 11 and 10.
- Part 1: Definition of Windows Update Cache & Cuases of Clearing It
- Part 2: Is It OK to Delete Windows Update Cache & When to Do That
- Part 3: Preparatory Works Before Windows Update Cache Clear
- Part 4: How to Clean Windows Update Cache (3 Ways)
- FAQs
Part 1: What Is Windows Update Cache & Why Should You Delete It?
The Windows Update cache is a temporary directory or folder that holds files required for system updates. These are downloaded update packages, configuration files and logs that help the Windows Update service install patches and upgrades.
These files are stored in the SoftwareDistribution folder. Over time this folder can grow in size and hold unnecessary or corrupted files.
Why Should You Purge Windows Update Cache?
Over time the update cache can grow or even become corrupted and cause performance and update issues. Here are the main reasons you should purge Windows Update cache:
- Fix Update Problems: If you experience Windows update hangs or failed installations the culprit is often a corrupt cache.
- Improve Performance: A large or corrupted cache can make your computer slow after a Windows update, overall speed.
- Free Up Disk Space: Clearing unused files helps reclaim storage space.
- Resolve System Errors: Removing old cache files can eliminate conflicts caused by incomplete updates.
A quick flush of Windows updates can fix these problems and keep your system running smooth.
Part 2: Is Clearing Windows Update Cache Safe & When to Delete It
Is Clearing Windows Update Cache Safe
Yes, it’s safe to clear Windows Update cache. The cache does not contain system files; only temporary update data is stored. Deleting it will not affect your operating system. In fact, doing so often fixes update errors and computer slow performance issues. When you clear Windows update the system simply re-downloads the files the next time you check for updates.
When to Delete Windows Update Cache
You should delete cached files in these cases:
- Windows Update Hangs or Fails: Updates won’t install or freeze during installation.
- Computer Slow After Windows Update: Cache buildup slows down your system.
- Low Storage Space: Cache files can take up gigabytes of disk space over time.
- Corruption Detected: Damaged cache files prevent updates from working.
Deleting the cache during such situations can speed up processes and stabilize the system.
Part 3: Pre-requisites Before Deleting Cached Windows Update
Before you clear Windows Update cache, make sure your system is prepared to avoid data loss or system issues. Corrupted updates or accidental deletions can sometimes cause Windows boot or system stability problems. That’s why we recommend these two essential steps before you delete cached Windows updates:
1. Back Up Your System with 4DDiG Partition Manager
Deleting system files can sometimes cause problems if updates fail or files get corrupted. To be safe, you should back up your entire system before clearing Windows Update cache. The best way to do this is by using a reliable tool that ensures complete protection.
4DDiG Partition Manager is a powerful, all-in-one solution for disk management and data safety. With its user-friendly interface and professional features, it ensures zero data loss when performing risky operations. It’s not just a partition tool; it can:
- Back up your entire Windows system for disaster recovery
- Clone disks or partitions for migration
- Migrate entire OS to SSD or HDD
- Restore Windows from backups in case of corruption
- Support SSD migration and disk optimization.
Secure Download
♦️ Follow these steps to back up your system before clearing the update cache:
-
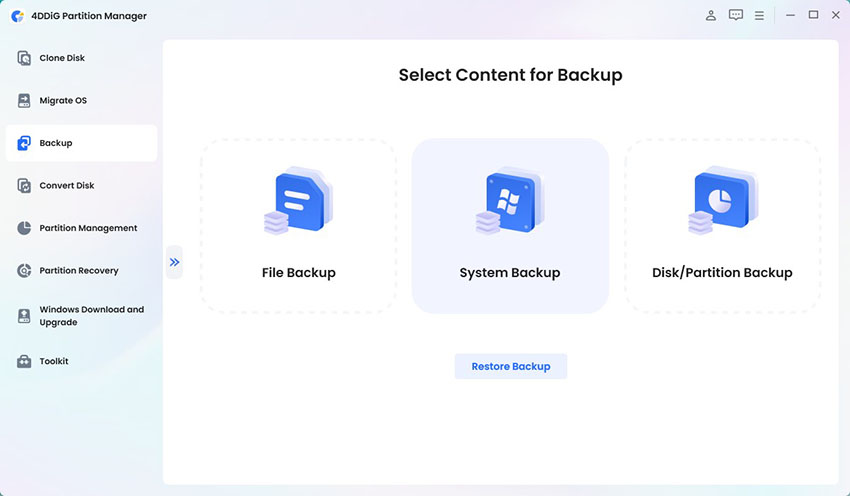
Open 4DDiG Partition Manager, go to the “Backup” section and click “System Backup.” If you have used this feature before, click New to start a fresh backup.

-
Choose to back up the system partition only or both system and data, then click Change to select a storage location. Once you choose the path, click “Start” to begin the backup.

-
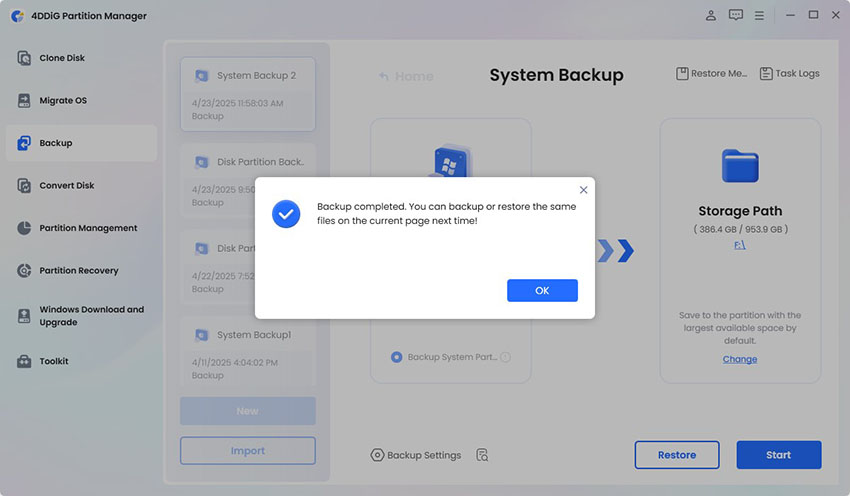
Wait for the backup to complete. Once done, your system is safely backed up and ready for further actions like clearing Windows Update cache.

It takes only a few clicks to backup your system before you delete cached Windows update files. Once you’ve backed up your system using 4DDiG Partition Manager, you can proceed to delete the cached Windows update files. If anything goes wrong, restoring the system is just one click away.
2. Stop Windows Update Service
You need to stop Windows Update service (wuauserv) and the Background Intelligent Transfer Service (BITS) before you delete Windows Update cache files. These services keep updating related files locked so stopping them is necessary to avoid errors.
♦️ Steps:
-
Press "Win + R" to open the Run dialog box. Then type "services.msc" and press "Enter”.
-
Find Windows Update in Services and double-click to access its settings.
-
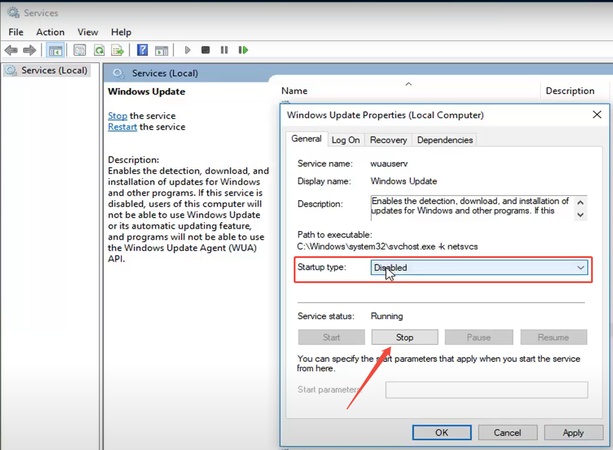
From the Startup type dropdown menu, choose “Disabled.”
If the service is currently running, click "Stop".
-
Click "Apply", then "OK" to save the changes.

Part 4: How to Delete Windows Update Cache on Windows 11 and 10
When Windows Update hangs or fails repeatedly, clearing the update cache is often the quickest fix. This happens because the update cache contains old or corrupted files. Here are three ways to delete Windows Update cache safely. These work on both Windows 10 and Windows 11. Make sure you have the above 2 requisites done.
Method 1: Delete Windows Update Cache Using Command Prompt or PowerShell
When Windows Update fails or stalls, cached files in the SoftwareDistribution and Catroot2 folders may be corrupted. You can reset the Windows Update components and delete outdated or corrupted update files using Command Prompt or PowerShell, so Windows Update can download fresh files from Microsoft servers.
♦️ Steps:
-
Open the Start Menu, type "Command Prompt" in the search bar, right-click it, and choose "Run as Administrator". When prompted by User Account Control (UAC), click Yes to proceed.
-
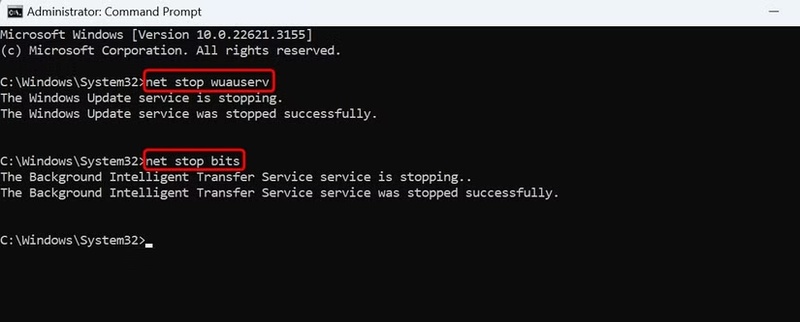
In the Command Prompt window, enter the following commands one by one, pressing Enter after each to stop the related services:
-
net stop wuauserv -
net stop bits
-
-
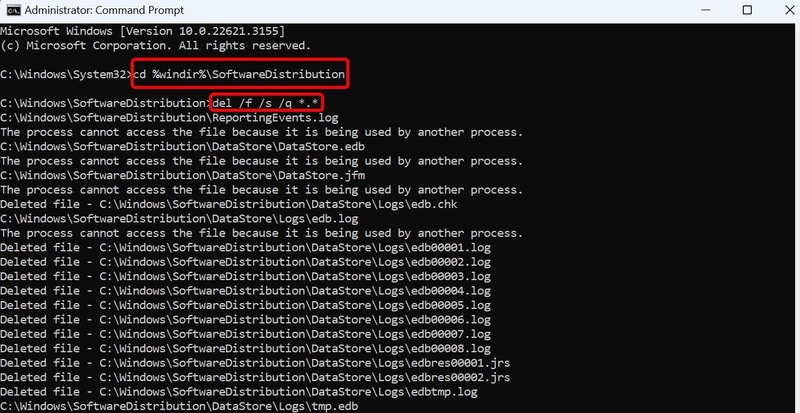
Navigate to the Windows Update cache folder by entering:
cd %windir%\SoftwareDistribution -
To delete all files in the cache directory, execute:
del /f /s /q.
Finally, start the services you stopped earlier by running:
net start wuauservnet start bits
Method 2: Manually Delete Windows Update Cache via File Explorer
If you prefer a more visual, hands-on approach, this method is for you. You can manually delete the update cache using File Explorer. This approach is easy to use and avoids any command-line work. Just make sure to stop the update services first to avoid file locking issues.
♦️ Steps:
-
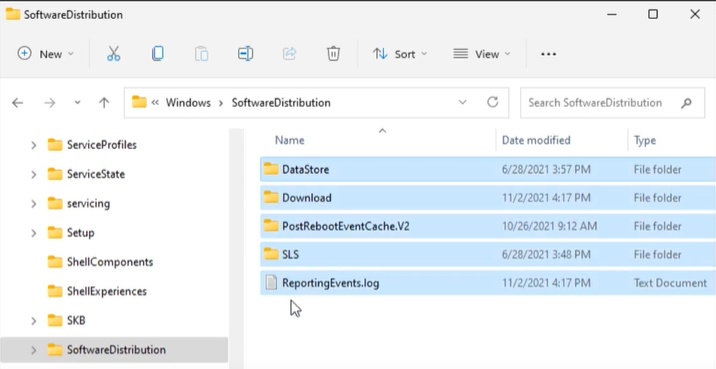
Go to: C:\Windows\SoftwareDistribution\Download.

Select all files in the Download folder and delete them.
-
Go back to services.msc, start the stopped services and restart your PC.
This method is handy when freeing up disk space caused by leftover update files.
Method 3: Empty Windows Update Cache Using Disk Cleanup Tool
Windows’ built-in Disk Cleanup tool can also clean Windows Update cache quickly. It not only removes the update cache but also clears temporary files, giving your PC a performance boost.
♦️ Steps:
-
Open the Start Menu, search for Disk Cleanup and select the tool from the results.
-
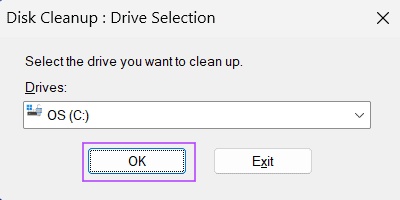
In the prompt, select your “Windows installation drive” (usually C:) and click “OK”.

-
In the Disk Cleanup interface, press “Clean Up System Files.” Select the Windows drive again and click OK.

FAQs About Clearing Windows Update Cache
Q1: Where are Windows update files stored?
Windows update files are stored in the SoftwareDistribution folder, typically located at C:\Windows\SoftwareDistribution. This directory contains all temporary update files and logs used during the update process.
Q2: Why can’t my computer check for updates?
This issue often occurs because of corrupted update cache, misconfigured system settings or disabled Windows Update services. Clearing the update cache and restarting the Windows Update service usually fixes the problem.
Q3: How to delete pending Windows 11 update?
To delete pending Windows 11 updates, go to C:\Windows\SoftwareDistribution\Download and delete all files. This method empties Windows update cache so updates start fresh. Always restart your PC after deleting these files.
Q4: How to copy packages to the Windows update cache?
You can manually copy update packages into the SoftwareDistribution\Download folder but it’s generally better to let Windows handle this process to avoid errors. Alternatively use the Windows Update Standalone Installer (.msu) for manual updates.
Q5: Can running Windows Update Troubleshooter clear out the Windows update cache?
Yes. The Windows Update Troubleshooter often resets update components which includes clearing corrupted cache files and restarting necessary services. This can automatically fix update failures without manual deletion.
Conclusion
Clearing the Windows Update cache is a safe and quick way to fix update errors and boost PC performance. Whether you use CMD commands, manual deletion or Disk Cleanup, these methods give your updates a fresh start. For added security, always back up your system first. The best tool for this is the 4DDiG Partition Manager. It protects your data and helps manage partitions easily.
Take control of your system maintenance. Clear Windows Update cache regularly and get a faster PC today! Also, share you clearing experience in the following comment area.
Secure Download
💡 Summarize with AI:
You May Also Like
- Home >>
- Windows Fix >>
- 3 Effective Ways to Clear Windows Update Cache for Faster Updates and PC Performance


 ChatGPT
 Perplexity
 Google AI Mode
 Grok
Grok


