How to Clear RAM Cache on Windows 10/11
Is your computer running too slow, even though you’ve installed many gigabytes of RAM? You’re not alone in this water. Windows users face a common issue when the computer takes a lot of loading time to launch even smaller apps.
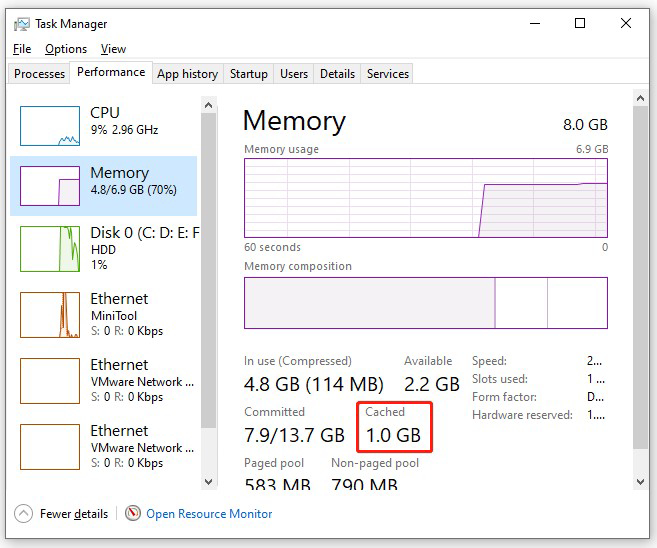
You can monitor the RAM cache in the Task monitor to see how much of the RAM is currently used by the system. If it’s taking more than what you’re currently using, then it’s time to clear to improve system performance. Follow this guide to learn how to clear ram cache Windows 10.
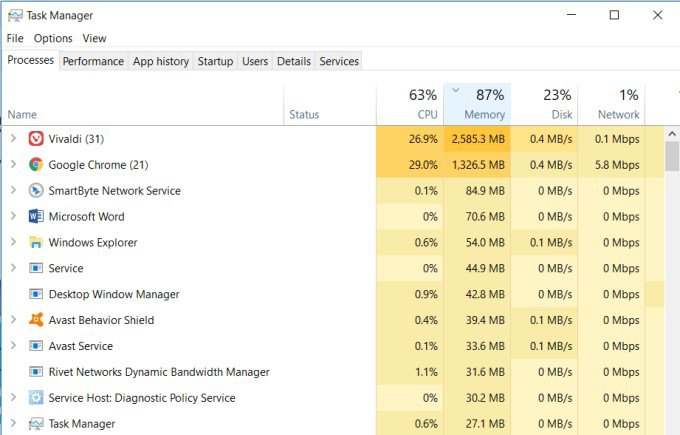
Part 1: What Is RAM Cache Memory?
Generally, RAM stands for Random Access Memory, responsible for speeding up the data retrieval process from CPU to local storage disk, e.g., hard drive or SSD. RAM stores the data frequently accessed from the local storage, such as applications you use frequently.
The RAM prevents the CPU from retrieving data directly from the hard drive, which results in faster system performance and time efficiency. That’s why the increased RAM results in high performance, and the difference can be noticed in app opening.
However, note that the RAM is a volatile memory. The data stored in the RAM gets deleted automatically when you restart your computer. When you restart your PC, the same loop starts again; the data is fetched from the storage device.
If you find the high RAM, memory, or CPU usage due to antimalware service executable, you'd never miss this guide: [Fixed] Antimalware Service Executable High RAM and CPU Usage
Part 2: How to Clear RAM Cache on Windows 10/11
In total, there are 9 ways to clear cache RAM Windows 10. Below are the 9 ways to clear RAM cache Windows 10 efficiently.
Way 1: [Bonus Tip] Free up Disk Storage with 4DDiG Duplicate File Deleter
Having full storage on the hard drive or SSD can also contribute to slow system performance, app crashes, and other system-related issues. Thus, it’s also necessary to have extra space in the storage device for the system to avoid system crashes.
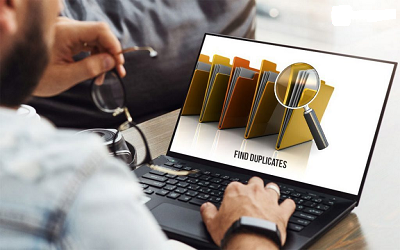
Duplicate files can be annoying to delete when you’ve too much time. 4DDiG Duplicate File Deleter is a tool that helps you identify duplicate files from the storage disk and delete them easily with a one-click process.
All you need to do is launch this program on your computer, start the scanning process, and show you all the duplicates found in the storage device within a few minutes (depending on the number of files). You can delete the duplicates after verifying if you need them or not.
- Quickly and easily locate duplicate files and images on various storage devices like Mac or Windows PC.
- Locate and delete duplicate files in any folder or storage.
- Free up the storage space and syncing performance of network drives in seconds.
- Support to remove duplicate files from computer, drive, USB flash disk, SD card, Google Drive, etc.
Secure
Download
Secure
Download
-
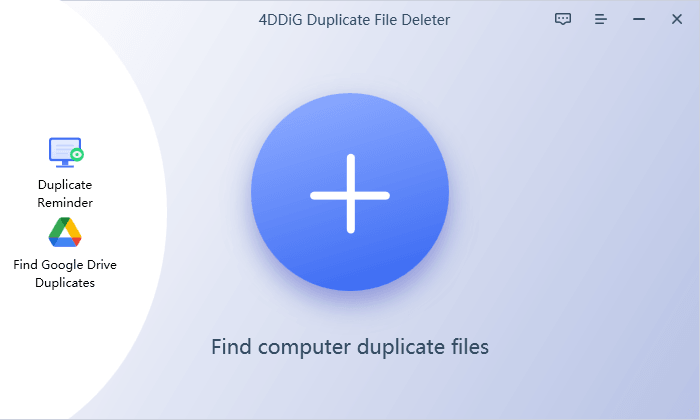
Download and install 4DDiG Duplicate File Deleter on your Windows PC, then run the program. You can choose a folder or partition for scanning.

-
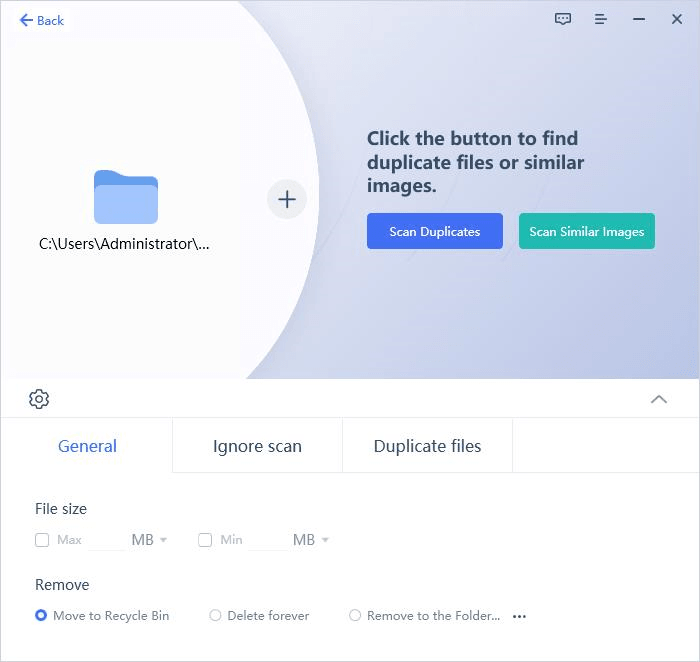
Select the gear icon in the bottom left corner to access customization options for your file search. Within the General tab, adjust file size preferences and determine whether to move duplicates to the recycle bin or delete them permanently.

-
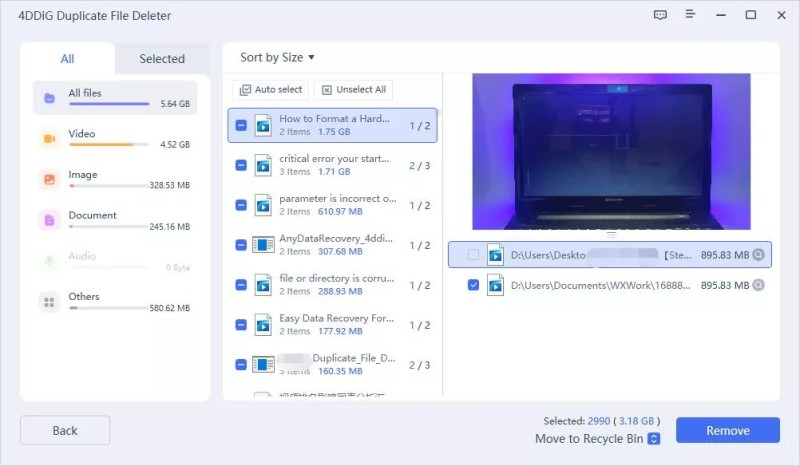
Once the scan is done, 4DDiG Duplicate File Deleter shows your duplicate files based on your criteria. On the left, you see file numbers and sizes. Hit the eye icon to preview. Choose the duplicates you want to delete (or use Auto select) and click Remove to clear them.

Way 2: Close Unwanted Programs
The more programs you’ve opened, the more RAM your system will use to run them. If your computer is low on RAM, the best solution is to close the unwanted programs you’re not using - especially the heavy ones.
Steps to close unwanted programs:
- Press the Ctrl + Shift + Esc shortcut key to launch the Windows Task Manager. Click the More Details at the bottom of the Window to expand it.
-
Locate the program using a lot of RAM, right-click on it, and choose End Task.

- This will immediately close the program’s activity.
Way 3: Reduce the Startup Programs
Startup programs automatically launch when you turn on your computer. Even if you don’t use them, they keep running in the background, eating a lot of RAM that your system can utilize in the tasks that you need to do. You can reduce the number of startup programs and choose the only necessary ones you need to run when your computer boots up.
-
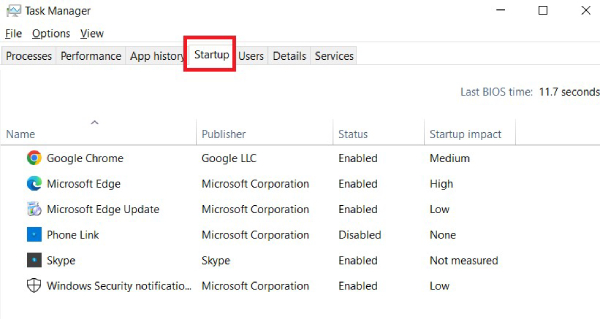
Launch Task Manager and select the Startup tab from the top bar.

-
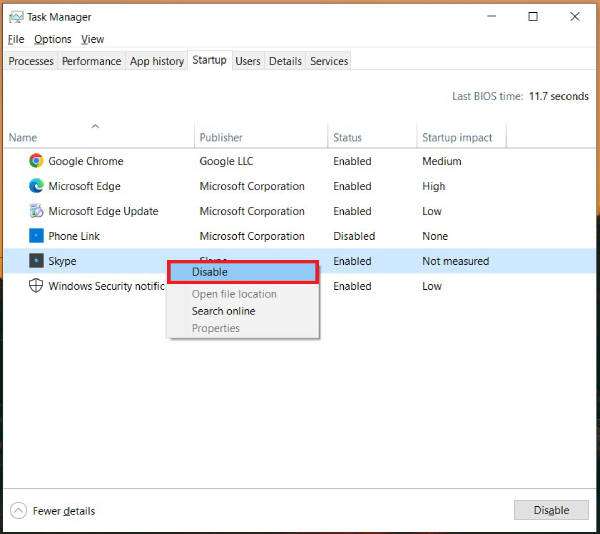
Right-click on the program and select the Disable option to stop it from starting up automatically when your PC boots up every time.

Way 4: Clear Page File While You're Shutting Down
The pagefile is the storage space designated as the virtual RAM the system uses when your actual RAM runs out of space. The data stored in the RAM chip gets destroyed once you shut down your computer, but the pagefile memory doesn't, as they’re stored in the hard drive.
The pagefile contents’ can be transferred to the RAM due to data leakage, which increases the RAM cache. You can clear the pagefile as it’s stored in the folder name pagefile.sys. You can set it to clear the pagefile contents on every startup automatically. Here’s how:
- Press Windows + R to launch the Run window, and enter the “gpedit.msc” command.
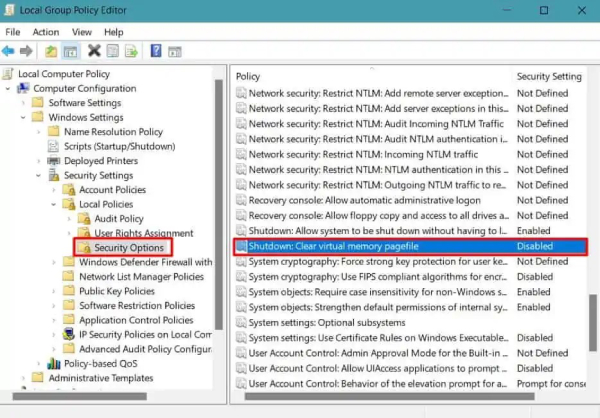
- In the next window opened, click Computer Configuration from the left side of the window, and go to Windows Settings >> Security Settings >> Local Policies >> Security Options.
-
Locate the Shutdown: Clear the virtual memory pagefile in the right pan, double click on it, and select enable.

- Now restart your computer.
☞ 3 Effective Ways to Clear Windows Update Cache for Faster Updates and PC Performance
Way 5: Disable Visual Effects that Take up Much RAM
Windows has evolved a lot with time and has adopted visual effects to elevate the user experience. However, it consumes a lot of RAM and might slow down your PC. The best bet to clear RAM cache Windows 11 in the scenario is turning off the visual effects.
-
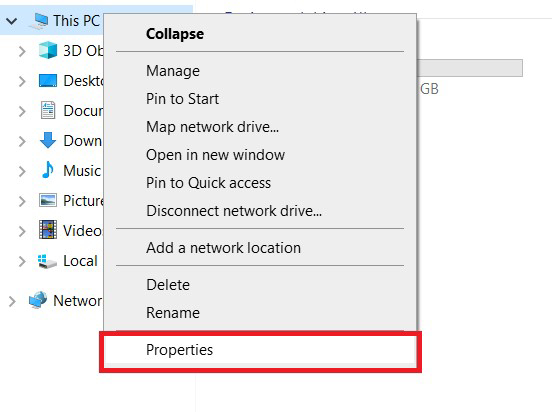
Go to the File Explorer, and right-click on This PC option. Select the Properties option from the drop-down window.

-
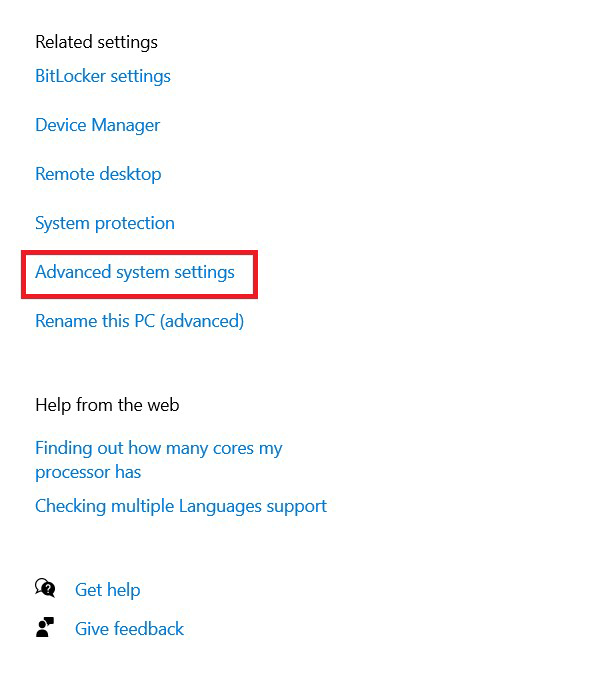
In the next window, scroll down from the left side pain, select the About option, and go to Advanced system settings.

- Select the Advanced tab, and click on Settings under the Performance section.
- In the next window, tick Adjust for best performance and hit OK to save the changes.
Way 6: Flush the RAM Cache
Flushing the RAM cache refers to creating a shortcut to clear the RAM cache. Whenever you need to clear the RAM cache on your PC, you can double-click on it. Here’s how to do so:
-
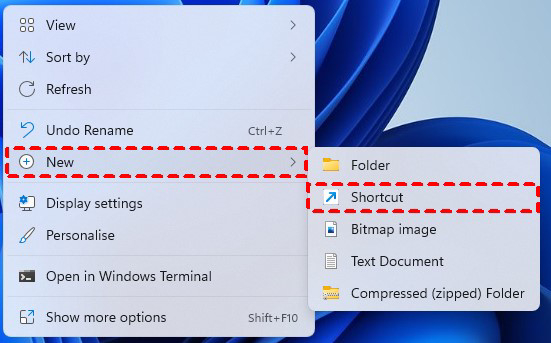
Go to the Desktop, right-click in the empty space, and select Shortcut in the pop-up window.

-
In the next window, type the following command in the text field and hit Next. %windir%\system32\rundll32.exe advapi32.dll,ProcessIdleTasks

-
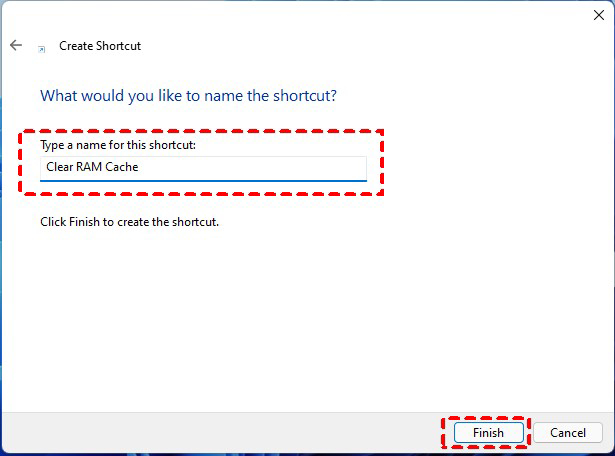
Enter any name to the shortcut, like Flush RAM, and click Finish. Now, you can click on this shortcut anytime to clear the RAM cache.

Way 7: Update Your Device Driver
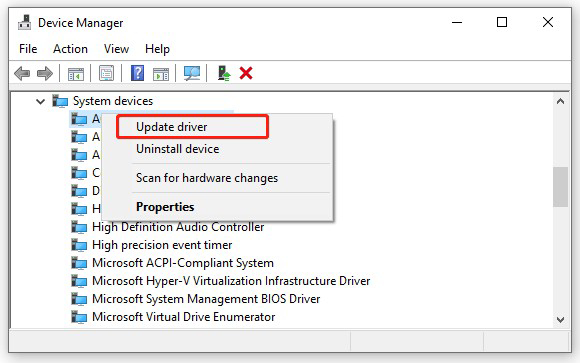
Sometimes, the outdated or corrupt driver's file can cause the RAM cache to be filled due to data leakage. That’s why it’s recommended to keep the drivers up to date. If you don’t know how to update the device driver, follow the steps below:
- Go to the Device Manager and locate drivers with yellow exclamation marks. The exclamation mark indicates there’s a driver issue.
-
Right-click on the device driver with an exclamation mark, and select Update driver.

Way 8: Use RamMap to Clear RAM Cache
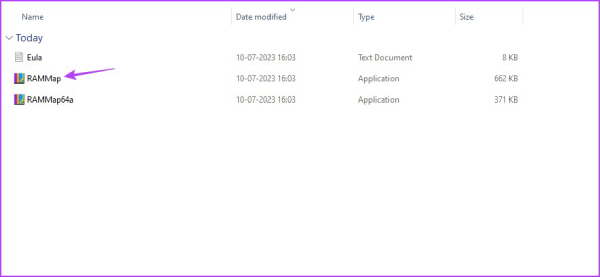
If you don’t want to clear the RAM cache using the manual steps, you can perform it using the tool RAMMap. Microsoft built it, which can monitor RAM resources on the system and clear RAM cache Windows 10. Here’s how it works:
-
Download the RAMMap program on your computer and launch it.

-
Select the Empty tab, and select the Empty standby list option.

- If your system runs low on the RAM, perform these steps to clear the RAM cache.
Way 9: Add More RAM
The best answer to the question “How do I clear my RAM cache Windows 10?” is to add more RAM to the system. If your PC has a small capacity of RAM, consider investing in new RAM chips and installing them into your PC. This will prevent your computer from slowing down and from high memory usage.
Part 3: FAQ
Q 1: Is It OK to Clear Cached RAM?
Yes, clearing cached RAM on your computer is okay if you notice increased RAM usage. It has potential advantages in terms of computer performance. When you clear the cached RAM, it deletes the corrupt contents and prevents memory-related issues.
Q 2: How Do I Clear My RAM without Restarting It?
You can clear the RAM cache using a RAMMap tool built by Microsoft. Using this tool, you can monitor the RAM usage on your system and clear it as needed. Killing the programs from the Task Monitor is also a convenient way to clear RAM without restarting your PC.
Q 3: Why Is My RAM Usage So High?
If you notice high RAM usage on the system, it might result from opening too many programs running in the foreground and background. Go to the Task Manager and kill the programs one by one to decrease the RAM usage and increase system performance.
⛳ You May Also Like: How to Check RAM Speed on PC in Multiple Ways
Concluding Thoughts
The increased RAM usage on the PC can seriously impact the performance and may cause severe issues. Cleaning the RAM cache becomes necessary if your PC runs low on RAM. This guide explains all the possible ways to clear the RAM cache Windows 10.
Moreover, if your PC is low on storage space due to the duplicate file, consider using the 4DDiG Duplicate File Deleter. It’ll find and remove the duplicate files from the storage device quickly.
☞ Out of Memory Error in Chrome: What Causes It & How to Fix It



 ChatGPT
 Perplexity
 Google AI Mode
 Grok
Grok

