5 Effecxtive Ways to Fix PC Screen Flicker on Windows 11/10/7
Is your screen flickering or blinking? PC screen flickering in Windows 11/10/7 is a common problem that can ruin your work and frustrate you. This issue can be caused by outdated display drivers, incompatible apps, wrong refresh rate settings, or even hardware malfunctions. But before you rush to a technician, there are simple solutions you can try. This article will show you 5 ways to fix the Windows 10/11/7 flashing screen and get back to a smooth and stable display in no time! Follow these easy steps and enjoy a stable, flicker-free display in seconds!
- Part 1: What Causes PC Screen Flickering in Windows
- Part 2: How to Fix Windows Screen Flashing Black
- Part 3: Advanced Tips to Upgrade HDD to SDD to Optimize Performance
- FAQs
Part 1: Why Is My PC Screen Flickering for Windows 11/10/7?
If you’re dealing with a situation that PC screen keeps flickering issues on Windows, you’re not alone. Many users report problems as follows:
- Windows 11 or other versions screen flashing black when using fullscreen,
- screen flickering when playing gaming/after update/in safe mode,
- screen flashes black for a second, etc.
These symptoms can occur after updates, while gaming or during daily use.
Why Is My Laptop Screen Flickering on Windows 11/10/7:
Several reasons can cause a flickering screen in Windows 11 or earlier versions. Here are the most common:
- Outdated or corrupted display drivers: These are often the cause of screen flickering in Windows 11 when in fullscreen, especially in games or videos.
- Incompatible apps: Apps like Norton AV or iCloud can sometimes lead to screen flickering problems.
- Refresh rate mismatch: If your display’s refresh rate doesn’t match what your monitor supports, flickering is common.
- Overheating GPU or CPU: Especially in gaming laptops, screen flickering in Safe Mode Windows 11 or while gaming can mean thermal issues.
- Hardware connection issues: A loose DP or HDMI cable can cause random flickers, especially noted in cases like screen flashing black for a second in Windows 11.
- Adaptive Sync or Freesync/G-Sync issues: These settings may cause your screen to flicker when you run high frame rate tasks.
Whatever your PC screen flickers intermittently or constantly, knowing the cause helps you choose the right fix.
【Solved】Fast Tips to Fix Macbook Screen Flickering after macOS 15 Update
Part 2: How to Fix PC Screen Flickering in Windows 11/10/7
Screen flickering is so frustrating especially when it happens on premium devices like Surface Pro 4, XPS 13 or gaming rigs from ASUS, HP or Lenovo. Whether you see a Windows flashing screen, random black flashes or a constant flickering PC monitor screen, these 5 ways will help.
Way 1: Connect a Monitor to the PC via HDMI
A loose or damaged video cable can cause flashing screen issues. To rule out the PC like Windows 10 display problem, connect your computer to an external monitor using an HDMI cable.
♦️ Steps:
Turn off your PC and unplug all connections.
-
Get a good HDMI cable and connect it from your PC to an external monitor.
-
Power on the system and see if the flickering issue continues.
If the flicker disappears on the external monitor, the issue is with your laptop’s display or internal cables, as is common with Microsoft Surface Pro 4 flickering screens and XPS 13 screen flickering problems.
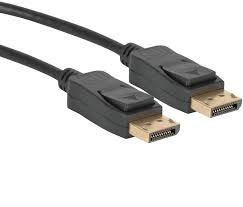
Way 2: Flip the DP Cable
If you’re using a DisplayPort (DP) cable, poor pin contact can cause flickering. Reconnect or adjust the cable to resolve the issue.
♦️ Steps:
Shut down your PC completely.
Disconnect the DP cable from both ends.
Reconnect it in reverse orientation.
-
Turn on your computer and test the display.

If your system only supports DP connections (common in gaming setups), make sure you use high-quality cables to avoid pc monitor screen flickering.
Way 3: Change the Monitor Refresh Rate
A mismatched refresh rate can cause Windows 11 screen flashing black when in fullscreen or gaming. Changing it usually fixes the issue.
♦️ Steps:
-
Right-click on the desktop screen on your PC and choose “Display settings” from the drop-down.
-
The act as follow in different Windows versions:
-
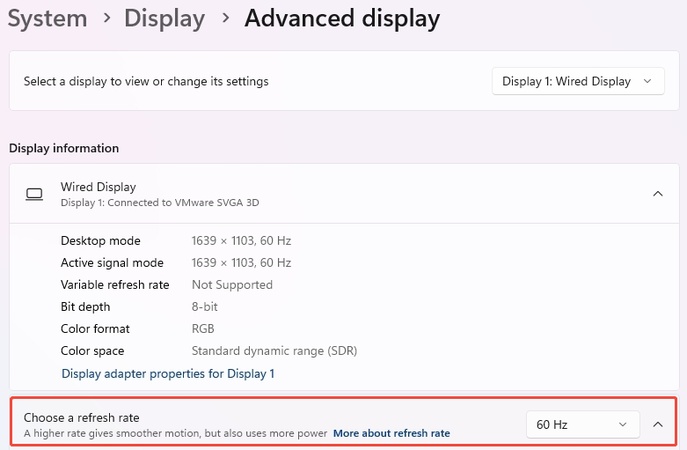
On Windows 11, scroll to Related settings tab and select “Advanced display” under it. Locate “Choose a refresh rate” at the bottom and use the dropdown menu to select your preferred option, ensuring it is 60Hz or higher.

-
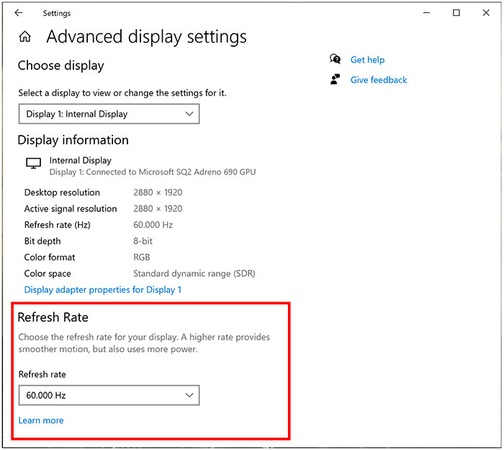
On Windows 10, just look for and click the bottom “Advanced display settings” tab. Then select 60Hz or others under the lower “Refresh Rate” tab.

-
-
If you have multiple displays, first select the display from “Select a display to view or change its settings”, then adjust its “refresh rate”.
This fix is particularly useful for screen flickering Windows 11 when playing games or after updates.
What Causes Black Screen After Windows Update & How to Get Rid of It
Way 4: Restart Graphic Drivers with Windows + Ctrl + Shift + B
If your Windows screen flickers suddenly, restarting the GPU driver is the fastest solution. This is especially handy when your Dell XPS 13 screen flickers or HP laptop display glitches during multitasking.
♦️ Steps:
-
Press Windows + Ctrl + Shift + B at the same time.
Your screen will blink, and you’ll hear a beep
-
Windows will reset the graphics driver without rebooting the PC

This method is safe and often resolves temporary glitches without restarting the entire system.
Way 5: Disable Freesync/AdaptiveSync/G-Sync
If your screen flashes black when playing games in fullscreen on Windows 11, the culprit might be Adaptive Sync, FreeSync, or G-Sync. These technologies are meant to reduce screen tearing, but on some systems they cause flickering, especially in fullscreen mode.
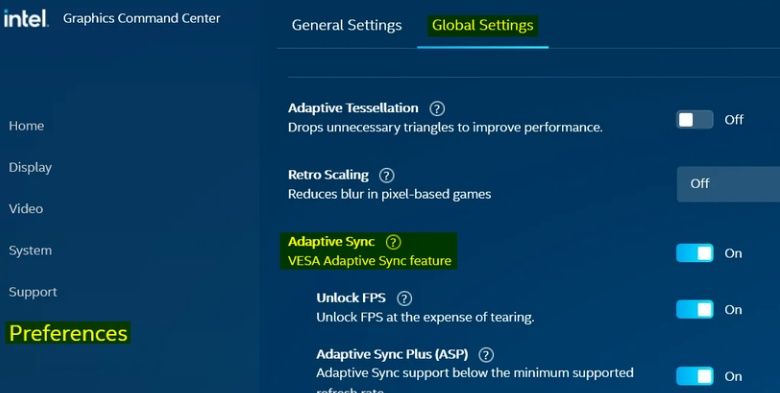
♦️ Steps to Disable AdaptiveSync (Intel Graphics):
-
Search and open the Intel Graphics Command Center from the Start menu.
Go to “Preferences” and select “Global Settings.”
-
Find “Adaptive Sync” and toggle of the button next to it.

Some users report that Adaptive Sync may re-enable automatically after updates, so check again if the issue returns.
♦️ Steps to Disable G-Sync (NVIDIA Control Panel):
-
Search and launch the NVIDIA Control Panel from the Start menu.
-
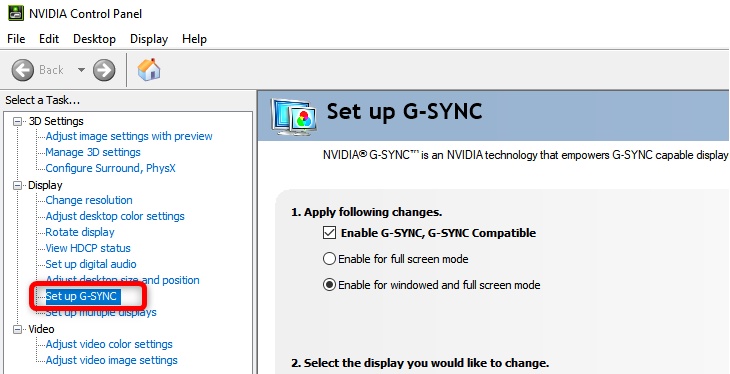
In the pop-up dialog, expand the “Display” directory and click on “Set Up G-Sync” under it.
-
Then uncheck all settings related to G-sync and click “Apply”.

-
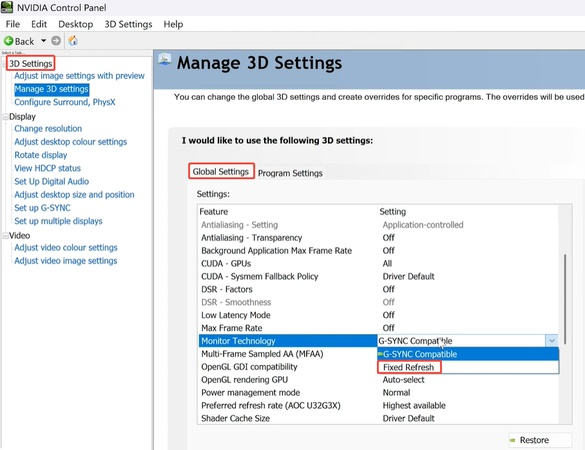
To disable G-sync for games, please select “3D Settings” > “Manage 3D settings” > “Global Settings”. Then locate “Monitor Technology” and change from “G-SYNC Compatible” to “Fixed Refresh”.

Gamers often report flickering in titles running in full-screen mode, especially after enabling adaptive sync. Turning it off solves the to Windows 11 or other laptops screen flickering issue in many cases.
Part 3: Advanced Bonus Tip: Upgrade HDD to SSD for Improved Performance
Screen flickering can sometimes be linked to slow disk performance or corrupted system files, especially on older HDDs. When the disk struggles to keep up with system demands, it can cause delays that affect your GPU and display rendering, leading to PC monitor screen flickering or Windows 10 screen issues.
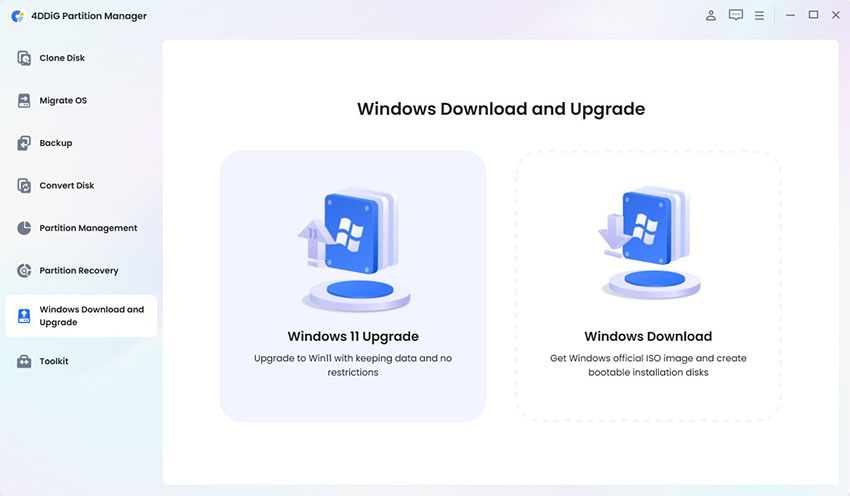
Upgrading to a Solid-State Drive (SSD) significantly improves system speed, reduces loading times and enhances overall stability and may even fix flickering problems caused by disk bottlenecks. 4DDiG Partition Manager is a powerful tool that helps you one-click to clone your entire HDD to an SSD without losing data, ensuring a smooth upgrade.
Secure Download
Here’s what makes it great:
- One-click Disk Cloning – Clone your entire HDD, including OS, apps and data to an SSD.
- Zero Data Loss – Safe migration without overwriting or corrupting files.
- Supports Larger SSD Upgrade – Move from an older HDD to a bigger SSD without hassle.
- Disk Management Tools – Easily create, delete, resize, or format your disk partitions.
- Bootable Media Creation – Migrate even if your system won’t boot.
How to Clone HDD to SSD Using 4DDiG Partition Manager
-
Install the Tool and Connect SSD
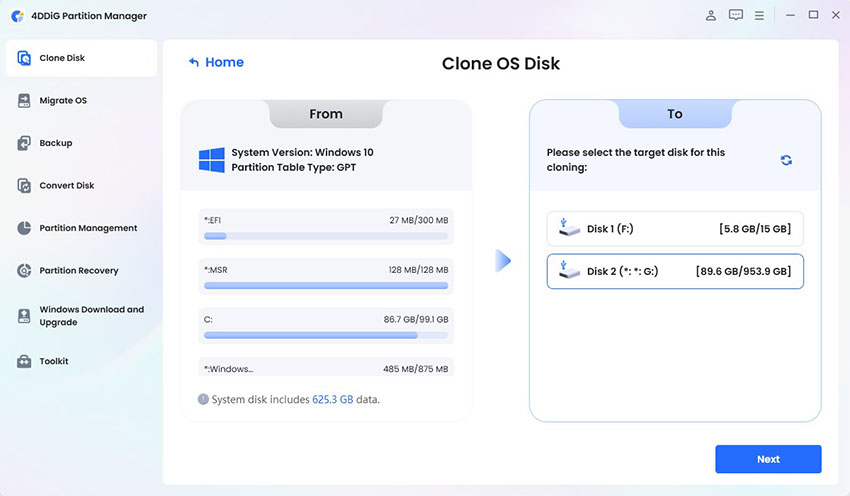
First download and install 4DDiG Partition Manager on your PC. Then plug your new SSD into the computer using a cable or adapter. Launch the software and select “Clone Disk” > “Clone OS Disk”.
-
Choose the SSD as the target disk.
The software will automatically select your current system drive as the source. Just select your new SSD as the target drive and click “Next.”
-
Check and Edit the Layout
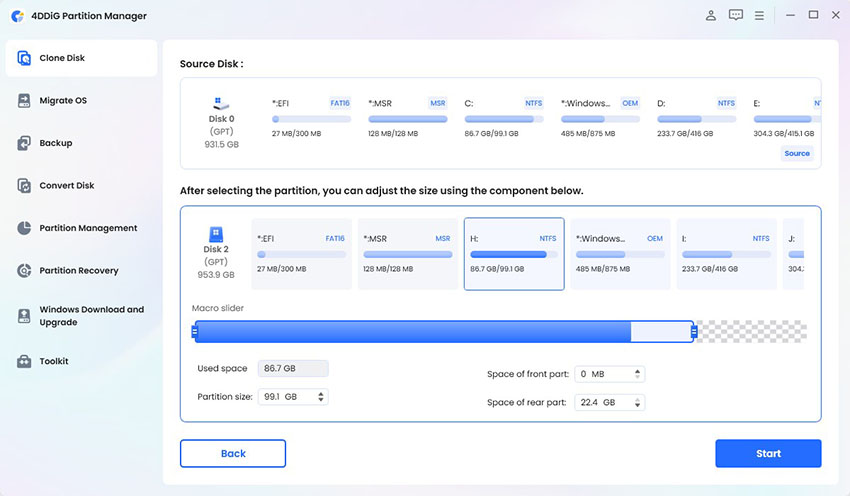
You’ll see how the data from your old drive will be copied to the SSD. You can adjust by dragging the edges of the boxes to resize partitions. Once it looks good, click “Start.”
-
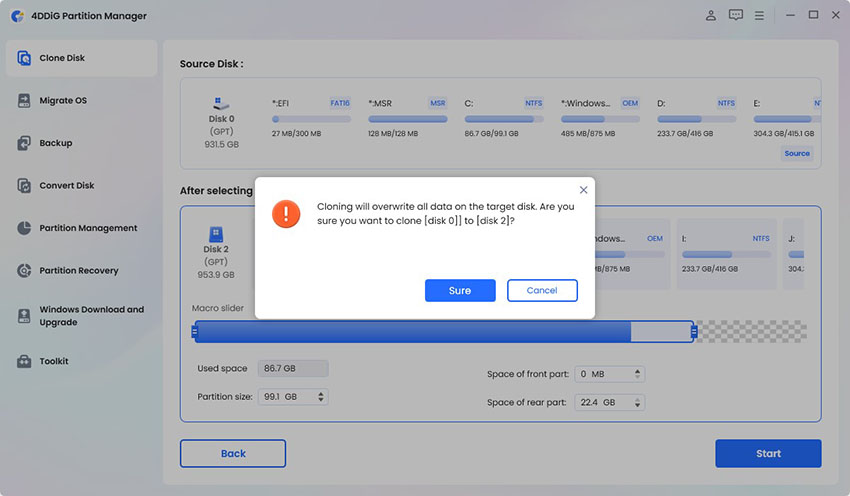
Confirm You Want to Replace the Data
A message will pop up saying the SSD will be erased during the process. Make sure you’ve selected the right disk then click “Sure” to continue if you have backed up all things on the new SSD.
-
Let It Finish & Swap the Drives
Now just wait. The time it takes depends on the size of your old drive. Do not disconnect any cables or power off your PC during the process. After it’s done, turn off your PC. You can now remove the old hard drive and replace it with your new SSD. If you’re keeping both, just change the boot order in BIOS to boot from the SSD.
Now your system is faster, more stable and those annoying screen flickers might be gone for good. Upgrading to an SSD is one of the best ways to fix computer screen keeps flickering issues especially on older machines.
People Also Ask about Screen Flashing Black in Windows 11/10/7
Q1: Is screen flickering a serious problem?
Yes. It could be hardware failure or software conflicts. If left unresolved it may escalate into permanent display damage or usability issues.
Q2: Can HDMI cause screen flickering?
Yes. A faulty or loose HDMI cable can cause flickers. Try a new high quality HDMI cable and ensure it’s tightly connected.
Q3: Can the motherboard cause screen flickering?
Rarely but possible. Faulty GPU sockets or electrical instability from the motherboard can cause flickering especially in older laptops.
Q4: Why is my computer screen suddenly flickering?
This could be due to driver corruption, recent Windows updates, background apps or overheating. Start by updating your graphics drivers.
Q5: Can a virus cause screen flickering?
Malware or viruses can cause abnormal processes to run in the background and interfere with graphics rendering. Run a complete system scan to confirm there are no issues.
Q6: How do I fix my screen display in Windows 11?
Start with a refresh rate adjustment, update your display drivers and if needed use the Windows + Ctrl + Shift + B shortcut. If the problem persists, consider running a hardware diagnostic.
Conclusion
PC screen flickering on Windows 11/10/7 can be annoying and frustrating. Whether you have a Microsoft Surface Pro 4, Dell XPS 13, HP, Lenovo, Acer or ASUS device these fixes ranging from checking cables to disabling adaptive sync can help restore a stable display. Don’t overlook system level causes like slow HDD. In that case upgrading to an SSD using 4DDiG Partition Manager could be the ultimate solution. With the ability to clone your data safely it’s a powerful tool not just to fix screen flickers but also to improve overall PC performance.
Secure Download
💡 Summarize with AI:
You May Also Like
- Home >>
- Windows Fix >>
- 5 Effecxtive Ways to Fix PC Screen Flicker on Windows 11/10/7


 ChatGPT
 Perplexity
 Google AI Mode
 Grok
Grok

