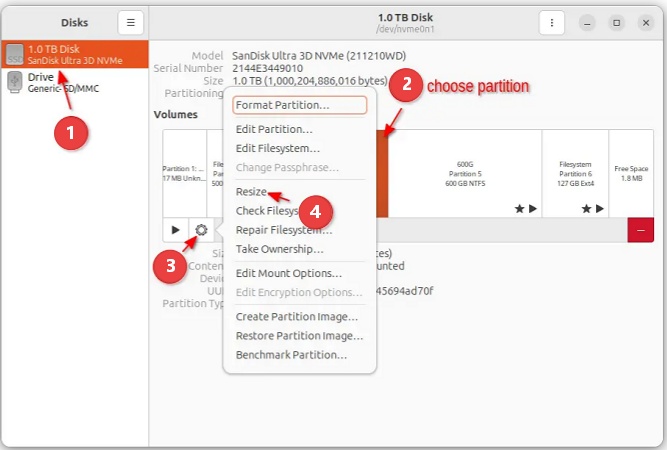
How to Partition SD card Without Losing Usable Space?

5 mins read

Updated on 2026-07-02 12:06:27 to Hard Drive

Need to partition SD card for a camera, Raspberry Pi, Android device, dash cam, or file separation? Partitioning an SD card means dividing one physical card into two or more logical sections, so each section can use a different file system or purpose.

This guide explains what to check before SD card partitioning, then shows how to partition SD card safely.

1. What You Should Do before Partitioning SD Card

SD cards are smaller and more fragile than internal SSDs, and partitioning mistakes can quickly lead to lost files or unusable space. Before partitioning, follow the steps below to prepare.

Back Up Your SD Card First

Partitioning can delete existing files, especially if you clean the card, create a new partition table, or format a partition. If you clone your SD card, you can recover your files if something goes wrong.

Check Whether the SD Card is Write-Protected

Full-size SD cards usually have a small physical lock switch on the side. If the switch is in the locked position, Windows may treat the card as read-only. In that case, SD card partitioning or formatting may fail.

MicroSD cards do not have a lock switch, but the adapter used to connect them to a computer may have one. Also, some failing SD cards become read-only automatically to prevent further damage. If you don’t know how to remove write protection from SD card safely, follow this guide.

Choose the Right File System

Choosing the right file system matters because different devices support different formats.

  • FAT32 works well for older devices, cameras, game consoles, and small cards, but it cannot store a single file larger than 4 GB.
  • exFAT is better for large SD cards and large files, such as 4K videos.
  • NTFS is useful for Windows storage, but many cameras, phones, and embedded devices do not support it well.
  • EXT4 is common for Linux-based devices, such as Raspberry Pi systems, but Windows cannot read it natively without extra tools.

If you want to create partition on SD card for a dash cam, exFAT or FAT32 may be required depending on the device. If you choose NTFS, the dash cam may fail to recognize the card.

⚡ 2. How to Partition SD Card Safely?

Method 1: Use Disk Management

  • Right-click the Start button (Windows logo) and select Disk Management. To create new partitions, you first need to clear the existing one to create "Unallocated" space.

  • In the Disk Management window, look for your SD card. It is usually labeled as Removable (e.g., Disk 1 or Disk 2).

    Warning:

    Be absolutely sure you select your SD card and not your computer's primary hard drive. Check the storage capacity to confirm.

  • Right-click the existing partition bar on your SD card and select Delete Volume. Click Yes to confirm.

  • The bar should now turn black and be labeled as Unallocated. Right-click the black Unallocated space and select New Simple Volume. Click Next on the Wizard welcome screen.

    wizard welcome screen
  • On the Specify Volume Size page, choose how large you want this first partition to be (in MB) and click Next.

    set size of partition
  • Assign a drive letter (or leave the default) and click Next. Choose your File System.

    • NTFS: Best for Windows-only use.
    • exFAT / FAT32: Best for cross-platform compatibility (Android, cameras, Mac, etc.).
  • Leave the allocation unit size as default, give it a Volume label (name), check Perform a quick format, and click Next -> Finish.

    Look back at the Disk Management window. You will see your newly created partition, and next to it, the remaining Unallocated space.

  • Right-click the remaining black Unallocated space and select New Simple Volume again.

    new simple volume
  • Follow the same wizard steps. If you want to use all the remaining space for this second partition, leave the volume size at its maximum default value.

  • Choose the file system for this second partition, complete the wizard, and click Finish.

Once the formatting is complete, your SD card will successfully be split into two separate partitions, each showing up with its own drive letter in Windows File Explorer.

Method 2: Use Reliable Third-Party Tool to Partition SD card

A third-party partition manager gives you a visual layout of the SD card. This helps you see existing partitions, unallocated space, file systems, and partition sizes before applying changes. 4DDiG Partition Manager is suitable for users who want to split a partition, adjust size, or create a new partition without relying on command-line input.

The biggest advantage is clarity. You can view the card structure before confirming changes, which lowers the risk of selecting the wrong disk. It is more beginner-friendly than DiskPart and often better for users who want to split, resize, delete, or create partitions in one workflow.

  • Connect the SD card to your Windows computer. After downloading and installing, launch 4DDiG Partition Manager and choose the SD card from the disk list.

    FREE DOWNLOAD

    Secure Download

  • Check the current layout. Confirm that you are working on the SD card, not your system drive. Next, Click “Split” feature.

    split partition
  • Set the size for each partition based on your real need. For example, reserve one partition for device system files and another for general storage. And choose the file system for each partition, such as FAT32 or exFAT, depending on the target device.

    set size
  • Preview the pending changes and confirm. Click OK to start partition SD card.

    confirm info
  • Apply the operations and wait until the process is complete.

    split partition successfully

Compared with DiskPart, this method is easier for users. It also helps avoid wasting usable space because you can adjust partition sizes visually before applying changes.

Method 3: Use Windows DiskPart to Create Partition on SD card

DiskPart is a command-line tool included in Windows. It can handle many tasks that the normal Disk Management interface may not complete, but it requires careful operation. The risk is high if you select the wrong disk.

  • Insert the SD card into your computer using a card reader.

  • Press Win + S, type cmd, and choose Run as administrator.

  • Enter DiskPart via command: diskpart. Next, enter command: list disk. It will show all connected disks.

    list disk
  • Select your SD card. Replace X with the correct disk number: select disk X. Remove the existing partition layout by running command: clean.

    clean disk via diskpart
  • Then, create a new primary partition: create partition primary size=32768. This example creates a 32 GB partition. You can change the size based on your needs.

  • Format the partition. For example, use NTFS: format fs= ntfs quick. Then, assign a drive letter: assign

  • Create another partition with the remaining space: create partition primary

  • Format the second partition: format fs=exfat quick, and assign a drive letter again: assign.

  • After that, type exit to close DiskPart.

This method is useful if you want full control over partitioning SD card. However, be careful: using clean will erase existing partitions, so always back up first.

FAQs about SD card Partitioning

1. How to Add Partition to SD card?

To add a partition to an SD card, you need unallocated space. If the entire card is already occupied by one partition, you must shrink the existing partition first or delete it after backing up the data. Then, you can add partition via Disk Management.

2. Can I Merge SD card Partitions?

Yes, you can merge SD card partitions, but the method depends on your current layout. If the partitions are next to each other, a partition manager may be able to merge or resize them more easily. If they are separated by hidden or system partitions, you may need to delete partitions and recreate one full-size partition.

3. Why Does My SD card Show Less Space after Partitioning?

This can happen when the card has hidden partitions, unallocated space, or a file system that Windows does not fully recognize. To fix it, check the layout in Disk Management. If you no longer need the existing structure, remove the old partitions and create one new partition using the full capacity.

Conclusion

Learning how to partition SD card helps you prepare storage for cameras, Raspberry Pi, Android devices, file separation, and bootable systems. 4DDiG Partition Manager is a better choice for users who prefer a clear visual layout, especially when splitting, resizing, creating, or merging partitions. Before partitioning SD card, always back up your files, check write protection, and choose the right file system for the device that will use the card.

FREE DOWNLOAD

Secure Download

William Bollson (senior editor)

William Bollson, the editor-in-chief of 4DDiG, devotes to providing the best solutions for Windows and Mac related issues, including data recovery, repair, error fixes.

(Click to rate this post)

You rated 4.5 ( participated)