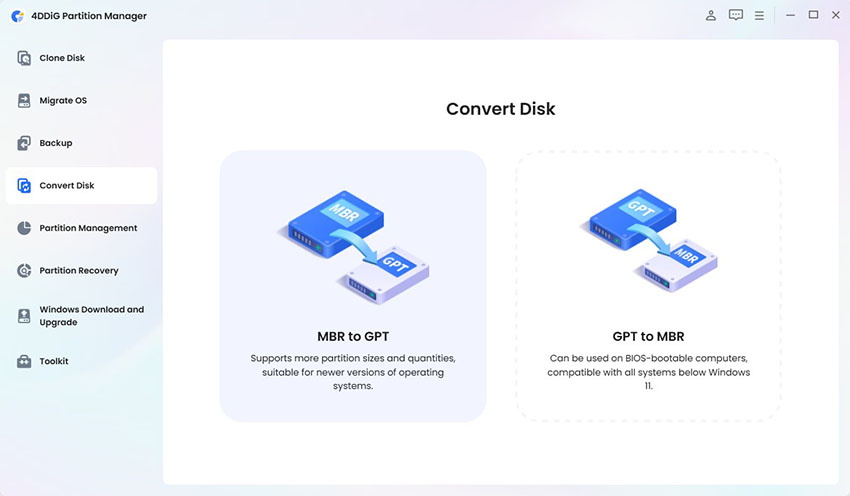
How to Partition a USB Drive: Guide for Windows 11/10
Whether you're looking to organize different types of files, create a bootable drive alongside regular storage, or simply maximize the utility of your USB device, learning how to partition a USB drive can be incredibly useful.
This comprehensive guide will walk you through everything you need to know about partitioning USB drives on Windows 11/10, from understanding the basics to implementing practical solutions using multiple methods.
1. Can USB Flash Drives Be Partitioned?
Yes, USB flash drives can absolutely be partitioned. However, there's an important caveat to understand: by default, Windows only allows you to see and use one partition on a removable USB drive through File Explorer, even if multiple partitions exist on the device.
This limitation exists because Windows treats USB flash drives differently from fixed drives. When you create partitions on a USB drive, all partitions are created and functional, but Windows will only mount and assign a drive letter to the first partition automatically. The remaining partitions are hidden from normal view in File Explorer, though they're still accessible through Disk Management or other partition management tools.
⚡ 2. How to Partition a USB Drive in Windows 11/10?
We'll cover ts multiple ways to partition USB drives, each with its own advantages. Choose the method that best fits your comfort level and needs.
Method 1: Partition a USB Drive via Disk Management
Disk Management is Windows' built-in graphical tool that provides a straightforward way to manage all your storage devices, including USB drives. This method is ideal for users who prefer a visual interface and don't need to work with complex partition configurations.
-
Press Windows + X, then select "Disk Management" from the menu.
-
Right-click on the USB drive's partition and select "Shrink Volume."
-
Enter the amount of space you want to shrink in megabytes. The system will show you the maximum available space. Enter your desired amount and click "Shrink."
-
Then, you'll see unallocated space appear next to your original partition. Right-click this space and select "New Simple Volume." The New Simple Volume Wizard will launch. Click "Next" to continue through the setup process.
-
Specify the volume size. Assign a drive letter to your new partition. Windows will suggest the next available letter, which you can accept or change according to your preference.
-
Format the partition by selecting your preferred file system (NTFS, FAT32, or exFAT), allocation unit size, and volume label. For most general purposes, the default settings work well.
-
Review your settings and click "Finish" to create the partition. The formatting process will begin, and your new partition will be ready to use in moments.
Method 2: Partition a USB Drive via Diskpart Command
Diskpart offers a powerful way to partition a USB drive using the command prompt. Here's how to partition a USB drive using the command prompt.
-
Open Command Prompt as Administrator. Type "diskpart" and press Enter to launch the Diskpart utility.
-
Type "list disk" and press Enter to display all connected storage devices. Carefully identify your USB drive by its size. Take note of the disk number assigned to your USB drive.
-
Type "s elect disk X" (replace X with your USB drive's disk number) and press Enter.
-
Type "create partition primary size=X" (replace X with the size in megabytes for your first partition) and press Enter.
-
Type "format fs=ntfs quick" (or use "fat32" or "exfat" as needed) and press Enter to format the newly created partition.
-
Type "assign" and press Enter to assign a drive letter to the partition, making it accessible in File Explorer.
-
Type "exit" and press Enter to close Diskpart when you're finished. Your partitioned USB drive is now ready to use.
Method 3: Partition a USB Drive via Partition Tool
For users seeking the most comprehensive and user-friendly solution for partitioning a USB stick, dedicated partition management software offers significant advantages over Windows' built-in tools.
-
Download and install 4DDiG Partition Manager from the official website. Launch the program and click Partition Management in the left side bar.
FREE DOWNLOADSecure Download
-
In the main interface, locate your USB flash drive from the disk list and click on "Create" in right side bar to create partition.
Note:
If there’s no unallocated space, right-click on the existing partition and select "Resize/Move" to shrink it and create space for a new partition.
-
Specify the partition size, drive letter, file system (NTFS, FAT32, or exFAT), and volume label for your new partition.
-
Review all pending operations in the task list at the bottom of the window. Click the "Execute 1 task" button and OK to apply all pending operations.
-
The software will proceed to create and format your new partition. Then, click Done when partition is created successfully.
More FAQs about Partitioning a USB Drive
1. How to wipe and reformat a USB?
Open Disk Management, right-click your USB drive, select "Format," and choose your preferred file system. For a more thorough wipe that erases all data securely, use Diskpart's "clean" command followed by creating a new partition and formatting it.
2. How to partition a USB drive to FAT32?
When creating or formatting a partition, simply select FAT32 as the file system. Note that Windows' built-in formatting tools limit FAT32 partitions to 32GB, even though the file system itself supports larger sizes.
3. Is partitioning the same as formatting?
No, partitioning and formatting are distinct operations. Partitioning divides a storage device into separate logical sections, each of which can function as an independent drive. Formatting, on the other hand, prepares a partition for use by creating a file system structure that organizes how data is stored and retrieved.
4. How do I partition an external drive?
Partitioning an external hard drive follows the same process as partitioning a USB drive. Use Disk Management, Diskpart commands, or partition management software with the same steps outlined in this guide.
You may also like: How to Format External Hard Drive?
5. Can I partition an external hard drive that already has data on it?
Yes, you can partition a drive with existing data by shrinking the current partition to create unallocated space, then creating new partitions in that space. Always back up your important files before performing partition operations.
Conclusion
Learning how to partition a USB drive opens up new possibilities for organizing your portable storage and creating specialized configurations for different needs. Whether you choose Disk Management, Diskpart, or professional partition management software, each method provides reliable ways to divide your USB drive into multiple logical sections. For users seeking the most efficient and user-friendly experience, 4DDiG Partition Manager stands out as an excellent choice.
Secure Download
ChatGPT
Perplexity
Grok