How to format external hard drive for Mac? That’s a common query asked by many Mac users. Most external hard drives come with a file system that supports Windows PC. Therefore, as a Mac user, you’ll have to format the drive first, so it is compatible with the Mac file system. Or you can also format it with a standard file system compatible with both Mac and Windows OS. So, you can share the drive between both systems. However, we recommend creating a backup as sharing the external drive between both OS can increase the chance of file corruption. In this article, we’ll teach you how to format external hard drive for Mac and PC. But as formatting can erase files, we have also included a bonus tip to recover data just in case.

Part 1: Overview of Disk Utility
Before we can read and write on internal or external drives, they are formatted to erase data or for reconfiguration purposes. Thus when you get an external drive for your Mac or PC system, it may already be formatted. But due to the incompatibility of the drive’s file system with Windows or Mac operating systems, you may have to format the drive again. For instance, if the external drive has an NTFS file system, your Windows PC can read and write on the drive. However, your Mac will only be able to read the drive as it doesn’t support the NTFS file format. If you want to format external hard drive Mac, you’ll have to use the Disk Utility on Mac. It is a tool for formatting and managing the internal and external drives of Mac and disk images. The Disk Utility is also used to repair drive and volume errors.
Part 2: How to Format External Hard Drive for Mac?
Most external drives are formatted to use on a Windows PC. So, if you contemplate using an external drive on Mac, you’ll have to format it. If you want to save Time Machine backups on the drive, there is an extra step to make a partition in the drive that will support Time Machine backup in the future. But if you don’t want to create a partition, skip the 14th step and onwards. Here’s how to format external hard drive on Mac:
Step 1: Connect the external drive to your Mac.
Step 2: Move to Spotlight search. Type “Disk Utility.”
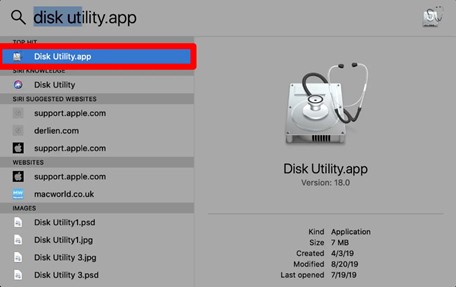
Step 3: Choose the first option to find all drives connected to your Mac. Then tap on “View” in the top-left corner.
Step 4: Now select “Show All Devices.” From under the “External Hard Drives” option on the left side, select the external drive you wish to format. And from the top menu, choose “Erase.”
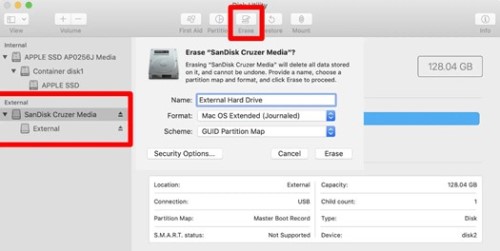
Step 5: A pop-up window will warn you that erasing the drive will delete all data. If you have a backup ignore the pop-up window. Proceed to choose a name, format type, and scheme for your external drive.
Step 6: Select “GUID Partition Map” for the scheme.(We suggest choosing “Mac OS Extended (Journaled)” as the format type because it is compatible with all Mac OS devices. However, if you want to share the drive between your Windows PC and Mac, select “exFAT” as the format type.)
Step 7: Once you’ve entered all the details, hit “Erase.” That’s how to format an external hard drive for Mac. From the top menu, choose “Partition.”

Step 8: Allocate the amount of space you want for the Time Machine backup. And hit “Apply.”
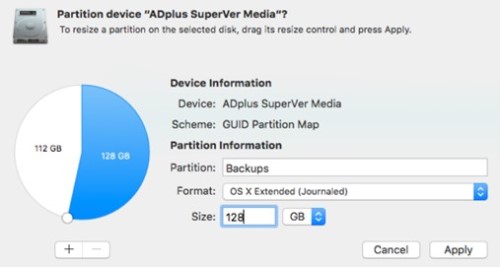
Step 9: Select the untitled partition and hit “Erase.” Then choose the partition name and select ex-FAT as the format type. Hit “Erase.”
Part 3: How to Format External Hard Drive for PC?
If you’ve read the above method for how to reformat external hard drive, Mac let’s find out how to format it for Windows PC use:
Step 1: Connect the external drive to your Windows PC. Then open the “Disk Management” utility. You can open it by heading to “Control Panel.”
Step 2: Choose “Control Panel” then “Administrative Tools.” Next, select “Create and format hard disk partitions.”
Step 3: Right-click on the external disk’s unallocated space you want to format and select “New Simple Volume.”.
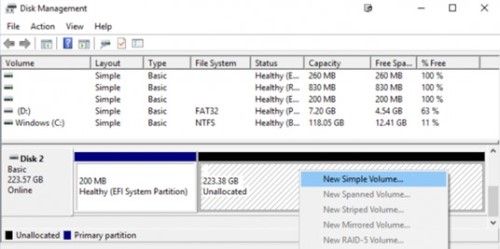
Step 4: Choose “Volume size.” And assign a drive path or a drive letter.
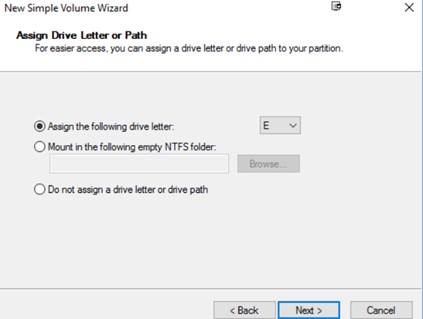
Step 5: Select “exFAT” as the format type for your external drive. And choose a name for the new volume.
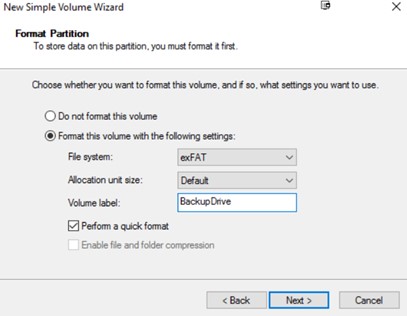
Now press “Next” and then hit “Finish.” Your external drive will be formatted to “exFAT.” So you can use it on both Windows and Mac.
Bonus Tip: What if I Lost My Data After Formatting External Hard Drive for Mac?
If you’ve read the methods above regarding how to format external hard drive for Mac Big Sur and Windows PC, let’s also consider the risks of formatting. There is a high chance that you’ll lose all data, as formatting an external drive for Mac will erase all files. However, your data will be hidden but not permanently gone. So, you can easily recover it via a professional third-party tool like Tenorshare 4DDiG Mac data recovery software. It can scan deeply to extract hidden, lost, deleted, formatted, and corrupted Mac files to restore them in just three clicks.
So what more can it offer? Let’s find out:
- Completely retrieves data from Mac-based drives, encrypted disks, SD cards, USBs, and digital cameras.
- Recovers all data types, including documents, audio, videos, and images.
- Extracts data from partition loss, disk damage, emptied trash bin, broken system, and failed CPU.
- Fast and secure scanning that won’t compromise your data.
- It supports T2 chip, M1, M1 Pro, M1 Max, and macOS Ventura.
- Supports FAT32, exFAT, NTFS, APFS, and HFS+ file systems.
- Quick and Deep scan modes with a high data recovery rate.
Here are the three steps to recover your data from the formatted external Mac drive using 4DDiG-Mac:
For PC
Secure Download
For MAC
Secure Download
- Install the 4DDiG-Mac tool on your Mac device. Connect the external drive to your Mac and open 4DDiG-Mac to choose the drive for scanning. Hover the mouse over the external drive, and you will see the word “Scan” appear in the right corner.
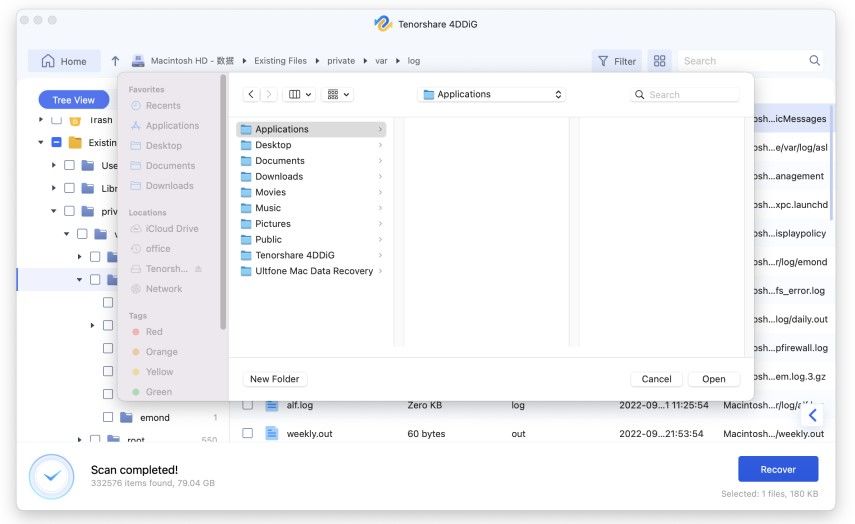
- Hit “Scan,” and the 4DDiG-Mac will start looking for lost data from the external drive. You can pause the scan and click on specific files to check their details.
- Once the 4DDiG-Mac generates the result, including all recovered files, hit the “Recover” button to save them in a secure partition. Never save files in the section where you’ve lost them, as it may cause permanent data loss.


Conclusion
Formatting an external drive for Mac allows you to read and write on the drive. As most drives come with a file system compatible with Windows OS, formatting them to support Mac OS becomes necessary. Although Mac supports reading the drive with a Windows OS compatible system, it doesn’t allow to write on it. Hopefully, our above post has been able to answer your query regarding “how to format external hard drive for Mac and Windows PC.” We recommend creating a backup before formatting, which can cause data loss. If you don’t have a backup and somehow have lost your files, you can always choose Tenorshare 4DDiG Mac data recovery software. It can retrieve hidden, formatted, deleted, and corrupted files from Mac-based internal and external storage devices with a high recovery rate.
 ChatGPT
 Perplexity
 Google AI Mode
 Grok
Grok
