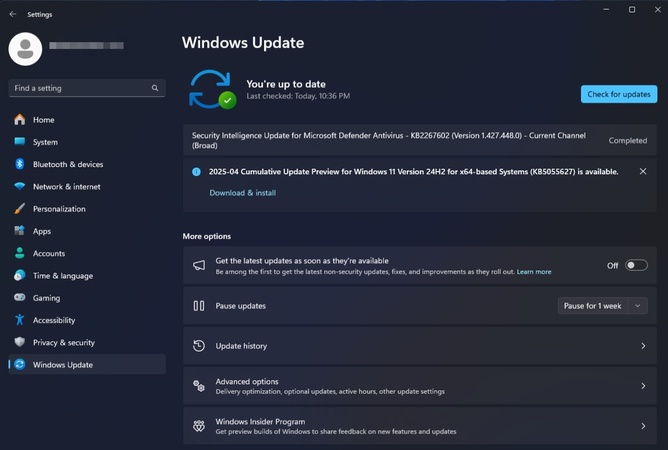
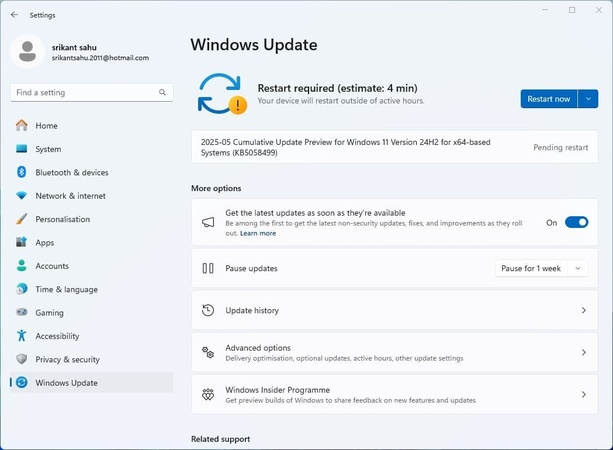
How to Install macOS 26 Beta on Windows PC: Complete 2025 Guide

5 mins read

Updated on 2025-08-29 12:17:04 to Windows Fix

Apple recently introduced macOS 26 Tahoe Beta, bringing a fresh design, productivity upgrades, and performance improvements. While it's meant for Apple hardware, many users want to try it early. The good news? You can install macOS 26 Beta on Windows PC through virtual machines or Hackintosh builds.

Although it requires some preparation, you can run macOS 26 Tahoe on a supported Windows PC if you meet the requirements. This guide covers everything from system requirements to a detailed, step-by-step installation process.

install macos 26 beta on windows pc

Part 1. Hardware & Software Requirements for Downloading macOS 26 Beta on Windows PC

Before installing macOS 26 Beta on a Windows PC, you need to make sure your hardware and software meet the minimum requirements. Running macOS on Windows requires more system resources than standard Windows usage.

1. Hardware Requirements

To run macOS 26 Tahoe on a supported Windows PC, your computer should have at least:

  • Hardware
  • Minimum Requirement
  • CPU
  • Intel Core i5 (6th Gen) / AMD Ryzen 5
  • RAM
  • 16GB minimum (32GB recommended for smooth experience)
  • Storage
  • 256GB SSD (NVMe SSD preferred for faster performance)
  • GPU
  • Dedicated graphics card (NVIDIA or AMD with virtualization support)
  • Motherboard
  • UEFI-based BIOS
  • Supported Devices
  • While macOS is officially for Apple hardware only, Hackintosh community has confirmed support for many high-end Windows PCs.

2. Software Requirements

To install macOS 26 Tahoe on a supported Windows PC, you'll need:

  • Virtual Machine Software: VMware Workstation or Oracle VirtualBox
  • macOS 26 Beta ISO / VMDK Image: Downloadable from Apple Developer Program or trusted mirrors.
  • Bootloader (for Hackintosh): OpenCore or Clover
  • TransMac (optional): For creating a bootable macOS USB on Windows

3. Is It Legal to Run macOS on Windows?

Apple's End User License Agreement (EULA) allows macOS to be installed only on Apple-branded hardware. Running macOS 26 Beta on Windows PCs via VirtualBox, VMware, or Hackintosh is technically against Apple's terms. While Apple rarely pursues legal action against individual users, there are risks.

Part 2. [Prerequisites] Backup Windows 11/10 Before macOS 26 Beta Download

Before you install macOS, always back up your existing Windows system. Beta software, especially when installed in dual-boot or virtual environments, always carries risks of crashes, corruption, or accidental overwrites. The last thing you want is to lose years of files, settings, or your primary Windows OS.

That's where a 4DDiG Partition Manager comes in. Unlike ordinary backup tools that only save selected files, this professional utility allows you to back up the entire Windows system, including the OS, applications, configurations, and personal files. Even if the macOS Beta experiment goes wrong, you can restore Windows from backup at any time with just a few clicks.

FREE DOWNLOAD

Secure Download

4DDiG Partition Manager Makes It Easier To:

  • One-click full system backup and restore.
  • Backup to external drives, partitions or network storage.
  • Incremental backups to save time and storage.
  • Restore Windows instantly from backups without complex setup.

Steps to Back Up Windows Before Installing macOS 26 Beta on PC

  • Open 4DDiG Partition Manager and go to "Backup", then click "System Backup". If you have already used this feature, click "New" to create a new backup task.

    choose system backup
  • Choose to back up "System Partition Only" or "System and Data". Click Change to set a storage path, then click "Start" to begin the backup process. Afterward, wait until the "Backup" is complete.

    choose storage path for windows backup
  • Once finished, your Windows system will be safely saved and ready to restore after installing macOS 26. Just choose the backup and hit the bottom-right "Restore" button.

    restore windows system from backup
Pro Tip:

Use 4DDiG to shrink your Windows partition and create unallocated space. This will later serve as your macOS 26 Beta partition if you go for dual-boot.

shrink partition to make space for macos 26 beta install

Part 3. Install macOS 26 Beta on Windows PC | Step-by-Step [3 Ways]

There are three main approaches to run macOS 26 Beta on a Windows PC: using a virtual machine, creating a bootable USB with a separate partition, or building a Hackintosh. Each method has different advantages depending on your needs.

Method 1. Install macOS 26 Beta on Windows Virtual Machine

Running macOS on a virtual machine is one of the safest ways to test the system without touching your actual Windows installation. Tools like VirtualBox or VMware let you create a macOS environment inside Windows. A virtual machine is ideal if you want to test macOS features temporarily without repartitioning your hard drive. It also allows you to switch between Windows and macOS seamlessly.

Step to Install macOS 26 Beta on VirtualBox for Windows 11/10

  • Install VirtualBox: Download Oracle VirtualBox from the official website. Install it by following the on-screen instructions and then restart your Windows PC if required.

    install virtualbox
  • Get macOS 26 Beta Image: Download a VMDK file or macOS 26 Beta ISO from Apple's Developer Program. Make sure to use a reliable source so the image works properly during installation.

  • Create a New Virtual Machine: Open VirtualBox and click on "New". Name the VM as "macOS 26 Beta". Choose "Type": Mac OS X and set the "Version" to macOS 10.14 or later (64-bit) or whichever option is closest.

    create new vm and name it as macos 26 beta
  • Configure VM Settings: Select your VM, click "Settings" > "System" > "Processor", and allocate at least two CPU cores. And under "Display", maximize the video memory slider (e.g., 128MB) for better graphics performance.

    Note:

    Assign at least 4 GB of RAM (8 GB recommended) and create a virtual hard disk with at least 60 GB of space.

  • Add macOS Image: Go to the VM settings and open the "Storage" section. Select "Empty" under the "Controller: SATA" tab. click the disk icon next to "Optical Drive", and select "Choose a disk file". Locate your macOS 26 Beta ISO/IPSW file.

    choose a disk file
  • Adjust VirtualBox for macOS Compatibility: Open Command Prompt as Administrator and run the following commands, replacing "macOS 26 Beta" with your VM name:

    adjust virtualbox for macos compatibility
    • cd "C:\Program Files\Oracle\VirtualBox"
    • VBoxManage modifyvm "macOS 26 Beta" --cpuidset 00000001 000106e5 00100800 0098e3fd bfebfbff
    • VBoxManage setextradata "macOS 26 Beta" "VBoxInternal/Devices/efi/0/Config/DmiSystemProduct" "iMac19,1"
    • VBoxManage setextradata "macOS 26 Beta" "VBoxInternal/Devices/efi/0/Config/DmiSystemVersion" "1.0"
    • VBoxManage setextradata "macOS 26 Beta" "VBoxInternal/Devices/efi/0/Config/DmiBoardProduct" "Mac-AA95B1DDAB278B95"
    • VBoxManage setextradata "macOS 26 Beta" "VBoxInternal/Devices/smc/0/Config/DeviceKey" "ourhardworkbythesewordsguardedpleasedontsteal(c)AppleComputerInc"
  • Install macOS: Start the virtual machine. From the boot menu, select the macOS installer and follow the on-screen setup instructions. Once the installation completes, you will have macOS 26 Beta successfully running inside Windows 11/10 through VirtualBox.

Congratulations! You now have a working macOS virtual machine on Windows. After the installation finishes, you'll have a fully functional macOS virtual machine on Windows, ready to use. This method is perfect for those who want to test macOS virtual machine on Windows without modifying hardware.

Method 2. Create a Bootable USB to Install macOS 26 Beta on a Separate Partition

If you want a more native macOS experience, you can install it on a separate partition of your hard drive using a bootable USB. This setup allows you to dual boot between Windows and macOS. This method is best for users who want to run macOS more smoothly with better hardware access compared to a virtual machine.

  • Prepare your hardware: Ensure your PC meets the hardware requirements (16GB RAM, 256GB SSD, compatible CPU/GPU). Use a USB drive with at least 16GB capacity (32GB recommended).

  • Download macOS 26 Beta: Obtain the macOS 26 Tahoe Beta installer from Apple's Developer Program or Public Beta Program. You'll need a Mac or a macOS virtual machine to download the installer, as it's not directly available on Windows.

  • Create a Bootable USB on a Mac:

    • On a Mac, download the macOS 26 Beta installer from the App Store or Apple's beta portal.

    • Connect the USB drive and open Disk Utility. Erase the USB, naming it (e.g., "macOS26Beta"), and format it as "Mac OS Extended (Journaled)" with GUID Partition Map.

      format usb as mac os extended
    • Open Terminal and run the following command, replacing "macOS26Beta" with your USB name: sudo /Applications/Install\ macOS\ 26\ Beta.app/Contents/Resources/createinstallmedia --volume /Volumes/macOS26Beta

  • (Alternative) Create a Bootable USB on Windows: Since creating a macOS bootable USB directly on Windows is not natively supported, use a tool like TransMac or GibMacOS:

    • Download TransMac (trial version available) and run it as Administrator.
    • Insert your USB drive, right-click it in TransMac, and select "Format Disk for Mac". Then, choose "Restore with Disk Image" > choose your macOS 26 Beta DMG/ISO file.
    • This process can take 20–30 minutes. Note that TransMac's trial may limit functionality, so consider purchasing a license for full access.
  • Partition Your Drive: On your Windows PC, go to "Disk Management" in Windows, then shrink your existing Windows partition and create a new partition (minimum 50GB) for macOS. Format the new partition as exFAT to ensure macOS can read it during installation.

    shrink primary partition disk management

  • Install macOS 26 Beta:

    • Once your USB is ready, insert the bootable USB to your PC, restart your PC, and press the boot menu key (usually F12, Esc, or Del depending on your system). Choose the USB drive as the boot device.

    • Then boot from the USB and follow the macOS installer prompts to select the new partition as the installation destination. Complete the installation and set up macOS 26 Beta.

      install macos 26 beta on windows from bootable usb

Method 3. Installing macOS 26 Beta on Windows Using Hackintosh

For the most authentic macOS-on-PC experience, you can set up a Hackintosh. This involves installing macOS directly onto your PC hardware, bypassing virtualization. However, it's the most technical method and requires compatible hardware.

"A Hackintosh is a non-Apple computer configured to run macOS with the help of custom bootloaders and patches. While Apple does not officially support it, many enthusiasts use it to experience macOS on high-performance PCs.

Steps to Install macOS 26 Tahoe on a Windows PC Hackintosh

  • Check Hardware Compatibility: Before beginning, confirm that your CPU, GPU and motherboard are supported by macOS. Communities like tonymacx86 and Hackintosh forums provide detailed compatibility lists and guides to help you verify your hardware.

  • Download the Required Tools: You will need the following tools to prepare the installer and configure your PC to run macOS.

    • A macOS 26 Beta DMG or ISO file
    • A bootloader such as OpenCore or Clover
    • Bootable USB creation software like BalenaEtcher or TransMac.
  • Create a macOS Bootable USB (see Method 2): Format a USB drive as GPT with FAT32. Install the OpenCore or Clover bootloader onto the USB. Then copy the macOS 26 Beta installer to it. This USB will serve as your macOS installation media.

  • Configure BIOS Settings: Enter your PC's BIOS and adjust settings for macOS compatibility. Disable Secure Boot, enable AHCI mode for storage and set the USB drive as the first boot device. These changes ensure that your system can load the macOS installer properly.

    disable secure boot
  • Boot and Install macOS: Restart the PC and boot from the prepared USB drive. Choose the macOS installer from the bootloader menu. Once the installer loads, open Disk Utility, erase the target partition as APFS, and begin installing macOS 26 Beta onto your chosen drive.

  • Complete Post-Installation Setup: After installation, install the bootloader directly onto your system drive so you can boot without the USB. Apply necessary kexts (kernel extensions) for components like graphics, network and audio. Finally, reboot, and you'll have a fully functional Hackintosh running macOS 26 Tahoe.

FAQs about Installing macOS 26 Beta on PC

Q1: How do I install macOS 26 Beta?

You can install it on a virtual machine (VirtualBox/VMware) or via Hackintosh. For beginners, the VM method is recommended.

Q2: What is device support for macOS 26 Beta?

Apple officially supports MacBooks, iMacs and Mac Minis from recent years. On Windows PCs, hardware must meet minimum requirements (Intel/AMD CPU, 16GB RAM, SSD).

Q3: How to try macOS 26?

You can try it via a virtual machine without modifying your system. It's the safest way for first-time users.

Q4: Can you install macOS 26 Beta without a Mac?

Yes, you can install macOS 26 beta on a PC without a Mac using a virtual machine or the Hackintosh method.

Q5: Can I make a Mac bootable USB on Windows?

Yes, with tools like TransMac and BalenaEtcher.

Conclusion

You can install macOS 26 Beta on a Windows PC through virtualization, dual-boot partitions or Hackintosh methods. It's technical but gives Windows users a chance to try macOS 26 Tahoe before committing to Apple hardware. Always backup your Windows system first using 4DDiG Partition Manager which makes partition resizing and system recovery easy. Proper preparation lets you run macOS 26 Beta on a Windows computer.

FREE DOWNLOAD

Secure Download

Sawart Mashab (senior editor)

Sawart Mashab, the content writer for 4DDiG, is adept at creating informative and practical solutions related to Windows and macOS issues, data recovery, file repair, and RAID storage.

(Click to rate this post)

You rated 4.5 ( participated)