How to Change Drive Letter Windows 10 without Losing Data?
How to change drive letter windows 10?
““I have TWO hard disk and a cd rom drive on my computer. The HDDs are C and E, and the cd rom drive id D. Is it possible to swap the HDD letters, i.e C becomes E and E becomes C? Or are the letters fixed at the time of format? ”
-Question from Reddit
Think about whether you want to change your drive letter? Indeed, and for quite a long time. For instance, even though you depend more on graphical desktops that empower you to work effortlessly, drive letters are essential to how your software work. But the question is how to change drive letter windows 10? One such inquiry can be seen above:
Part 1: Why Do I Need to Change Drive Letter?
A drive letter is an alphabet distinguishing an existing drive. Drive letters start from A and end at Z. Windows will appoint an open drive letter for all the disks. The system holds the drive letters A and B for the floppy drive and tape drives, and the default drive letter is C. The CD-ROM or other drive is the last drive letter (e.g., D:). That is because C: is the primary drive letter. Windows will generally be the drive letter C. Windows allots the last drive letter to external drives and cell phones.
Individuals change hard drive letter for ease of use. Assigning drive letters in sequential order is a method for keeping them coordinated. You don't need to waste your valuable time by going through drives to track down your files.
Part 2: How to Change Drive Letter?
Solution 1: Change Drive Letter via 4DDiG Partition Manager (the Easiest Way!)
If you're in need of a reliable and efficient disk partition manager, look no further than 4DDiG Partition Manager. This all-in-one partition manager offers advanced features, such as the ability to change drive letters without data loss, making it stand out from built-in tools like Disk Management or Diskpart. Its user-friendly interface makes it easy for anyone to use, even without prior technical knowledge.
Follow the below steps to help you change drive letter Windows 10/11 with 4DDiG Partition Manager:
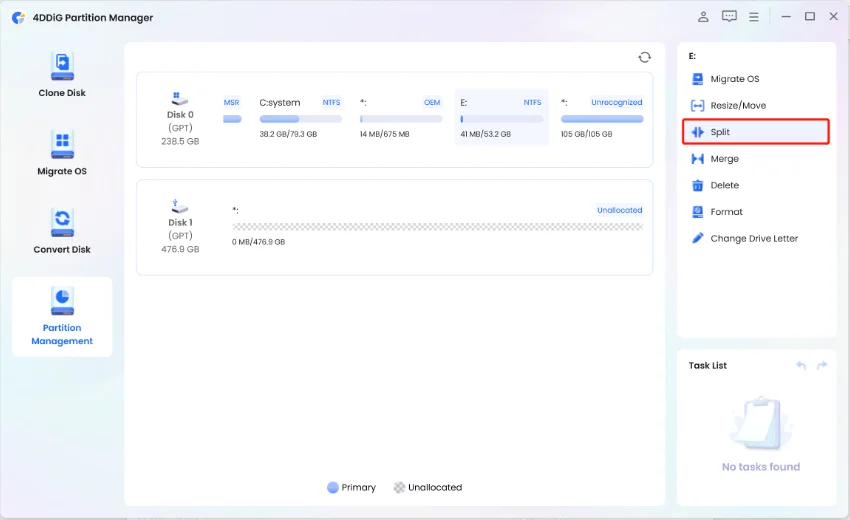
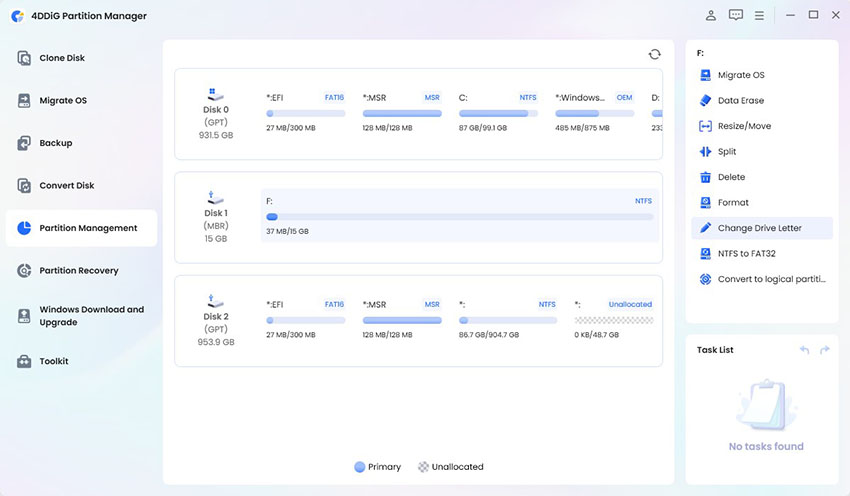
Download and install 4DDiG Partition Manager on your computer and launch it. Select "Partition Management" in the left navigation bar. Right-click the partition whose drive letter you want to change and select "Change Drive Letter".
FREE DOWNLOADSecure Download

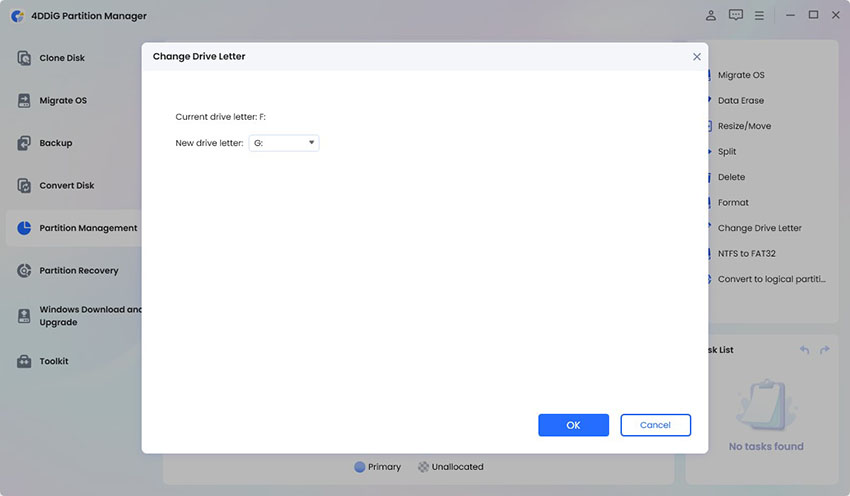
Select a new drive letter that hasn't been taken up by other partitions for the partition and click OK.

Once you have selected the new drive letter, the main interface will display a preview of the partition with the updated letter. To confirm and apply the change, click on "Execute 1 Task(s)" and then select OK.

Click Done when the drive letter of the partition is successfully changed to the one you specify.

Solution 2: Change Drive Letter via Disk Management
Step 1: Click the Win and R keys simultaneously on your keyboard to open the Run box. When the window springs up, type the following command in the bar: diskmgmt.msc.
Step 2: Hit the "Enter" button, and the "Disk Management" window will be displayed on your screen.
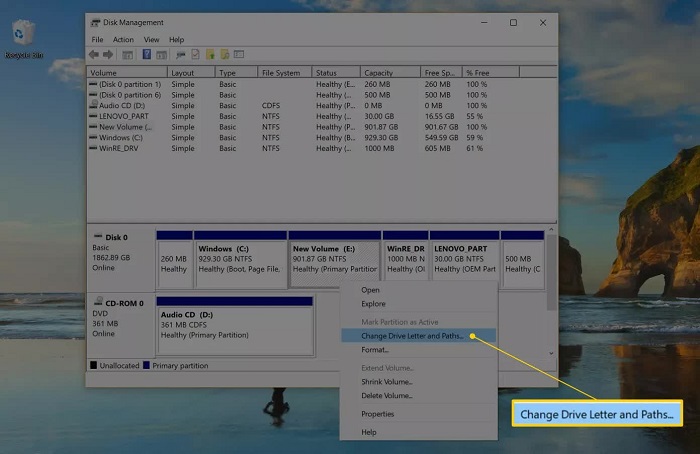
Step 3: You will see a rundown of drives in the following window. Choose the one you need to change the letter of, then, at that point, right-click on it and select "Change Drive Letter and Paths."
Step 4: Tap on "Change" and a new window will spring up.
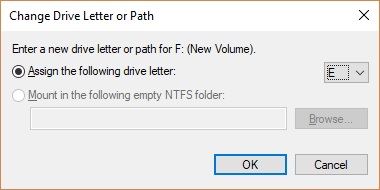
Step 5: To the right of the "Assign the following drive letter" option, you will see a drop-down menu. Select the drive letter you need to give from this menu.
Step 6: Click the Win and R keys simultaneously on your keyboard to open the Run box. When the window springs up, type the following command in the bar: diskmgmt.msc.
Solution 3: Change Drive Letter with Command Prompt
Step 1: Press Win + S keys simultaneously, then, at that point, type in "cmd." Click on the command prompt and when the window opens up, Run it as Administrator by right-clicking it.
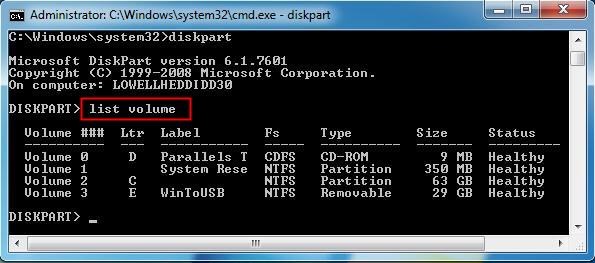
Step 2: Type "diskpart" in the next window and hit "Enter," type list volume, and press "Enter" once more. You will see a rundown of volumes under the "Volume ###" sign.
Step 3: One of them will be the drive you need to allocate another letter. Knowing which one is the required drive is not hard. Simply notice their sizes below the "Size" tab.
Step 4: Pick the volume and tap the "Enter" button on your keyboard, then, at that point, type appoint letter=X and continue to assign drive letter Windows 10.
Step 5: To eliminate the letter and maybe supplant it with another, type removes letter=X. Furthermore, that is all there is to it. Close the window and restart your PC, and you should see your drive with the new letter you just allotted to it.
Solution 4: Change Drive Letter in PowerShell
Step 1: Press the Windows key on your keyboard and type "Windows PowerShell." Right-click on the program and run it as an administrator.
Step 2: Type Get-Disk in Windows PowerShell to recognize the hard drive you need to give the new drive letter to, and Press "Enter."
Step 3: When you select the drive, type the command: Get-Partition - DiskNumber 1 | Set-Partition - NewDriveLetter X. Press Enter, and that's how to reassign drive letters Windows 10.
Note: In the command up there, 1 is the plate number of the drive to be designed; the letter "X" in a similar order addresses the drive letter to be allocated to the drive so you can change it to the letter you like.
Solution 5: Change Drive Letter in Settings
To change the drive letter with Manage Disks and Volumes in the Settings application, utilize these means:
Step 1: Go to your computer settings and click on System.
Step 2: Tap on Storage, and under the "More Storage Settings" segment, click the Manage Disks and Volumes choice.
Step 3: Select the drive you wish to change the letter for.
Note: You might have to tap the bolt button in the upper right corner of the drive to see each partition.
Step 1: Select the desired partition and click the "Properties" button.
Step 2: Tap on "Change drive letter."
Step 3: Utilize the drop-down menu and choose a new letter for your drive and tap OK.
Step 4: When you complete the means, it will change drive letter Windows 7, and it will begin utilizing the new letter.
FAQs about Changing Drive Letter
1. How do I change a drive letter from D to C?
Open Disk Management from Windows 10 menu and right-click the particular hard drive letter you need to change. Tap the "Change Drive Letter and Paths" optionthen press Add. Choose another drive letter for it, and afterward tap the "Change" button, as shown, and this can be a solution to how to switch drive letters.
2. How do I change the drive letter without disk management?
There are several other options that you can employ to change the drive letter without disk management. One can go to the command prompt, or Powershell can also be an answer to how to change drive letter.
3. Can I change the drive letter without losing data?
In case a partition contains just the documents that you seldom use, changing the drive letter might cause infrequent issues and not something more regrettable. So, you can change the drive letters of external drives without issues.
4. Can I change the drive name without formatting?
Yes, you can change the drive letter without formatting the drive using Disk Management. That lets you save a lot of precious data from getting deleted and helps change the letter for your ease.
Summary
After going through this guide, you should be able to easily change the drive letter of any drive in your Windows 11/10. We have discussed every aspect of how to change drive letter windows 10. Among the above five methods, I most recommend you to use 4DDiG Partition Manager. This useful tool can help you change drive letter without data loss in only four steps.


 ChatGPT
 Perplexity
 Google AI Mode
 Grok
Grok


