How to Recover When Photos Disappeared After macOS Tahoe Update?
You may have noticed your photos disappeared after macOS Tahoe update, and this is not unique. A significant number of Mac users have complained about the loss of pictures after an upgrade. It can be frustrating when one cannot locate a picture or an essential file.
Luckily, the photos are not lost forever in most cases. This guide lists five practical techniques of recovery, the causes of photo loss, and how to avoid such loss in the future.

Why Did My Photos Disappear After macOS Tahoe Update?
The question that many users ask is why the error of photos disappeared after macOS Tahoe update occur. The most prevalent reasons are given below.
- iCloud Sync Issues: iCloud photos might fail to synchronize following the update. This is what causes pictures to seem lost when they are on iCloud.
- Photos Library Corruption: The Photos Library can be corrupted during the update process, and the user may lose the thumbnails of certain photos or have no access to an album.
- Storage Optimization Settings: When the “Optimize Mac Storage” feature is turned on, original photographs can be synchronized to iCloud. They can seem to be missing without an internet connection.
- Interrupted Update Process: In case the update process was interrupted by power outages or crashes, the migration of some of the files, such as photos, might be incomplete.
- Accidental Deletion: Some users do end up deleting or losing photos when they are arranging them, and the update occurred.
How to Recover Missing Photos After macOS Tahoe Update?
When you notice that your photos have disappeared from Mac after Tahoe update, do not panic. Try the following recovery methods step by step.
1. Check the Recently Deleted Album
Most of the time, we accidentally delete an image from the library and forget about it. However, sometimes an update may cause accidental deletion. The best thing here is that the Recently Deleted album will keep everything deleted safe for 30 days. So, you just need to access and check this folder.
-
Open the "Photos App" on your Mac and go to the "Recently Deleted" folder from the right menu.

-
Click “View Album” and enter your credentials to unlock the album. Now, you can check if the photos disappeared from Mac after Tahoe update is available here or not.
2. Verify iCloud Settings and Sync Photos
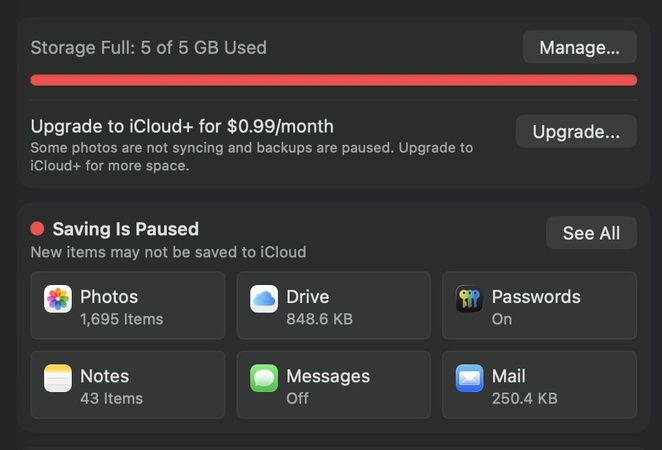
iCloud makes syncing images between your devices effortless. However, sometimes it is paused or glitched after an update. You can simply check if that is the case with your computer and resolve it to get your images back.
-
Open "System Settings" on your Mac and go to the "Apple ID" option at the top to click "iCloud”

-
Make sure that your iCloud Photos option is enabled. Now open “Photos” and ensure that the images are syncing to iCloud.
-
If it is not working, then you need to log out of iCloud and log in again on your Mac to resume syncing and recover missing photos after macOS Tahoe update.
3. Repair the Photos Library
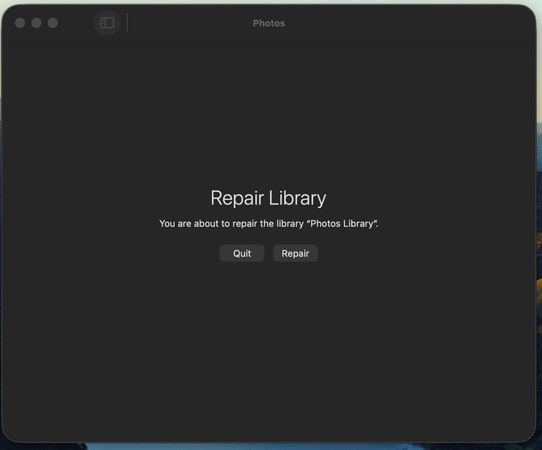
MacOS has a built-in feature that allows users to easily repair the photo library. This feature scans for any missing or bad image files and recovers them with the following steps:
Quit the Photos App on your Mac with the "CMD + Q" buttons.
-
Hold the "CMD + Option" button and click on "Photos app" while holding it.

-
Click the "Repair" button to repair your photo library, and it will recover lost photos after macOS Tahoe Update.
4. Use Data Recovery Software to Retrieve Lost Photos After macOS Tahoe Update
If the above methods do not work to resolve the issue of your photos disappeared after updating to macOS Tahoe, a reliable recovery tool is the fastest way to get them back.
Tenorshare 4DDiG Mac Data Recovery specializes in restoring deleted or lost photos caused by system updates, crashes, or formatting errors, all without complex steps.With powerful scanning and high recovery success rates, it can help you restore your missing photos in just a few minutes.
Key Features of 4DDiG:
- Recover Any File: Able to recover missing files after macOS update, including photos, videos, documents and over 2,000 file types.
- Supports All Drives: Works with internal Mac drives, external hard drives, USB flash drives, SD cards, and more.
- Compatible with Latest macOS: Supports macOS Sonoma, Ventura, Sequoia, and the new macOS Tahoe.
- Preview Before Restore: Lets you preview photos, videos, and documents before restoring them.
- Beginner-Friendly: Easy interface suitable for beginners.
Steps to use 4DDiG Mac Data Recovery:
-
Download and install the 4DDiG Mac Data Recovery software on your Mac and launch it. Click "Hard Drive" from the left menu and select your local drive that you want to scan.

-
Select “Photos” and other file types that you want to scan and click “Scan All File Types” to begin scanning.

-
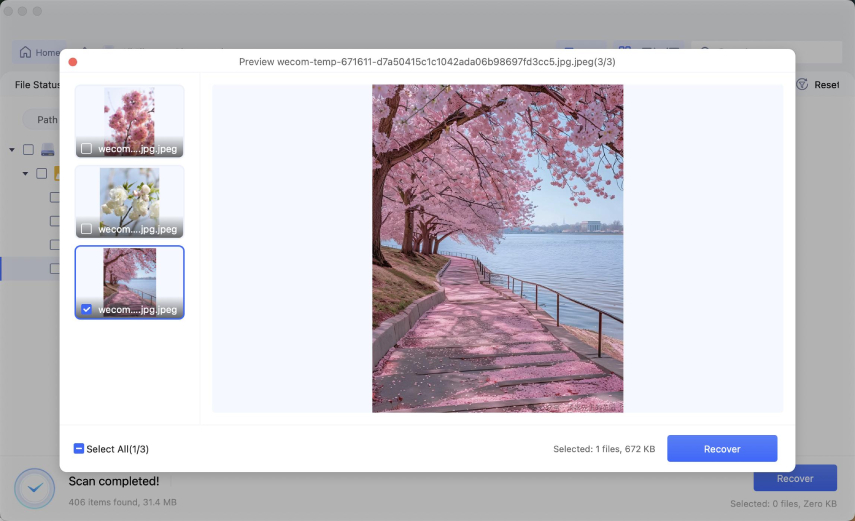
Once the files are scanned, click on a recoverable file to see its preview. If you want to recover that file, click the "Recover" button.

-
Finally, select the location to save that file and click "Save Now," and you have successfully recovered the photos that disappeared after macOS Tahoe update.

5. Restore Missing Photos from Time Machine Backup
If you had Time Machine enabled before upgrading, it is one of the best ways to recover photos.
-
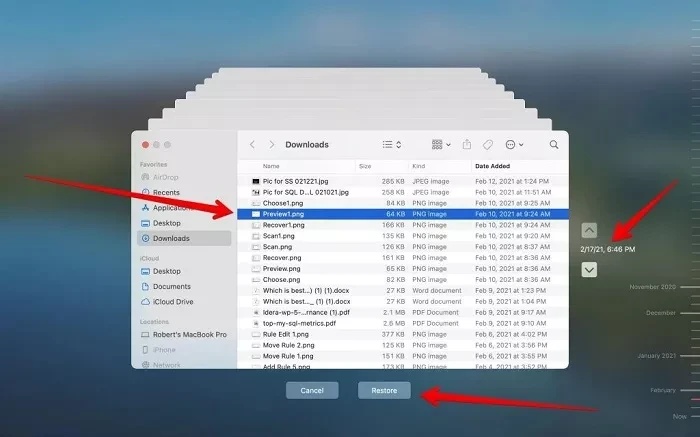
Open the "Time Machine" app on Mac, and if you have saved the backup on external drive, connect it to the Mac as well.
-
Open the recent backup and locate the missing photos after macOS Tahoe update.

-
Click to select a photo and click the "Restore" button to get the file back on your Mac.
How to Avoid Future Photo Loss After macOS Update?
Although it is possible to restore photos, it is always better to keep them safe. These are some of the tips that can be followed to prevent facing situations like lost photos after macOS Tahoe update.
Regular Backups
It is wise to make sure to back up your Mac computer before applying a new update to macOS. Turn to Time Machine or some other reliable backup program.
Use iCloud Wisely
Keep iCloud photos on, but do not go overboard with storage capacity, so that you are not doing incomplete uploads.
Check Storage Before Check Update
This is because before you can run the update, you need to check the amount of free space on your Mac. Low storage may create a file migration error.
Check the Recently Deleted Folder
Regularly check the folder once a week to check if you accidentally deleted something that you needed. Otherwise, the image will be permanently deleted after a month.
Update in Safe Conditions
It is not advisable to update macOS when the battery is low or when the connection is slow and unstable.
When you do these things, you minimize the possibility of missing photos when updating to macOS Tahoe in the future.
Photos Disappeared from Mac After Tahoe Update FAQs
Q1: Are the photos permanently lost after a macOS Tahoe update?
Not necessarily. Most photos are either saved in iCloud, Recently Deleted, or can be retrieved in Time Machine or recovery software.
Q2: Will repairing the Photos Library delete my photos?
No. The tool will not erase your data, but is created to resolve the issue without deleting your storage.
Q3: Can third-party recovery software retrieve missing photos from Mac safely?
Yes. Some programs, such as 4DDiG Mac Data Recovery, can be used safely and efficiently if the drive is not overwritten.
Q4: Will restoring from Time Machine overwrite my current photos?
Yes, it may substitute the current Photos Library. To be on the safe side, back up the present library and then undo the restoration using Time Machine.
Conclusion
In case the photos disappeared after macOS Tahoe update, you might think that your memories are lost forever. However, in most cases, they can be restored with the help of methods such as Recently Deleted, iCloud, Photos Library repair, or Time Machine.
When they fail, Tenorshare 4DDiG for Mac is an efficient means of recovering lost photos in a secure environment. Try all the methods above to get back all the lost photos.
Secure Download
Secure Download
💡 Summarize with AI:
You May Also Like
- Home >>
- Mac Update >>
- How to Recover When Photos Disappeared After macOS Tahoe Update?




 ChatGPT
 Perplexity
 Google AI Mode
 Grok
Grok

