How to Hide Files and Folders on Mac [2026 Updated]
Want to protect your Mac data? Learn 7 simple ways to hide files and folders. For accidental deletions during the process, rely on 4DDiG Mac Data Recovery to get them back.
If you value the privacy and security of your Mac, it's crucial to keep your files and folders hidden from prying eyes. Whether it's personal items like photos, sensitive documents, or work-related files, safeguarding them is of utmost importance. In this article, we will guide you through seven straightforward methods to hide files and folders on Mac.
Additionally, we will show you how to conceal desktop icons, not only for a cleaner desktop appearance but also to enhance your Mac's performance. And should you accidentally delete something while in the process of hiding, fret not, as we’ve included a bonus tip to assist you in recovering those files.

Way 1. Hide Files and Folders on Mac with Keyboard Shortcuts
One quick and easy way to hide your files and folders on Mac is by utilizing keyboard shortcuts. This method allows you to swiftly hide selected items without needing any third-party applications. However, it only works if your Macbook runs on MacOS Ventura or later.
This said, here’s how you can use the specific key combinations to hide folder on Mac.
- Select the file or folder you want to hide on your Mac.
-
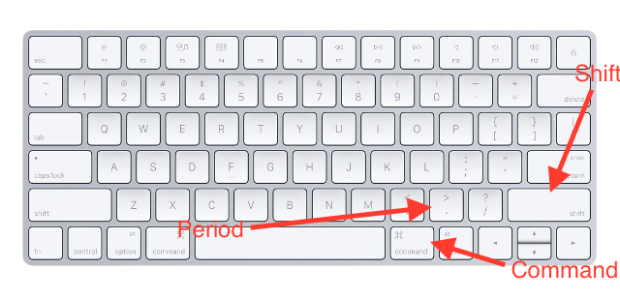
Simultaneously press the Command + Shift + Period (.) keys and the selected item will be hidden immediately.

- To hide the file or folder, press Command + Shift + . again.
The major con of this method is that anyone can press the same shortcut keys to access your hidden files and folders, as there is no security verification. Besides, you’ll have to repeat the command on each folder or file to hide it. You can’t conceal all of them at once.
Way 2. Hide Files and Folders on Mac Using Terminal
If you are comfortable with command-line interfaces, the Terminal provides a powerful tool to hide your Mac files and folder. All you need to do is to execute some specific commands.
Here’s how to hide files on Macbook using the Terminal command line:
-
Open Terminal from Launchpad, or search for it from Spotlight by pressing Command + Space Bar.

-
Type the command “chflags hidden” without the quotes and give a space after hidden.

-
Now drag the file or folder you want to hide and drop it into the Terminal window.

-
Hit “Return” and the file or folder will disappear from your Mac desktop.

To unhide the files and folders using Terminal:
-
Launch Terminal and enter the command below:
defaults write com.apple.Finder AppleShowAllFiles true
-
Hit Enter, type killall Finder in Terminal and then press Enter again. The hidden files and folders will appear in Finder.

The one drawback of this method is that it is not for beginners, as using the command line interface can be challenging for them.
Way 3. Enable FileVault to Hide Files and Folders on Mac
FileVault is an integral security feature on macOS that can help you conceal your files and folders on your MacBook. This is also the most secure method because it requires you to enter security credentials and password to encode the hidden files to prevent unauthorized access.
Here’s how to hide files on Mac using FileVault:
- Click the Apple logo and navigate to System Settings > Privacy and Security.
- Scroll down to FileVault and click Turn On FileVault.
-
Enter your password and either choose “Allow my iCloud account to unlock my disk” or “Create a recovery key and do not use my iCloud account.” Press “Continue.”

Note:
The first recovery option automatically starts the encryption, while the second one generates a recovery key.
- Save the key to access your concealed files and folders.
The con of this method is that multiple users on a single Mac can use their login password to access the encrypted hidden files and folders.
Way 4. Hide Files on Mac With Another User Account
Unlike the previous methods used to hide folder on Mac, you can keep your stuff discreet by setting up separate user accounts. By creating different accounts for work and personal use, you can keep everything separate. This is also useful if someone else needs to use your Mac, as they can have their dedicated account.
- Click the Apple logo and go to System Settings > Users & Groups.
- Click “Add Account” and Enter your Mac password to unlock.
-
Fill in the name and password when prompted, then press “Create User.” Now, you can easily switch between different user accounts on your Mac from the Lock Screen.

- Place sensitive files in this new account and switch between user accounts, then you can keep your files hidden and inaccessible to other users.
The con of this method is that your Mac files are not encrypted or have any security verification. So, if any user can access your account, they can easily view your files.
Way 5. Hide Files by Adding a Dot before the File Name
Sometimes, a simple trick like adding a dot before a file or folder name can make it invisible to the average user as Mac systems consider files starting with a period as hidden. So, if you save your file with a dot at the beginning of its name, it will automatically be hidden from view.
Here’s how to hide files on Macbook with a dot:
- Right-click on the file you want to hide and choose Rename.
- Add a dot in front of the file name, and press “Return.”
-
Click OK to confirm to hide the file, and it will become translucent.

- If your conceal the file entirely, press the keyboard shortcut “Command + Shift + Period (.),” and the file will disappear from Finder. To reveal the file and return it to normal, repeat the keyboard shortcut and remove the dot from its name.
The major drawback of this method is that you’ll have to add dots to each file you need to hide. You can’t add a period (.) to multiple files simultaneously.
Way 6. Use Third-Party Apps to Hide Files and Folders on Mac
If you find managing files individually a hassle, there are handy third-party apps that simplify hiding files on macOS. Apps like Cleanshot X and Parallels Toolbox save time and provide a more convenient way to manage sensitive data.
They also offer additional features to improve your Mac experience, making them great options if you frequently need to conceal your files and folders on your Mac.
Way 7. Hide Desktop Icons on Mac with Finder
In some cases, you may want to hide desktop icons temporarily to keep your screen clutter-free. You can achieve this by using Finder to hide the icons while still having access to your files and folders.
Here’s how you can hide icons on desktop Mac through Finder.
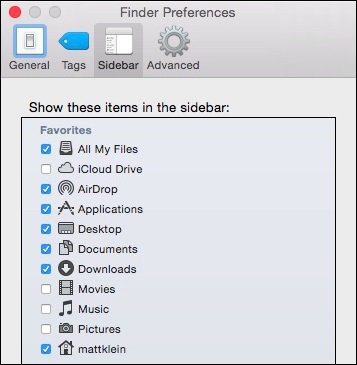
- Open Finder from the menu bar, then select Preferences.
-
Navigate to the General tab and uncheck all the items listed there.

When you hide desktop icons using Finder preferences, the files are still accessible through other means, such as using Terminal or third-party file explorers.
Bonus Tip. How to Recover Deleted Files on Mac
Sometimes even with the best intentions, accidents happen, and you may find yourself in a situation where important files or folders have been accidentally deleted on your Mac. In such cases, it’s crucial to learn how to recover this lost data.
One effective solution for swift recovery is using third-party software like 4DDiG Mac Data Recovery. This tool can retrieve permanently deleted files from various Mac storage devices within a few minutes. Here’s what 4DDiG Mac offers:
- Efficient data recovery in three simple clicks.
- Recover lost files from Mac-based storage devices like USB, SD cards, and digital cameras.
- Fast scan, secure recovery, and high success rate.
- Advanced algorithms for deep file restoration.
- Supports T2 chip, M1, M2, M3, M4, and macOS Sequoia devices.
- No need to disable System Integrity Protection.
Moving on to your Mac file recovery, check out the instructions below for restoring your accidentally deleted files with 4DDiG Mac:
-
Choose Location for Scan
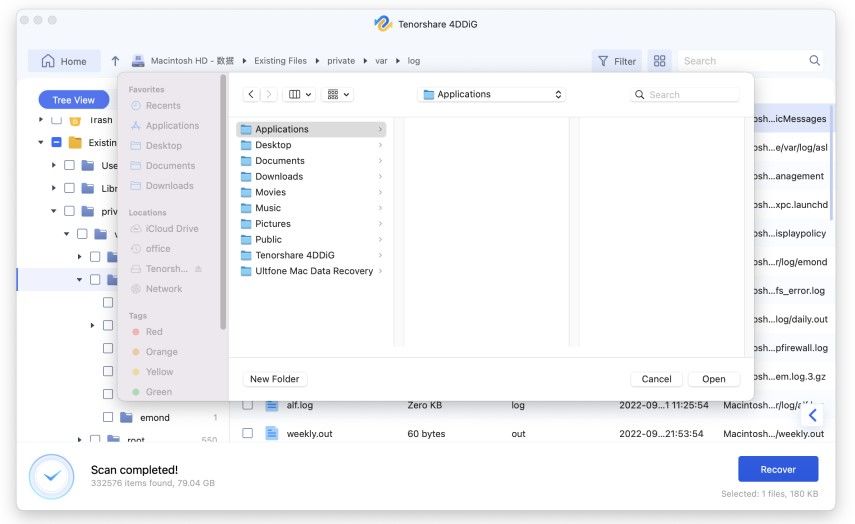
After installing 4DDiG Mac software, open it and choose a location like “Trash” to start Mac data recovery.
FREE DOWNLOADSecure Download
FREE DOWNLOADSecure Download

-
Preview Deleted Files
Click “Scan” to search for all deleted files in the Trash, which might take some time. Once the scan is done, you can view the details of the files by clicking on desired file types.

-
Save Recovered Files
Hit “Recover” and choose a different location to save the retrieved files. Avoid keeping them at the same spot where you lost them to prevent permanent data loss.

Conclusion
If you've been wondering how to hide files and folders on your Mac, we’ve presented seven quick and simple methods to keep your sensitive data away from prying eyes. Whether you choose to utilize Terminal commands or create separate user accounts, each method offers a convenient means to enhance the security of your files.
However, in the unfortunate event of accidental data loss during the hiding process, we highly recommend turning to 4DDiG Mac Data Recovery. This powerful software ensures a secure and successful recovery of lost files with just a few clicks.



 ChatGPT
 Perplexity
 Google AI Mode
 Grok
Grok


