Easily Recover and Show Hidden Files on Mac
Question:Show hidden files on Mac
“I just got a new MacBook Pro and wants to move everything from the old Mac to the new one. Does Mac Migration Assistant transfer everything which includes all command line applications, hidden files, dot files, etc from the time machine backup? How do I access the hidden files?”
-A question from Quora
One of the widespread issues with Mac users is the expanding hidden files. The users usually face a lack of space in the hard drive. Although deleting redundant large files, space does not seem to get emptied according to deleted data. Following is the guide to help you find hidden files on Mac and delete some to open space.

Part 1: An Introduction about Hidden Files on Mac
1. What are hidden files on Mac?
It will be easy for you to get the procedure for how to access hidden files on Mac. If you get to know the hidden files and what potential harm it can be to your system. The reason they are hidden from you will also be explained further.
Hidden Files on Mac
If you see something is eating up space on the hard drive, but nothing is visible in any folder on your Mac, you can not see some hidden files on the screen. macOs and other apps contain some files, logs, caches, and others that Apple hides automatically.
There is a library folder on your Mac, and mostly a pile of hidden files is filed in that. Usually, this folder is to store your personal data and the app support files. The hidden files are invisible. You can identify them by looking for these characters "." in the name of those hidden files. If you wish to see them, you must modify the entire Mac system manually.
Some apps provide the facility of hiding normal viewable files so that no one else could access them without your permission.
2. Why are your files hidden by Mac?
The first and foremost reason why macOS hides some files and makes them invisible is for safety purposes. The security of the MacOS itself so that it could run properly without any error. A user can make it delete or damage it unintentionally. These hidden files contain service files of the Mac operating system. The installed apps service files are also hidden to protect them from possible damage and deletion.
The second reason for hiding files from the sight to make you stress-free. The clutter that you can possibly experience if Apple does not hide them. The hidden files on Mac provide your system a clean and tidy appearance.
Last but not least, those files which start with (.) the character called dot/period are automatically hidden by macOS.
- The .trashes file
- The .htaccess file
- The ~/.bash_profile
- Folders like /usr, /bin, and /etc. are also tucked away out of sight.
Read also: Files are not found with error code 43.
Part 2: How to Show the Hidden Files on Mac?
Way 1: Use Keyboard Shortcut to Show Hidden Files on Mac
Suppose you are using the latest versions like macOS High Sierra, macOS Sierra, and later series. In that case, it takes a keyboard shortcut to find the hidden files on Mac visible. It works like a toggle switch means one keyboard shortcut used for hiding and unhiding the files on your mac system.
- Go to the folder where you suspect there are hidden files.
- Press Command+Shift+(.)
The hidden files on Mac will be visible. Now you can pick and delete unnecessary files and hide them again by the same keyboard shortcut.
Way 2: Use the Finder to See Hidden Files on Mac
You can also use a built-in option to see the hidden files on Mac. You can use Finder to unhide them. Remember that library folder you can get to the folder and see hidden files on Mac real quick.
- Open the Finder on your Mac system.
- Hold on to the option of "Alt" until there is a drop-down menu.
- You must click on "Go" from the list.
- The hidden ~/Library folder will be visible in front of you.
Once you do this procedure, you can work on that folder until you shut down the Finder. If you want to see the library folder always in front of you, just drag down the library folder to the finder sidebar.
Way 3: Use Terminal to View Hidden Files on Mac
You can also use Terminal to view hidden files on Mac. The Terminal is a command-line interface of the Mac OS interface. It has a command in line by default that is Terminal. It controls the system simultaneously. Suppose you are already familiar with using Terminal. In that case, it is pretty easy and straightforward to show hidden files on Mac using Terminal.
- Go to Finder and then select utilities and run Terminal. You can also use Spotlight search.
- Type "defaults write com.apple.finder AppleShowAllFiles TRUE".
- Press Enter.
- Select "kill all Finder." then again click Enter.
- If you wish to hide the files again, type "defaults write com.apple.finder AppleShowAllFiles FALSE".
- Press Enter.
Way 4: Use 4DDiG to Access Hidden Files on Mac
The other latest, most accessible way to access hidden files on Mac is to use 4DDiG data recovery software exclusively made for the purpose. Below is the complete guide to recovering hidden files on Mac using this software.
Part 3: How to Recover Hidden Files on Mac?
Recovering any kind of file, either damage, deleted or, hidden on the Mac system, is not a problem now. Tenorshare 4DDiG Data Recovery for Mac is professionally designed software to retrieve files. Whatever your hard drive and external storage disks contain as documents, photos, and videos are entirely recoverable through this genius software.
Secure Download
Secure Download
-
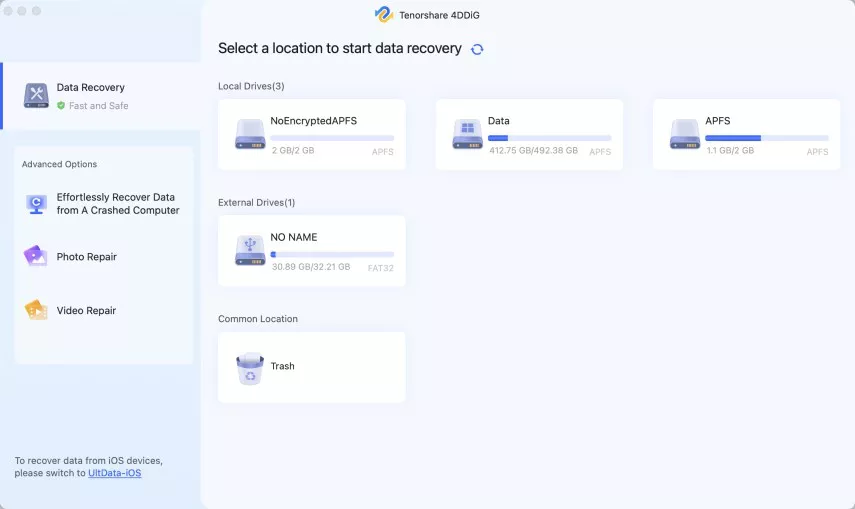
Select a Location
To recover hidden files on Mac, first of all, Install 4DDiG-Mac in your Mac system if you don't have it. To start the recovery, select location and click scan.

-
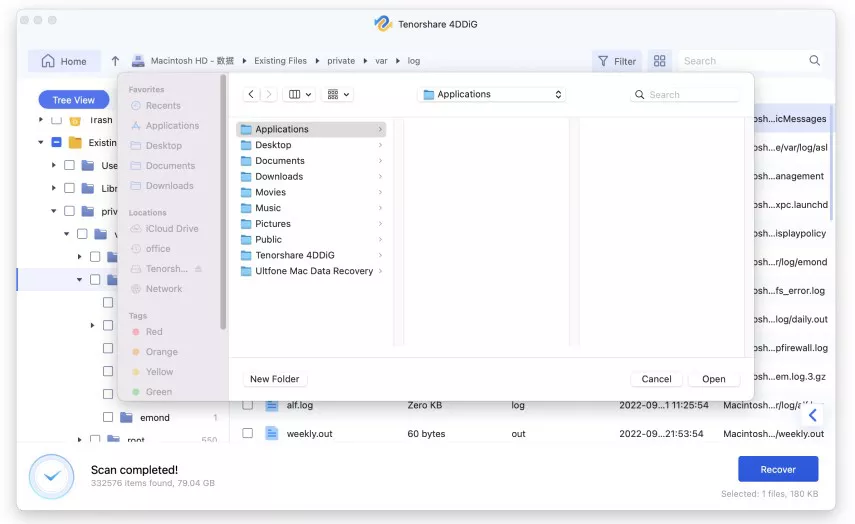
Scan and Preview
Let it scan for a few minutes, and it will unhide all the files after checking on your screen. It takes a while to scan all deleted files on mac./p>

-
Recover Hidden Files on Mac
Now, there is an option to recover the file; select the specific file you want to unhide and select the "Recover." Once you find the hidden files, it is up to you to delete them, recover them, or leave them hidden.

Part 4: How to Hide Files on Mac?
We have already explained earlier why some files should be hidden in the system. It saves you from stress, the extra burden of taking care of those files, and helps you to keep things private. Following are some tips to keep following.
1: Turn the FileVault On
Open System Preferences Security & Privacy, there you will see FileVault. Once you select the FileVault On, no one could reach your data without a password that you will set on the device.
2: The Library Folder
The Library folder is already hidden in the Mac system by default. You can easily use it to hide your important data that needs to be hidden.
3: Create another user account
Go to System Preferences Users & Groups preference pane, create a new account, and hide the data in the new account.
4: Turn visibility attribute to invisible
Write setfile -a V (filename) in the Terminal; it will instantly make your file invisible. You can use the same command to unhide the files. Just replace upper case V to lower case v.
5: Make the file or folder hidden in Terminal
There are two ways of doing it: a)Type chflags hidden File/folder path will make them disappear; b)Type mv filename .filename. The files with the name initiating with a dot are automatically hidden by Apple.
Conclusion:
The above article guided you on the best possible ways to open hidden files on Mac using different procedures and options. Now next time, If someone asks you. How do I unhide folders on Mac? You can readily recommend 4DDiG data recovery software for the quickest and easy way of doing so. Tenorshare 4DDiG Data Recovery Software is efficient, consumes less time, and is user-friendly. Give it a try, and you won't regret it.


 ChatGPT
 Perplexity
 Google AI Mode
 Grok
Grok


