How to Repair Photo Library and Recover Photos on Mac
Struggling to repair your Mac's photo library and retrieve lost photos? Learn effective methods and simplify the recovery process with 4DDiG Data Recovery, your go-to solution for photo recovery on Mac.
Many Mac users on different Apple platforms have reported that whenever they launch Photos on Mac, they receive the "Photos must quit because the photo library has become unavailable or its data is corrupt" error message. One such situation is illustrated below:
“Every time I go to launch Photos on my Mac, I receive the "Photos must quit because the photo library has become unavailable or its data is corrupt" error message. I have tried repairing the photos library and it works momentarily before reverting back to its corrupted state. I have checked to make sure all of my software is up to date and my photos library is accessible on my other Apple devices. If anyone could provide further information regarding this issue it would be greatly appreciated.”
-From Apple discussions
Why photos won't open on Mac and how to repair it? This post focuses on how to repair corrupted photos library and recover photos on Mac.
Part 1. How to Repair Corrupted Photos Library on Mac
Way 1. Use Photos Repair Library on Mac
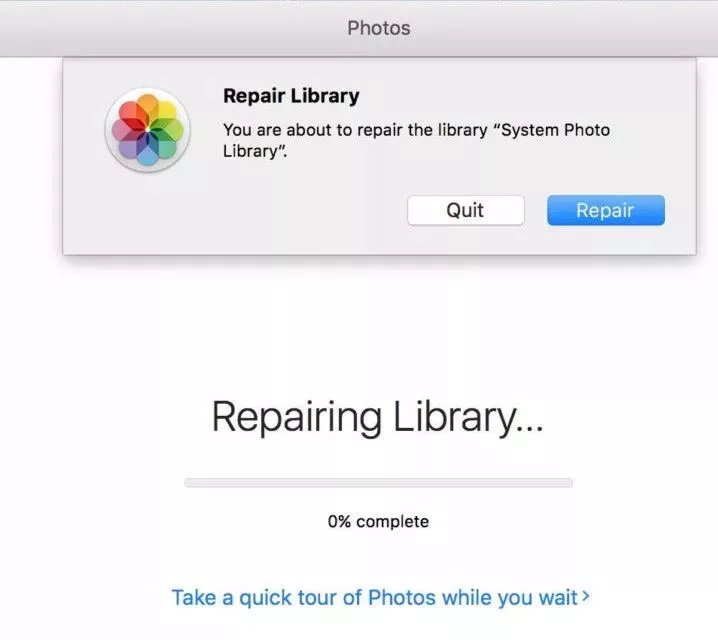
Try using Photos Repair Library tool on Mac if your Photos library won't open, or on the other hand, if the Photos application is corrupted. To get to the Photos Repair Library on your Mac device, you need to follow the means below:
- Close your Photos app if it's open and click open it again. Then, at that point, while you snap to open Photos, click and hold down the Command + Option keys on your keyboard simultaneously.
-
In the popped-up window, click Repair to start the repair process. Enter your account ID and password if needed.

The Repair Library tool breaks down the library's data set and fixes any problems found. Contingent upon the size of your library, the fixes may take some time. When your Mac is done troubleshooting the library, Photos will open the photos disappeared from iPhoto.
Way 2. Update your macOS
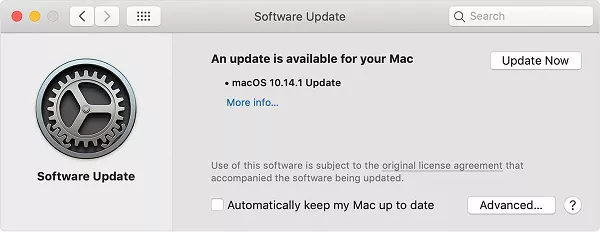
Before you begin updating your software, it's a good idea to back up your data. Then, at that point, follow these means to find and install any accessible system updates or redesigns:
Go to System Preferences from the Apple menu, situated toward the side of your screen.
Go to Software Update from the menu that shows on your screen.
You can also utilize the App Store to get updates if your System Preferences do exclude the Software Updates.
Click one of the two options:
- If you click Update Now, your Mac will update to the most recent updates for your installed version, for example, an update from macOS Mojave 10.14.5 to macOS Mojave 10.14.6.
-
If you click Upgrade Now, your Mac will upgrade to a significant new form with another name, like macOS Monterey.

At the point when Software Update says that your Mac is updated, then, at that point, macOS and all of the applications it installs will be up to date. It includes Safari, Calendar, Notes, Photos, Clock, and Maps.
Way 3. Repairing Photos Library with Disk Utility on Mac
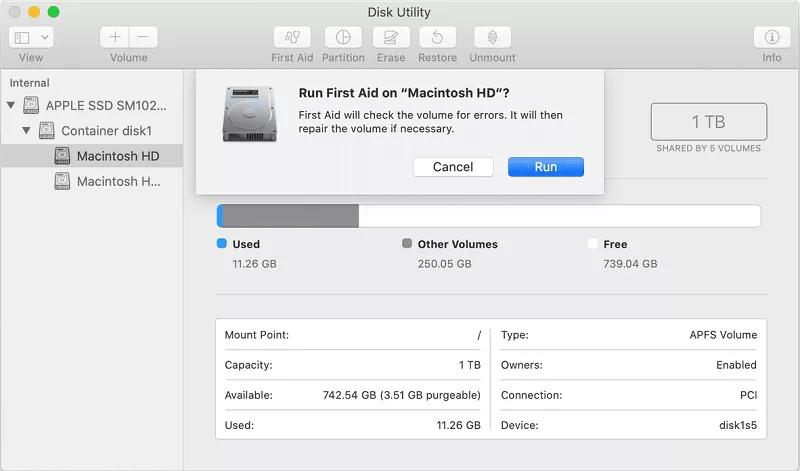
If you see errors like “Photos app quits unexpectedly” “a file is corrupted” or “a volume not working properly” on Mac, Disk Utility is worth trying, though it is not aimed to detect or repair all problems in the disk. It is a sort of emergency fix for your disk when a problem occurs.
- Go to the Disk Utility app on your Mac device.
- Go to View >> "Show All Devices."
- Select a disk or volume that creates a problem, then, at that point, click the First Aid option for further troubleshooting.
-
Click "Run" to start the process and, then click the "Continue" button.

If Disk Utility fails to fix your Photos Library issues or you receive a message that the First Aid process couldn't fix your issue, you can then try the following method to rebuild photos library in iPhotos.
Way 4. Rebuild Photos Library in iPhoto
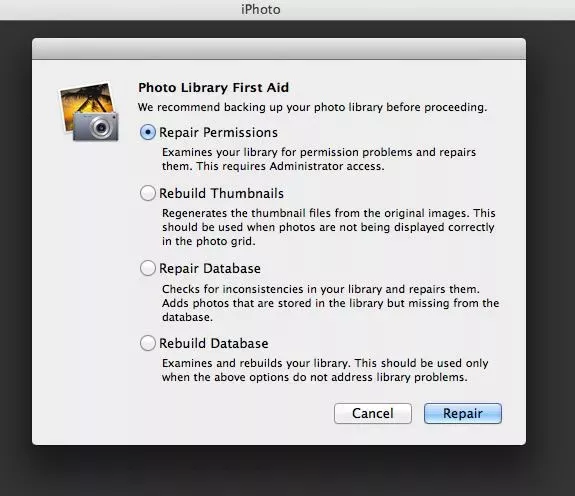
If you have an older iPhoto app on your Mac, use its Photos Library First Aid to fix this problem. It allows you to restore iPhoto library database. It lets you pick one out of the following four options:
Repair Permissions: Pick this choice if the photos library won't open or you get an error message saying you can't edit your photos.
Rebuild Thumbnails: Use this when your thumbnails in iPhoto don't show up accurately, and you see dark boxes on your picture documents.
Repair Database: Click on this option if your Photo Library is missing pictures from it unexpectedly.
Rebuild Database: If iPhoto stops suddenly, won't load, hangs, or the database is unreadable, use this option. That ought to be the last answer to how to recover iPhoto library.
Follow the steps below to rebuild Photos Library and get rid of the photos won't open on Mac error:
- Quit the Photos application and open the Apps list. Find iPhoto application.
- Hold down the Option + Command keys on your keyboard and click on the iPhotos app.
- Keep holding the keys until the iPhotos application is loading and you see the window of Photo Library First Aid.
- Click Repair Permissions.
- You can pick the other options if you need to perform other repairs, contingent upon the issue you're confronting.
- Click Repair.
- Every repair or rebuild will take some time to complete. Thumbnail and database rebuild usually take longer than the repair process.
-
When done, your iPhoto Library should work without a hitch.

Part 2. How to Recover Photos on Mac
If the photos library is corrupted, and your data gets lost, or you delete the iPhoto library, you can still get your photos back using the following methods:
Way 1. Recover Lost Photos on Mac without Time Machine
If you have accidentally deleted the iPhoto library and have not backed up photos to the time machine, you can get your photos back with Tenorshare 4DDiG Mac Data Recovery Software. This Mac photo recovery software supports to recover photos after accidental deletion, hard drive corruption, or system crashes. It gets your job done with such ease that even a non-technical person can perform the recovery process in the following way:
Secure Download
Secure Download
-
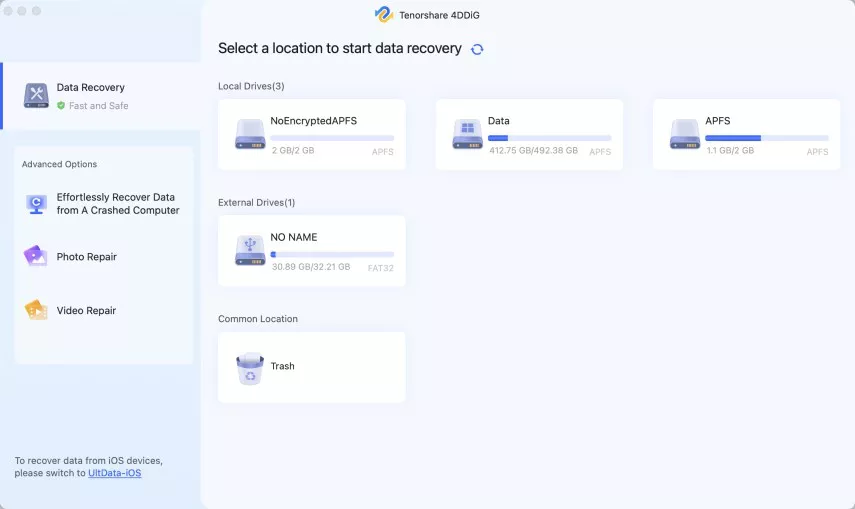
Select a Location
Install and open the 4DDiG Mac data recovery version from our official site and select an area like your hard drive to begin recovering files. Then, at that point, click the "Scan" and the software will look for all the lost files. You will need to disable SIP to recover files from macOS High Sierra and later systems.

-
Scan and Preview
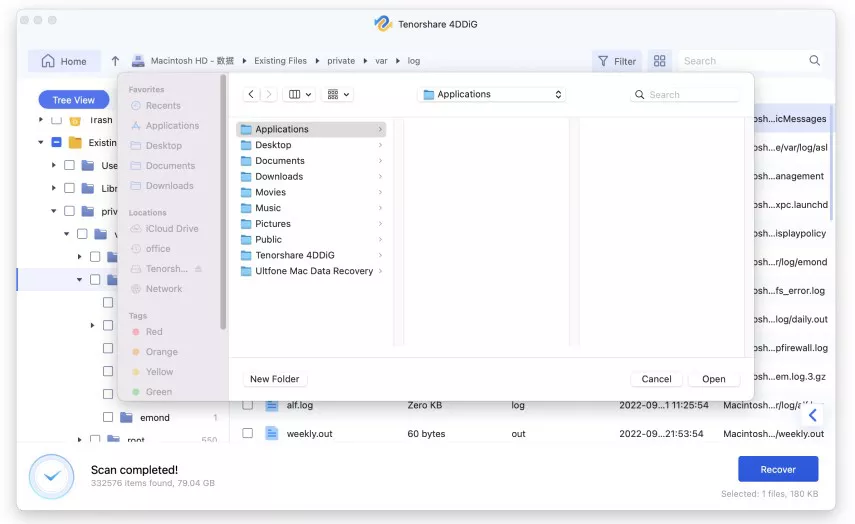
The process will take some time, and after the scan result creates, you can tap on each file record type to preview more files inside it.

-
Recover Mac Photos
Click the "Recover" button to restore the selected files and select a location to save them. It's better not to save them to the folder where you lost them to prevent permanent loss.
 FREE DOWNLOAD
Secure Download
FREE DOWNLOADSecure Download
Way 2. Restore Photos from Time Machine
If you’ve turned on Time Machine on Mac, here are the steps to restore photos from the Time Machine backup.
- Close the Photos app by selecting the "Quit Photos" option.
- Tap the "Time machine" from the menu bar and then the "Enter Time Machine" option.
- A window will open up showing your backup files.
- Click the date of your last reinforcement and find your Photos backup.
-
Click the Photos backup >> "Restore" button to get the iPhoto library recovered photos from time machine backup.

The Bottom Line
Photo Library applications may face problems like corruption and accidental deletion of photos. These issues demonstrate that your Photos app require repair. Utilize the above strategies to repair photos application, and recover any deleted file using the Tenorshare 4DDiG Data Recovery Software for Mac. It allows users to preview the files found after the scanning result.
💡 Summarize with AI:
You May Also Like
- Home >>
- Mac Recovery Solutions >>
- How to Repair Photo Library and Recover Photos on Mac


 ChatGPT
 Perplexity
 Google AI Mode
 Grok
Grok


