How to Fix “Windows Can’t Shrink Volume”?

5 mins read

Updated on 2026-07-24 18:40:08 to Windows Fix

Users often find they can't shrink volume Windows 10 partitions even when the drive appears mostly empty. This limitation stems from the physical placement of system-locked data, such as virtual memory and restore points. Don’t worry, we’ll breaks down how to identify these blocking files, remove the partition layout restrictions, and reclaim your disk space without data loss.

1. Why You Cannot Shrink a Volume beyond the Point in Windows 11

The main reason for this limitation is unmovable system files. Disk Management cannot automatically relocate certain system files that are located at the end or middle of the partition cluster. When the shrink process hits these unmovable files, it stops immediately.

  • Pagefile.sys (Paging File): Used by Windows as virtual memory. If it is located toward the end of the partition, Disk Management cannot move it while the operating system is running.
  • Hiberfil.sys (Hibernation File): Reserved for Windows Fast Startup and Hibernation modes, which locks its cluster position on the disk.
  • System Volume Information (System Restore Points): Contains shadow copies and restore points that are protected by system privacy and cannot be dynamically relocated during a standard shrink.
  • Disk Fragmentation: Over time, scattered fragments of regular files can sit near the end of the volume boundary, blocking Disk Management from shrinking further.

Other causes include a damaged file system, active applications writing to the drive, or a volume that is not NTFS. Windows Disk Management supports shrinking NTFS volumes and raw volumes, but it does not shrink EFI, recovery, or OEM partitions.

⚡ 2. How to Fix “You Cannot Shrink a Volume Beyond the Point”?

Back up important files before changing partition boundaries. The following methods begin with the least disruptive option and then temporarily remove common system-file blockers.

Method 1. Shrink the Partition with 4DDiG Partition Manager

When Windows can’t shrink volume through Disk Management, a dedicated partition tool, 4DDiG Partition Manager can provide a clearer visual layout and do not restricted by those unmovable files.

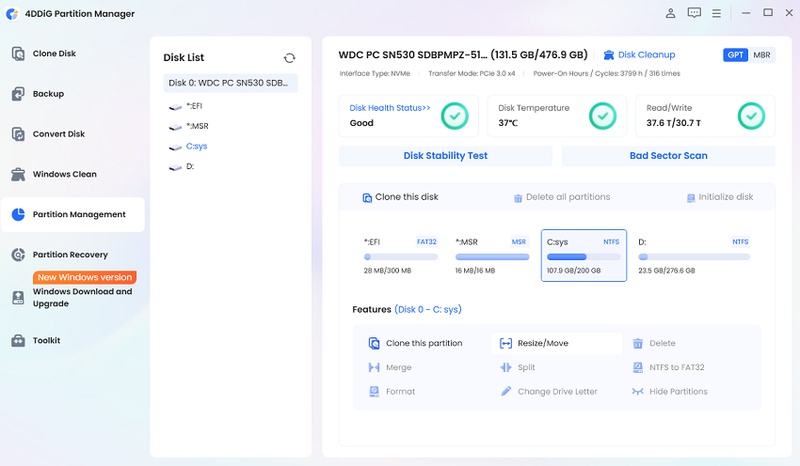
  • Install and open 4DDiG Partition Manager, then select Partition Management from the left panel. Click the partition you want to reduce and choose Resize/Move. Confirm the drive letter and current capacity before continuing.

    FREE DOWNLOAD

    Secure Download

    select partition and click resize button
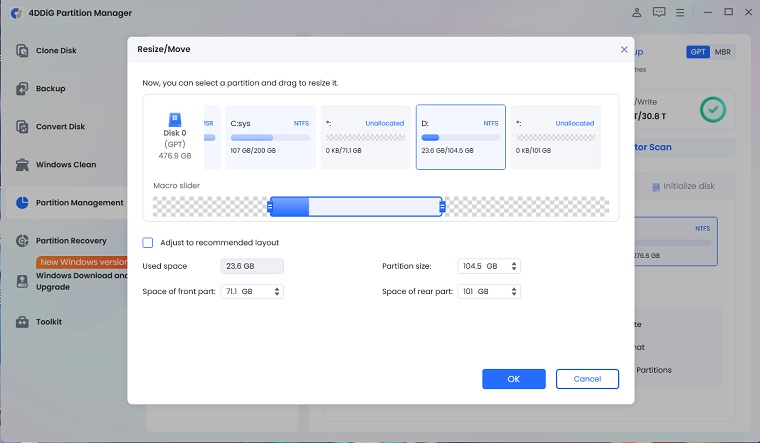
  • Drag the right boundary of the partition toward the left, or enter the required new size. Check the preview to make sure the unallocated space will appear in the intended location.

    resize the partition
  • Confirm the pending layout and start the operation. Keep the computer connected to power and do not force a shutdown while the partition is being adjusted.

    confirm to shrink volume
  • After completion, open Disk Management and confirm that the expected unallocated space is available.

    shrink disk volume successfully

Method 2. Temporarily Disable the Paging File

Pagefile.sys provides virtual memory when Windows needs more committed memory than physical RAM can supply. Disable it only long enough to complete the partition change, then restore the automatic setting.

  • Press Windows + R, type sysdm.cpl, and press Enter.

  • Open Advanced > Performance Settings > Advanced.

  • Under Virtual memory, click Change.

    change virtual memory
  • Clear Automatically manage paging file size for all drives.

    uncheck automatically managing page file
  • Select the target drive, choose No paging file, click Set, and accept the warning.

  • Restart Windows, open Disk Management, and shrink volume again.

Once the partition has been resized, return to Virtual Memory, enable “Automatically manage paging file size for all drives”, and restart again. If Pagefile.sys so big, try these methods to reduce.

Method 3. Disable Hibernation

Hibernation stores the contents of memory in Hiberfil.sys on the Windows drive. Removing that file temporarily can move the shrink boundary farther to the left.

  • Search for Command Prompt, right-click it, and select Run as administrator.

  • Run the command below to disable hibernation and remove Hiberfil.sys.

$ powercfg.exe /hibernate off
  • Restart the PC and try the shrink operation again.

  • After resizing, re-enable hibernation with the following command if you use Hibernate or Fast Startup.

$ powercfg.exe /hibernate on

Method 4. Run CHKDSK to Scan and Repair the Drive

If the calculated shrink space remains unusually low after removing system-file blockers, check the NTFS file system. CHKDSK can correct logical errors that interfere with volume management.

  • Open Command Prompt as administrator.

  • Replace C: with the letter of the affected volume and run:

$ chkdsk C: /f
  • If Windows says the volume is in use, type Y to schedule the scan at the next restart.

  • Restart the computer and allow the check to finish without interrupting it.

  • Return to Disk Management and test the shrink operation again.

The /f switch repairs logical file-system errors. Use /r only when you also suspect unreadable disk sectors, because it performs a much longer scan. If the drive reports repeated errors or unusual hardware symptoms, back up the data and check the SSD or HDD health before resizing.

More FAQs About Shrinking a Windows Volume

1. What Does Shrink Volume Do?

It reduces the logical size of an existing partition and creates unallocated space at its end. Shrinking an NTFS data or system volume normally does not erase the files that remain inside the new boundary.

2. Why is My Shrink Volume Too Low in Windows 11?

The number is low because Disk Management bases the limit on the last unmovable file, not on total unused capacity. A 1 TB drive may show 300 GB free but offer only 10 GB if Pagefile.sys, Hiberfil.sys, restore data, or NTFS metadata sits near the end.

3. How to Shrink Volume in Command Prompt?

DiskPart provides a command-line method for users who already understand their volume layout. It uses the same underlying Windows shrink limit, so it cannot bypass an unmovable file.

diskpart list volume select volume 3 shrink querymax shrink desired=50000 exit

Replace volume 3 with the correct number and enter the desired size in megabytes. Verify the selected volume carefully before running the command. DiskPart does not shrink EFI, recovery, or OEM partitions.

Conclusion

When you cannot shrink a volume beyond the point in Windows 11, the real obstacle is usually a fixed system file near the end of the partition rather than a lack of free capacity. Start with a backup, then try 4DDiG Partition Manager for a visual resize workflow. If you prefer Windows tools, temporarily disable the paging file and hibernation, repair file-system errors with CHKDSK, and retry Disk Management. Restore every system setting afterward. This order keeps the process focused, avoids unnecessary formatting, and gives you a practical route to create unallocated space for a new partition.

William Bollson (senior editor)

William Bollson, the editor-in-chief of 4DDiG, devotes to providing the best solutions for Windows and Mac related issues, including data recovery, repair, error fixes.

(Click to rate this post)

You rated 4.5 ( participated)