Windows Search Not Working in Windows 11? How to Fix It

5 mins read

Updated on 2026-11-05 18:44:12 to Windows Fix

If Windows Search is not working in Windows 11, start with the symptom: restart the search process for a frozen or blank panel, restore text input if you cannot type, or check search locations and indexing when results are missing. Follow the matching branch below, test after each fix, and stop once search works.

Windows Search Not Working in Windows 11? How to Fix It — 4DDiG troubleshooting illustration
Choose the Fix That Matches Your Search Problem

Press Windows + S and try searching for an installed app, then a file you can open directly in File Explorer.

What happensFollow this path
Search will not open, freezes, or displays a blank panelRestart the search process
Search opens but ignores typingRestore text input
Apps appear, but an existing file is missingCheck the location, service, and index
Search still fails after the relevant fixesRepair system files, then reset Search

If only the taskbar search box is missing and Windows + S works, open Settings > Personalization > Taskbar > Search and select a visible search option. A hidden box does not require an index rebuild.

Fix a Search Bar That Will Not Open or Accept Typing

Use these fixes for an unresponsive interface. If you can already enter a query and receive results, move to the file-search section.

1 Restart the Windows Search Process

  • Press Ctrl + Shift + Esc to open Task Manager, then select Details.

  • Right-click SearchHost.exe, choose End task, and confirm End process if prompted.

  • Press Windows + S again. Windows restarts the search process when you use Search.

Type an installed app's name and open the result. If the panel remains blank or closes again, continue below.

2 Restore Text Input When You Cannot Type

If typing works in other apps but not in Search, try restarting the Windows text-input component:

  • Press Windows + R, enter ctfmon.exe, and press Enter.

  • Reopen Search and type the same app name.

If typing also fails in other apps, check the keyboard connection and input language first. Rebuilding the file index does not address a keyboard-wide input failure.

3 Restart Explorer and Install Pending Windows Updates

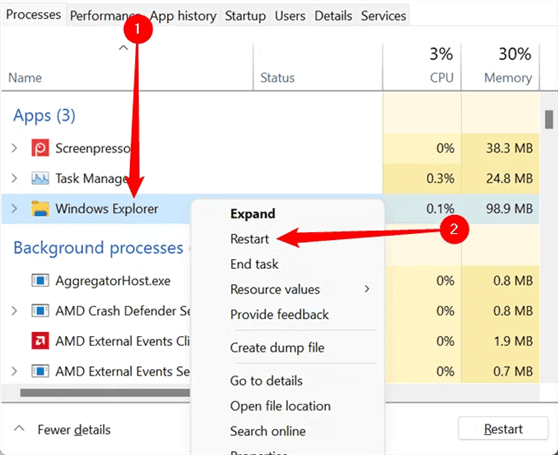
If Start or the taskbar also freezes, open Task Manager > Processes, select Windows Explorer, and choose Restart. The taskbar briefly disappears.

Save your work and restart the PC if Search still fails. Press Windows + I, open Windows Update, select Check for updates, install available updates, and complete any requested restart. Retest Search afterward.

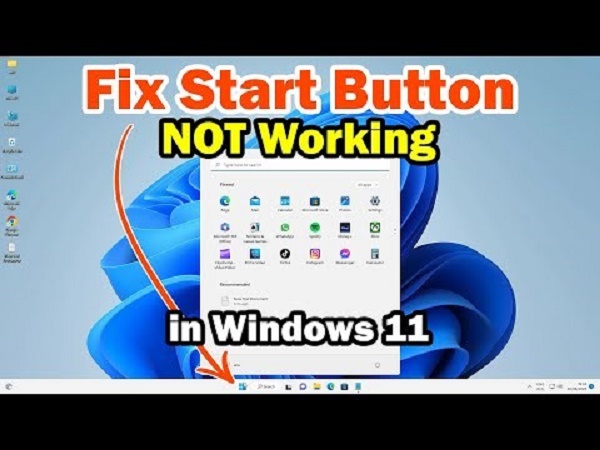
For a wider Start menu failure, see the Windows 11 Start button troubleshooting guide.

Fix Missing or Incomplete Search Results

Use this branch when Search accepts queries but omits files. First locate one affected file manually and confirm it opens. Use that same file to check each change.

1 Search the Correct Folder and Clear Filters

Press Windows + E, browse to the file's folder, and search its name there. Clear any date or file-type filters. If you do not know the location, search from This PC and allow more time for the wider search.

For OneDrive files, also check the correct account online. A file stored only in the cloud needs separate availability checks before treating it as a local indexing problem.

If the whole window freezes, follow File Explorer not responding troubleshooting.

2 Start the Windows Search Service

Use this when Windows reports Search indexing was turned off or Indexing is not running.

  • Press Windows + R, enter services.msc, and press Enter.

  • Double-click Windows Search. On a personal PC, if it is disabled, set Startup type to Automatic (Delayed Start) and select Apply.

  • Select Start if stopped. If it is already running but appears stuck, close Properties and choose Restart from its context menu.

Check the indexing status again. A paused index is different: connect to power or leave the PC idle if the status cites battery power or activity. Ask IT about settings locked by your organization.

3 Include the Missing Folder in the Search Index

Open Settings > Privacy & security > Search or Searching Windows, depending on the Windows 11 build. Under Find my files, review the indexing mode and excluded folders.

With Classic, select Customize search locations > Modify, include the affected folder, and confirm OK. Remove an applicable exclusion if necessary. Enhanced searches more locations, but uses more resources; including the required folder may be sufficient.

If file names appear but document text does not, open Indexing Options > Advanced > File Types, select the extension, and choose Index Properties and File Contents, then confirm OK. Content search also requires a suitable format filter. This setting cannot turn an image-only scan into searchable text.

Allow indexing to catch up, then search the same file again.

4 Rebuild the Windows Search Index

Rebuild only after confirming that the service runs and the required location is included.

  • On the search settings page, open Advanced indexing options.

  • Select Advanced > Index Settings > Rebuild, then confirm OK. Administrator permission may be required.

    Advanced indexing options showing the Rebuild button

Keep the PC powered on while the catalog rebuilds. Results can be incomplete during this process; the time depends on the number and type of files. Wait for Indexing complete, then repeat the known-file search.

Indexing Options displaying the Indexing complete status

Repair Search That Still Fails After Basic Fixes

Use these options if the matching branch above did not restore Search.

1 Repair Windows System Files

Open Task Manager > Run new task, enter cmd, select Create this task with administrative privileges, and approve the prompt. Run:

DISM.exe /Online /Cleanup-Image /RestoreHealth

After successful completion, run:

sfc /scannow

Read the results, restart Windows, and retest. If a command fails, keep its error message and resolve it before treating the repair as complete.

2 Reset Windows Search with Microsoft's Script

For persistent failures, Microsoft's ResetWindowsSearchBox.ps1 resets Search without deleting personal files. Obtain it from the Reset Windows Search PowerShell script link in Microsoft Learn's Fix problems in Windows Search article. Administrator access is required; ask IT on managed PCs.

  • In Task Manager > Run new task, enter powershell and enable administrative privileges. Run Get-ExecutionPolicy -Scope CurrentUser and record the value.

  • If needed to run the script, temporarily allow it with:

    Set-ExecutionPolicy -Scope CurrentUser -ExecutionPolicy Unrestricted
  • Accept the warning only if you intend this change. Close PowerShell, right-click the downloaded Microsoft script, and select Run with PowerShell. Approve the administrator prompt.

  • When Done appears, follow the prompt to continue. If you changed the policy, restore it in that window:

    Set-ExecutionPolicy -Scope CurrentUser -ExecutionPolicy <PreviousValue>

Replace <PreviousValue> with the recorded value, then confirm. Reopen Search and test again. If organizational policy blocks scripts, ask IT rather than changing policy further.

If Search remains broken, test it in another Windows account. Working there points toward an account-specific issue. Give support the Windows build from Settings > System > About, the test results, and any errors.

Note: The legacy Search and Indexing troubleshooter is being removed from newer Windows 11 releases. Its absence does not prevent the fixes above.

Recover Files That Are Actually Missing

If the original file is absent from its folder too, check the Recycle Bin, OneDrive, and backups. Rebuilding an index cannot restore a deleted original.

When an important local file was deleted and no usable copy remains, 4DDiG Data Recovery can scan for recoverable files and preview supported formats. It handles this separate file-loss scenario; it does not repair Windows Search.

Download the Windows version and install it on a different drive from the lost files. Stop saving new data to the source drive, and prepare another physical drive for recovery. Overwriting and SSD TRIM can prevent recovery; check current license terms before saving recovered files.

FREE DOWNLOAD

Secure Download

FREE DOWNLOAD

Secure Download

  • Scan the Original Drive. Open 4DDiG, select Hard Drive, and choose the drive that held the file to start scanning.

    4DDiG Windows interface for selecting the original drive
  • Find and Preview Files. Browse Path or Type, apply filters, and preview supported files before selecting what to recover.

    4DDiG scan results with Type categories and Filter controls
  • Recover to Another Drive. Click Recover, switch to Local for a local destination, choose another physical drive, and select Save Now. The example dialog below has Cloud Drive selected; switch tabs before choosing local storage. Open recovered files to verify them.

    4DDiG destination dialog showing Local and Cloud Drive tabs, with Cloud Drive selected

Confirm That Search Works Again

Test both an installed app and a known existing file. For a blank or frozen search bar, start with the search process and input checks. For missing results, check the search location, service, and index before rebuilding. Stop once the relevant test succeeds. Use 4DDiG Windows Data Recovery when the original file is genuinely lost.

FREE DOWNLOAD

Secure Download

FREE DOWNLOAD

Secure Download

William Bollson (senior editor)

William Bollson, the editor-in-chief of 4DDiG, devotes to providing the best solutions for Windows and Mac related issues, including data recovery, repair, error fixes.

(Click to rate this post)

You rated 4.5 ( participated)