How to Fix “Secure Boot is On, but Your Device isn’t Supported for Certificate Updates”

5 mins read

Updated on 2026-09-04 10:10:41 to Windows Fix

If Windows reports “Secure Boot is on, but your device does not support the automated Secure Boot certificate update,” Secure Boot itself is usually still active. The warning means Windows could not confirm that your firmware can safely receive the newer certificates used to trust current boot components. This guide explains the message, its common causes, three pre-checks, how to convert an MBR system disk when necessary, and four fixes from least to most advanced.

1. What Does “Secure Boot is On, but Your Device Does Not Support the Automated Secure Boot Certificate Update” Mean?

Secure Boot uses certificates and signature databases stored in UEFI firmware to decide which boot managers and low-level components are trusted. Microsoft is moving supported Windows devices from older 2011-era Secure Boot certificates to newer 2023 certificates before the older certificates expire.

secure boot certificate update status

The message “device does not support the automated Secure Boot certificate update” means Windows has identified Secure Boot as enabled but has not approved the device for automatic certificate deployment, or the attempt cannot progress. The operating system may be waiting for a firmware update, OEM validation, a required Windows component, or another reboot.

2. Why Does My Device Not Support the Automated Secure Boot Certificate Update?

  • Outdated BIOS/UEFI firmware: The installed firmware may not correctly process the newer certificate payloads, or the manufacturer may not yet have validated automatic deployment for that model.
  • Legacy or mixed boot configuration: Windows may be installed on an MBR disk or booted through Compatibility Support Module (CSM), even though the firmware offers Secure Boot settings.
  • Incomplete Windows servicing: Required cumulative updates, servicing stack changes, or the Secure-Boot-Update task may be missing, disabled, or pending a restart.
  • Customized Secure Boot keys: Enterprise-managed, dual-boot, or manually modified Platform Key, Key Exchange Key, DB, and DBX stores can prevent Windows from treating the system as a standard Microsoft-managed configuration.
  • Firmware storage or write errors: UEFI NVRAM can be full, write-protected, inconsistent, or unable to accept the update.
  • OEM-controlled rollout: Microsoft uses device eligibility signals and staged deployment. A healthy PC can therefore remain pending until its firmware and device class are approved.

3. Before Fixing the Automated Secure Boot Certificate Update: Quick Checks

Confirm Secure Boot Status and BIOS Mode

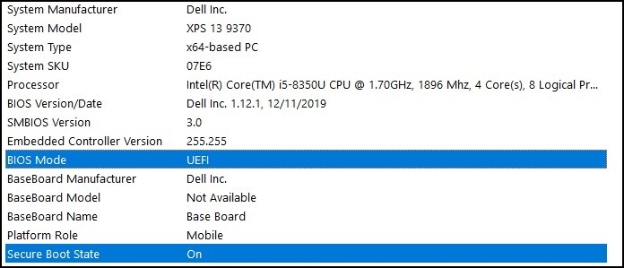
  • Press Windows + R, enter msinfo32, and press Enter.

  • In System Summary, confirm BIOS Mode shows UEFI and Secure Boot State shows On.

    secure boot and bios status
  • If BIOS Mode shows Legacy, do not simply switch the firmware to UEFI. Convert the system disk to GPT first or Windows may not boot.

Protect Recovery Access before Changing Firmware

Back up important files and save the BitLocker recovery key if device encryption is enabled. Suspend BitLocker when the manufacturer instructs you to do so and keep the PC on power; firmware, TPM, disk-layout, and Secure Boot changes can trigger recovery.

⚡ What If Your PC is Not Using UEFI or Secure Boot Yet?

Automated Secure Boot certificate servicing requires a UEFI-based boot path. If System Information shows Legacy mode and Disk Management shows the Windows disk uses MBR, the disk usually must be converted to GPT before enabling UEFI and Secure Boot. 4DDiG Partition Manager provides an MBR-to-GPT conversion workflow without requiring a normal clean installation.

  • Download and install 4DDiG Partition Manager, then launch the program. From the left-hand menu, select Convert Disk and click Convert MBR to GPT.

    FREE DOWNLOAD

    Secure Download

    convert mbr to gpt
  • Choose the system disk to convert and click Continue to enter the execution interface.

    select disk
  • If you are converting the system disk, the program will download the required PE components. After the download finishes, save any open files and make sure your computer is connected to a reliable power source. Click Sure when prompted. The computer will restart automatically and enter the PE environment.

    click sure
  • After 4DDiG Partition Manager launches in the PE environment, select Convert MBR to GPT.

    select mbr to gpt again
  • Select the disk you want to convert and click Continue. 4DDiG will begin converting the disk from MBR to GPT.

    select disk again to covert
  • When the conversion finishes, follow the on-screen instructions to boot your computer. Otherwise, Windows may not start properly.

    follow the steps to boot

4. How to Fix “Secure Boot Is On, but the Device Does Not Support the Automated Update”?

Fix 1: Run Windows Update Completely

  • Open Settings > Windows Update and select Check for updates.

    check for updates
  • Install all current cumulative and security updates. Open Advanced options > Optional updates and review relevant firmware updates from the PC maker.

  • Restart your PC, return to Windows Update, and check again until no applicable update remains.

  • Leave the PC online and powered for several hours. Secure Boot servicing can run through a scheduled task and may require normal restart cycles before its status changes.

Fix 2: Update BIOS/UEFI to the Latest Version

Find the exact PC model or motherboard revision in msinfo32, then use the manufacturer’s support page or update utility. Read the release notes for Secure Boot, certificate, DB/DBX, boot-manager, or Windows 2026 certificate references. Do not install firmware for a similar-looking model.

  • Save your recovery key, suspend BitLocker if instructed, connect AC power, and disconnect unnecessary peripherals.

  • Install the OEM firmware exactly as documented. Never force shutdown during flashing.

  • After restart, enter UEFI setup and confirm date/time, UEFI boot mode, TPM, and Secure Boot remain correct.

  • Boot Windows, run Windows Update again, and allow the Secure Boot servicing task time to retry.

Fix 3: Manually Trigger the Secure Boot Update Task

If Windows and firmware are current but the automated update remains pending, verify the built-in task before changing registry flags. This is an advanced diagnostic step, not a reason to copy undocumented registry values from a forum.

  • Open Command Prompt or PowerShell as Administrator. Run:

    $textreg add "HKEY_LOCAL_MACHINE\SYSTEM\CurrentControlSet\Control\SecureBoot" /v AvailableUpdates /t REG_DWORD /d 0x5944 /f
  • Note:

    Some reports use 0x40; 0x5944 is the more complete value referenced in Microsoft guidance for enabling relevant updates.

  • Then run:

    $textStart-ScheduledTask -TaskName "\Microsoft\Windows\PI\Secure-Boot-Update"
  • Restart the PC (sometimes twice) and wait. The scheduled task runs periodically.

If the newest OEM firmware still does not qualify, ask the manufacturer for a supported path rather than repeatedly clearing keys.

Conclusion

When Secure Boot is on, but your device does not support the automated Secure Boot certificate update, treat it as a servicing and firmware-compatibility issue, not an instruction to disable security. Confirm UEFI and Secure Boot status, protect recovery access, complete Windows Update, and install the correct OEM firmware first. If Windows still boots in Legacy mode, 4DDiG Partition Manager can convert the system disk from MBR to GPT so you can move to UEFI and enable Secure Boot correctly.

FREE DOWNLOAD

Secure Download

William Bollson (senior editor)

William Bollson, the editor-in-chief of 4DDiG, devotes to providing the best solutions for Windows and Mac related issues, including data recovery, repair, error fixes.

(Click to rate this post)

You rated 4.5 ( participated)