5 Effective Ways: How to Reduce PDF File Size on Mac
If you have ever tried to email or upload a large PDF, you know the frustration of slow transfers or file rejections. The PDF may become huge in size when they include pictures with high resolution or complex layouts.
Luckily, there are several useful tools in macOS to reduce them. Here, you will learn how to reduce PDF file size on Mac. We will share very simple techniques that work for all users, including students and professionals.
Why Is My PDF File Size So Big?
It is good to know what makes these files so big before learning how to reduce PDF file size Mac.
- High-Resolution Images: Photos that are embedded in a PDF file and in uncompressed form or full-resolution ones may significantly increase the file size.
- Scanned Documents: When you scan pages in the form of images rather than as text, the page is saved as a high-quality image; hence, the file is too big.
- Embedded Fonts: Embedded custom fonts in the PDF guarantee a similar result on all devices but increase the file size by several megabytes.
- Unnecessary Metadata: The file may contain hidden data that bloats the file, such as author information, history of editing, or notes without any visible data.
- Lack of Compression: If the PDF was exported without optimization, it may include redundant or uncompressed data streams.
- Interactive Elements and Multimedia: Videos and audio clips or form fields that are added to a PDF will automatically take extra space.
Understanding these causes helps you apply the right compression technique and avoid unnecessary size when saving PDFs.
How to Reduce PDF File Size on Mac?
Now that you know the reasons behind large PDFs, let’s go over five effective methods to shrink PDF file size on Mac. Each approach works best for different scenarios.
1. Try the Preview Feature to Shrink PDF File Size on Mac
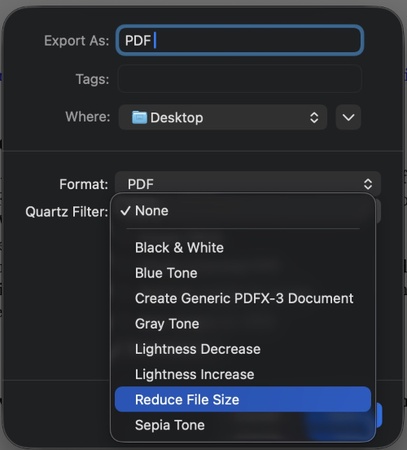
The built-in Preview app in Apple enables one to compress PDFs without any hassle using Quartz filters. It takes down embedded image resolution and unwanted information, creating smaller files that can be shared with ease.
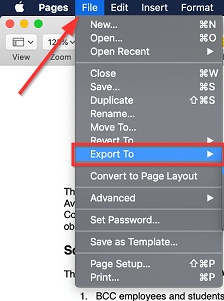
- Open your PDF in “Preview” to learn how to minimize PDF file size on Mac
with the built-in method. Click "File" in the top menu and select
"Export."

- In the dialog box, click "Quartz Filter" and choose "Reduce File Size," then click "Save."
2. Try Online Compressor to Minimize PDF File Size on Mac
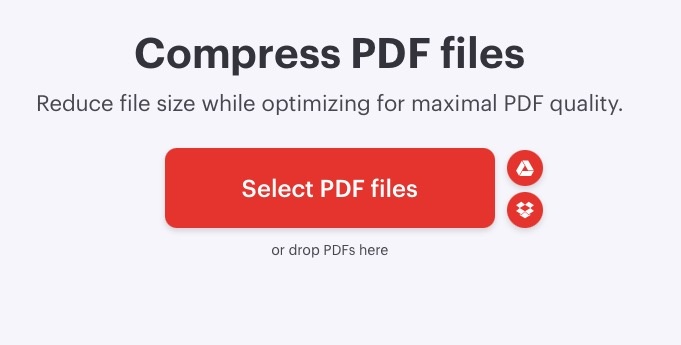
The online PDF tools, such as iLove PDF or Small PDF, are cloud-based programs that apply algorithms to optimize and reduce the size of documents. They automatically optimize image, font, and metadata clean-up to reduce file size.
- Open your browser for how to decrease size of PDF on Mac online and go
to iLovePDF "Compress PDF Files" page. Click the "Select PDF Files"
button to upload your file.

- After uploading, select your desired compression level and click the "Compress PDF" button. It will immediately compress your PDF, and you can click the "Download Compressed PDF" button to save it to your Mac.
3. Try Adobe Acrobat Pro to Decrease Size of PDF on Mac
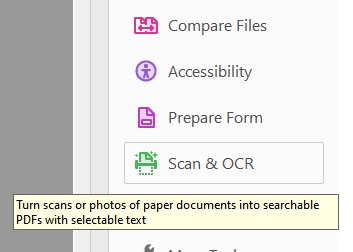
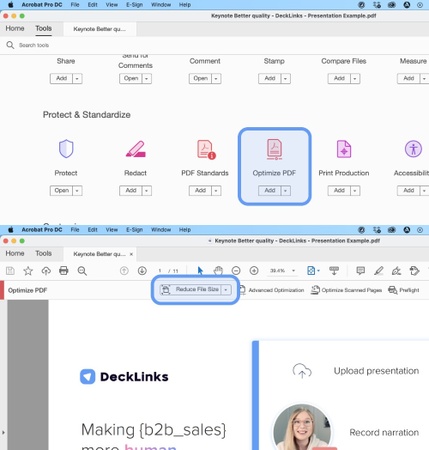
Adobe Acrobat Pro has an intelligent compression feature called Optimize PDF that intelligently compresses files. It examines fonts, pictures, and structure to provide quality small PDFs that can be used for professional purposes.
- Open Adobe Acrobat for how to make PDF smaller on Mac and click
"Optimize PDF" from the "Tools" tab, then click "Open" in "File" to open
your PDF document.

- Click the "Reduce File Size" option from the top menu and select your desired file size. Finally, click the "Save As" option from the "File" menu to save the new PDF with a smaller size.
4. Adjust Content to Make PDF Smaller on Mac
Compression of embedded image sizes, elimination of redundant graphics, and substitution of custom fonts with standard fonts have a direct effect of reducing file weights.
-
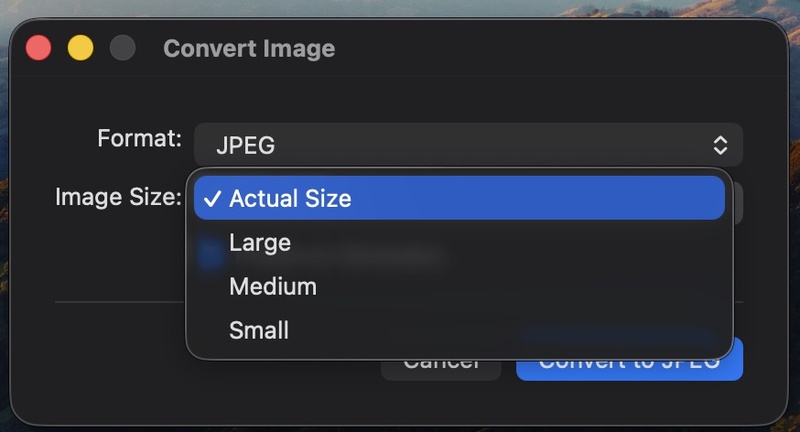
Right-click on the image on your Mac, and select "Quick Actions," then
click on "Convert Image."

- Select the desired size option in the “Image Size” dropdown and click “Convert”. It will reduce the image size significantly.
- Now, for how to reduce file size of PDF on Mac, add the new image to the PDF. You can also delete unnecessary content and use standard fonts to reduce PDF size.
5. Print to PDF with Lower Quality to Reduce PDF File Size on Mac
The print to PDF option provides an opportunity to re-export documents with a lower quality level. It also reduces the size of images and gets rid of the complicated layers, producing a light but readable version.
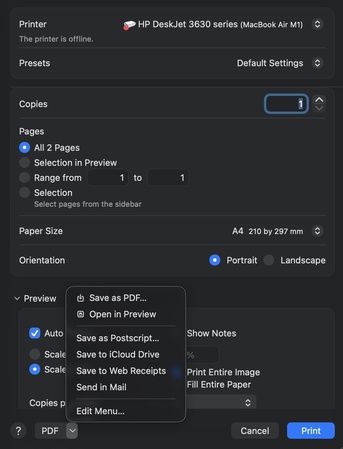
- Open your PDF in “Preview” and click “File” then “Print” for how to compress a PDF on Mac by printing in lower quality.
-
In the bottom-left corner of the print dialog, click the drop-down menu
and select “Save as PDF.”

- Before saving, click the "Media Quality" dropdown and select a lower quality option, then click “Print.”
How to Recover Lost PDF Files with 4DDiG?
After learning how to efficiently reduce the size of your PDF files on Mac, the next important step is to make sure your files are safe and recoverable in case of accidental deletion or corruption. Even with careful management, PDFs can sometimes get lost due to system crashes, accidental deletion, or other unexpected issues.
This is where 4DDiG Data Recovery software comes in. It’s a reliable tool that helps you recover lost, deleted or unsaved PDF files quickly and securely, ensuring your important documents are never permanently lost.
Secure Download
Secure Download
Steps to use 4DDiG for PDF recovery:
-
Download and install 4DDiG Data Recovery software on your computer and
launch it. Now, select "Hard Drive" from the left side and pick the
local drive where your PDF file was lost.

-
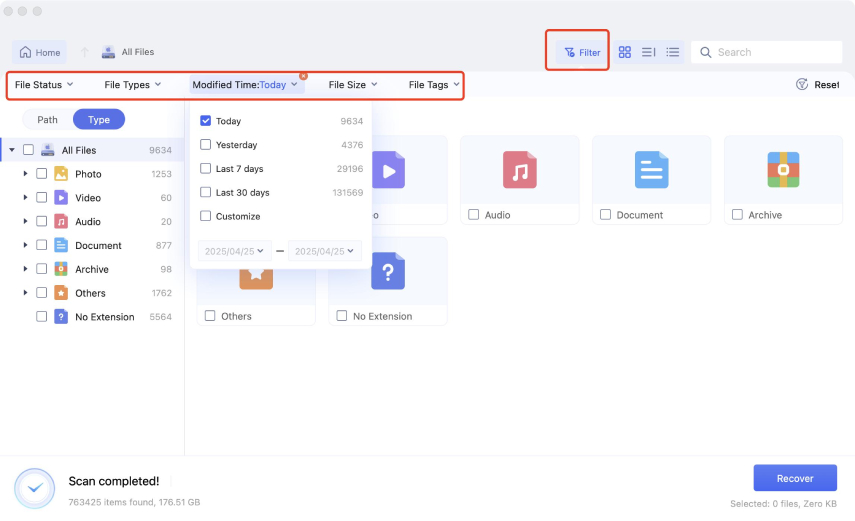
Next, you can choose the types of files you want to recover or simply
click the “Scan All File Types”.

-
4DDiG will start scanning your drive. When it’s done, click “recover”
button to proceed.

-
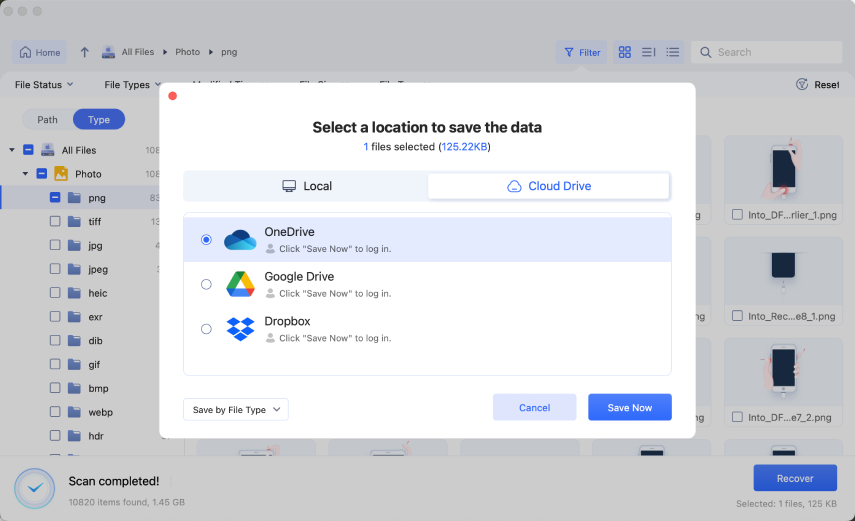
Choose the storage location where you want to save this file. Then,
click the "Save Now" button, and your recovered PDF file will be saved
to your desired storage.

Extra Tips for Smaller PDFs
You can optimize your work with PDFs by following these tips even after you reduce PDF file size on Mac.
Reduce Image Resolution Before Creating PDFs
If you want to convert images into PDF, reduce them in size with the built-in Preview or other third-party image compression software. Images with reduced resolution are ideal for use in PDFs.
Avoid Embedding Unnecessary Fonts
Each embedded font adds data. Do not use several custom types, but only one or two standard fonts.
Remove Hidden Layers or Annotations
Invisible layers or markup are sometimes referred to as design programs. Erase them before you export the PDF.
Use Monochrome or Grayscale
Export your document in grayscale if there is no need for color. It greatly saves on the file size without impacting quality.
Save as “Reduced Size PDF”
There is the option to save a reduced-size PDF in Adobe Acrobat. It also applies various compression settings to your file automatically.
These tips will ensure that your PDFs remain light and easy to share in the long run.
Conclusion
Large PDFs may slow down the sharing and waste storage space, but with the right methods and processes, they can be optimized easily. You have the Preview that is quick to fix, Adobe Acrobat that is advanced, or even an online service that is convenient. All these methods for how to reduce PDF file size on Mac are easy and effective.
If you face any problem like data loss after compression, Tenorshare 4DDiG software will keep your valuable documents safe.
Secure Download
Secure Download


 ChatGPT
 Perplexity
 Google AI Mode
 Grok
Grok


