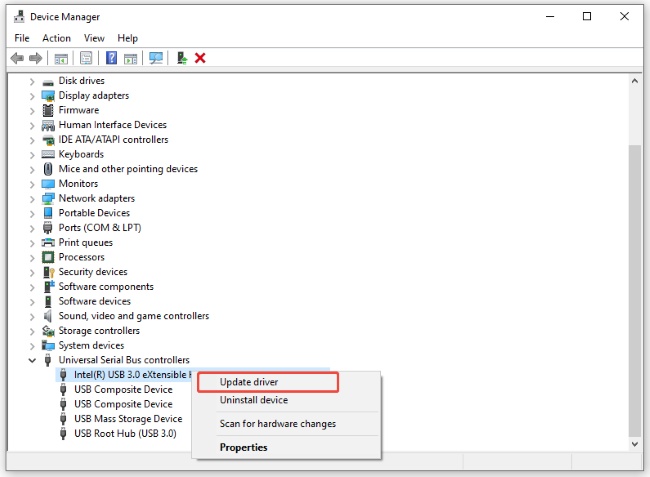
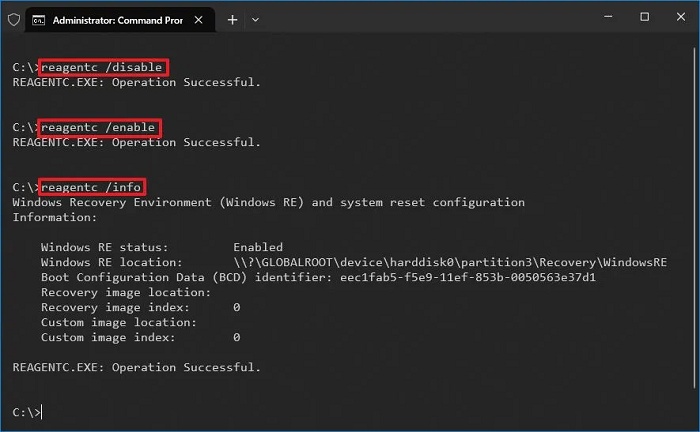
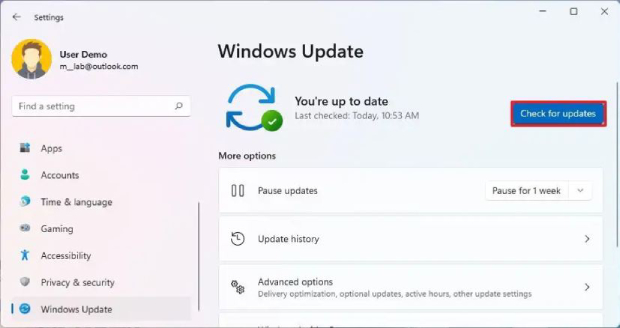
Ultimate Tips on How to Update CPU Drivers Without Errors

5 mins read

Updated on 2026-05-28 16:41:09 to Windows Fix

Updating CPU drivers is not as simple as downloading a graphics driver from NVIDIA or AMD. In most cases, CPUs do not require standalone driver updates. What Windows users usually need to update are chipset drivers, processor-related system drivers, BIOS or firmware, and Windows system updates.

This guide explains what “CPU drivers” actually mean, how to check whether your CPU-related drivers are up to date, and how to update them properly on Windows 10/11. You’ll also learn the correct update methods for Intel and AMD systems so you can keep your PC stable and running smoothly.

1. Does Your CPU Actually Have Drivers?

No, the CPU itself does not need or use traditional drivers. This is one of the most common points of confusion for Windows users. When you upgrade a GPU, you download a driver package from NVIDIA or AMD. So naturally, people assume CPUs work the same way — they don’t.

Here’s the key difference:

  • GPUs have large, dedicated driver packages that handle rendering pipelines, display output, and hardware acceleration. These are updated frequently and downloaded directly from the manufacturer.
  • CPUs rely on a different set of lower-level software components to communicate with the rest of your system:
  • Chipset drivers: these control how your CPU talks to the motherboard, RAM, storage, and USB controllers.
  • Motherboard firmware (BIOS/UEFI): manages hardware initialization and low-level CPU features.
  • Windows microcode updates: delivered silently through Windows Update, these patch CPU-level security vulnerabilities and stability bugs.

So when someone asks how to update CPU drivers, what they usually mean — and what actually matters — is keeping those three components current. Let’s get into how to do that.

2. How to Check If Your CPU Drivers are Up to Date

Before updating anything, it’s worth checking what state your system is already in. There are four reliable ways to do this.

Method 1: Use Windows Update (Easiest Method)

Windows Update is the simplest starting point. Microsoft pushes chipset driver updates and CPU microcode patches through this channel, so many users are already more up to date than they realize.

  • Press Windows + I to open Settings. Go to Windows Update. (Windows 10: Update & Security > Windows Update)

  • Click Check for updates and let the scan complete. If updates are available, click Download & Install.

    check for updates
  • On Windows 11, also click Advanced options → Optional updates — manufacturer driver updates sometimes appear here.

  • After that, restart your PC when prompted.

This alone handles the majority of processor-related system driver updates for most users.

Method 2: Check Device Manager

Device Manager lets you see what CPU-related drivers Windows has installed and whether any have flagged errors.

  • Right-click the Start button and select Device Manager. Expand the “Processors” category.

  • Right-click any entry and select Properties, then go to the Driver tab to see the driver version and date.

  • You can also click Update Driver > Search automatically for drivers, though Windows may not always find the latest chipset drivers this way.

    update processor driver
  • Also expand “System devices, looking for entries like “Intel Management Engine,” “AMD GPIO Controller,” or “Chipset Device Software.” These are the chipset-related components that actually matter.

If you see a yellow warning triangle on any device, that’s a signal something needs attention.

Method 3: Use Manufacturer Support Tools

The most thorough way to check for Intel or AMD CPU-related driver updates is to use the official tools from each manufacturer.

For Intel Users: Intel Driver & Support Assistant

Intel DSA scans your entire system and identifies outdated drivers across Intel components, including chipset, Bluetooth, Wi-Fi, and graphics.

  • Go to intel.com and download the Intel Driver & Support Assistant. Install and run the application.

  • It will scan your system and present a list of available updates. Click Download next to any relevant update, then follow the on-screen installation steps.

  • Restart your PC when complete.

For AMD Users: AMD Auto-Detect and Install Tool

AMD’s tool performs a similar scan for AMD Ryzen processors and associated chipset components.

  • Visit AMD official website and download the AMD Auto-Detect and Install Tool.

  • The tool will recommend the correct AMD Chipset Software package for your system. Download and install the recommended package.

This is the recommended method if you want to make sure you have the correct chipset software version for your specific Ryzen or Athlon processor.

Method 4: Check Your Motherboard Manufacturer’s Website

Your motherboard maker (ASUS, MSI, Gigabyte, ASRock, etc.) also publishes chipset and firmware updates tailored to your specific board. This is particularly important for BIOS updates, which are distributed by the motherboard manufacturer rather than Intel or AMD directly.

  • Identify your motherboard model. Press Windows + R, type msinfo32, and press Enter. Under “System Summary,” look for BaseBoard Product and manufactureer.

    baseboard product
  • Go to your motherboard manufacturer’s support page and search for your model. Download available chipset drivers and BIOS updates.

⚡ 3. How to Update CPU Drivers on Windows 11/10

Now that you know what needs updating and how to check, here’s a complete step-by-step walkthrough.

Step 1: Identify Your CPU

Before downloading anything, confirm exactly which processor you have.

  • Right-click the Start button > System > check under “Processor.”

  • Under the System tab, look at the Processor field, which shows your full CPU model name.

Knowing your exact CPU model ensures you download the correct chipset package.

Bonus Tip:

Avoid Reinstalling Windows During Hardware Upgrades

If you’re updating your CPU drivers as part of a hardware upgrade, you may be worried about having to reinstall Windows from scratch. There’s a smarter way.

4DDiG Partition Manager’s Clone OS Disk feature lets you migrate your entire Windows installation to a new drive without reinstalling the operating system. It clones your system partition cleanly, preserving all your files, settings, and installed apps.

Note:

The data on the target disk will be cleared, so if you have important data on it, please make sure to make a backup first.

  • After downloading and installing 4DDiG Partition Manager on your computer, connect an external disk. Launch the application and choose “Clone OS Disk”.

    FREE DOWNLOAD

    Secure Download

    clone os disk
  • Pick the target disk where you want the cloned data to go, then click Next. (The source disk is your system disk, and the target disk is the one you connected.)

    select source and target disk
  • A preview screen will appear showing how the cloned disk will look. By default, all partitions from the source disk will fill the target disk. You can adjust partition sizes by dragging the handles. Once everything looks correct, click Start to begin cloning.

    click start
  • Cloning will erase all data on the target disk. Double-check everything, then click Sure to confirm.

    click sure to proceed
  • Wait for the cloning process to finish. The duration depends on the size of the source disk. Avoid performing other tasks or interrupting the operation.

    clone successfully

Once completed, your data from the source disk will be successfully cloned to the target disk.

Step 2: Download the Correct Chipset Drivers

Based on your CPU brand, go to the right source:

  • Intel: Use the Intel Driver & Support Assistant or download directly from the Intel chipset software page, searching for your specific chipset (e.g., Intel 700 Series Chipset).
  • AMD: Use the AMD Auto-Detect Tool or go to AMD’s support page, select your Ryzen processor family, and download the AMD Chipset Software.
  • Motherboard site: Download any additional INF or firmware updates listed under your board’s driver page.

Always download from official sources only. Third-party “driver updater” software is often unnecessary and can introduce unwanted software.

Step 3: Install the Drivers Properly

  • Close any open programs before starting the installation. Run the downloaded installer (.exe file) as Administrator, right-click and select Run as administrator.

  • Follow the on-screen prompts. Most chipset installers are straightforward and require minimal input.

  • When installation finishes, restart your PC even if the installer doesn’t explicitly require it. A reboot ensures the new drivers are loaded into memory correctly.

  • After restarting, open Device Manager and verify there are no yellow warning icons under System devices or Processors.

After installing chipset drivers manually, run Windows Update one more time to catch any additional microcode updates or complementary system drivers Microsoft may have queued.

More FAQs About CPU Driver Updates

1. Do you need to update CPU drivers?

For most users, keeping Windows Update current is sufficient. However, if you’ve recently upgraded your CPU, motherboard, or switched platforms (Intel to AMD or vice versa), manually downloading the latest chipset software from the manufacturer’s site is recommended.

2. How to update CPU drivers with Ryzen Master?

AMD Ryzen Master is a performance tuning utility. It does not install or update chipset drivers. To update AMD CPU drivers, use the AMD Auto-Detect Tool or download AMD Chipset Software directly from AMD’s support page.

3. Does Windows automatically update CPU drivers?

Yes, partially. Windows Update automatically delivers CPU microcode patches and some chipset driver updates in the background. However, it doesn’t always push the very latest chipset software.

4. Can I update my Intel CPU drivers?

Yes. While Intel CPUs don’t have a single standalone “driver” to download, you can update all Intel processor-related components using the Intel Driver & Support Assistant.

Conclusion

Understanding how to update CPU drivers comes down to one key insight: CPUs don’t use traditional drivers like GPUs do. What matters is keeping your chipset drivers, Windows microcode updates, and BIOS firmware current.

If you’re managing a hardware upgrade alongside your driver update, consider using 4DDiG Partition Manager to protect your data. It eliminates the need to reinstall Windows when moving to new hardware, saving you hours of setup time.

FREE DOWNLOAD

Secure Download

William Bollson (senior editor)

William Bollson, the editor-in-chief of 4DDiG, devotes to providing the best solutions for Windows and Mac related issues, including data recovery, repair, error fixes.

(Click to rate this post)

You rated 4.5 ( participated)