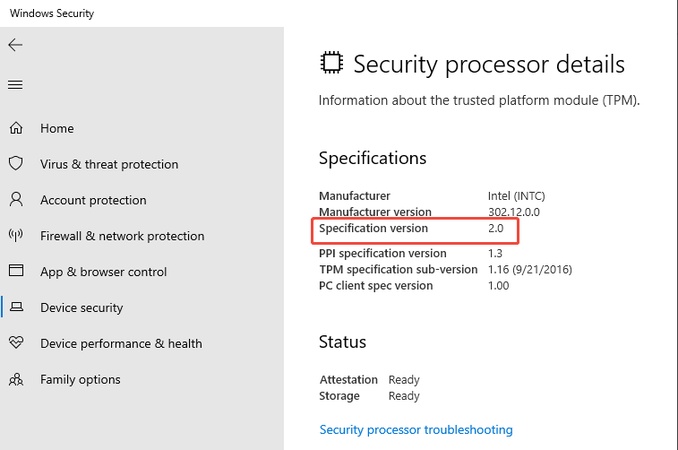
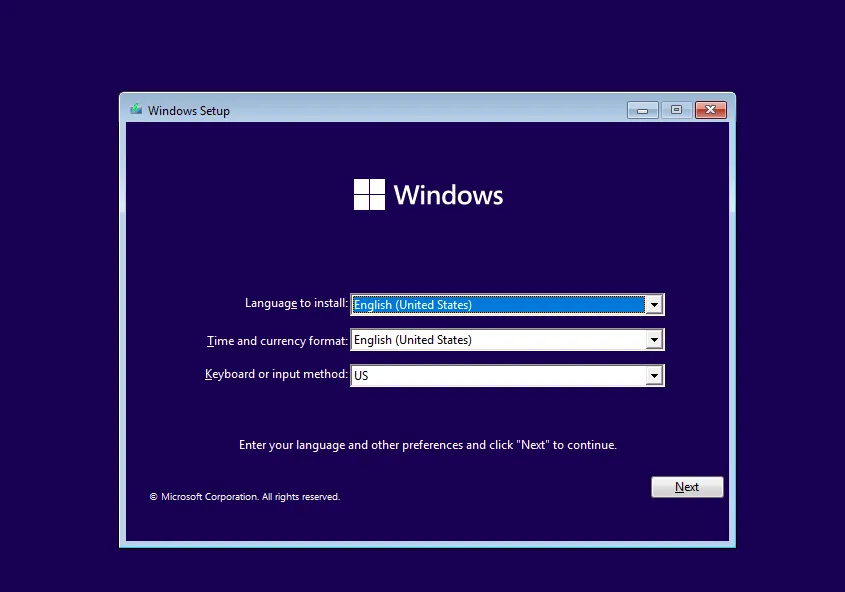
How to Solve Alert! TPM Device is Not Detected

5 mins read

Updated on 2026-03-10 16:11:04 to Windows Fix

Many users suddenly encounter the “A lert ! TPM device is not detected ” message when starting their computer, especially on Dell systems. This issue can prevent certain security features from working properly and may even block Windows updates or BitLocker encryption.

tpm device not detected

Fortunately, adjusting BIOS settings or updating system components can quickly restore TPM functionality. This guide explains why the error happens and how to fix it step by step.

1. What Does TPM Mean?

Trusted Platform Module (TPM), a specialized security chip built into the motherboard of many modern computers, provides hardware-level encryption and security features that help protect sensitive data.

TPM is commonly used for:

  • BitLocker drive encryption
  • Windows Hello authentication
  • Secure boot verification
  • Cryptographic key generation

Essentially, TPM stores encryption keys and verifies system integrity during startup. This makes it extremely useful for protecting data against unauthorized access or malware. If the system cannot detect the TPM chip, certain features will stop working, and you may see the TPM device not detected error message during boot.

2. What Causes Alert! TPM Device is Not Detected

If your computer displays the TPM device not detected message, it means the operating system cannot communicate with the TPM hardware. Before fix this issue, we should know what causes a TPM device error. Here are the main reasons:

  • BIOS Settings Are Disabled: In many cases, TPM exists on the motherboard but is disabled in the BIOS or UEFI firmware. If TPM is turned off, the operating system will not recognize it.
  • BIOS Firmware Issues: Outdated or corrupted BIOS firmware may fail to detect the TPM chip properly. Firmware updates often fix compatibility problems between hardware and the operating system.
  • Windows Updates or Driver Conflicts: Some Windows updates may introduce driver conflicts that affect TPM functionality. If the issue appeared after a system update, rolling back the update may help.
  • TPM Chip Malfunction: Although rare, the TPM chip itself can fail due to hardware damage or motherboard defects.
  • Motherboard Hardware Problems: Since TPM is integrated into the motherboard on most modern systems, a motherboard fault can prevent the TPM module from being detected.

⚡ 3. How to Fix the TPM Device Not Detected?

Below are several effective solutions to fix the compatible TPM cannot be found error.

Fix 1: Enable TPM in BIOS/UEFI

One of the most common causes of the TPM device not detected error is that TPM is disabled in BIOS settings. Even if your motherboard includes a TPM chip, it will not function unless it is enabled in the firmware. Enabling TPM in BIOS allows Windows to recognize the security module properly.

  • Restart your computer and press “F2” repeatedly to enter the BIOS setup (for Dell systems).

  • Navigate to the “Security/Advanced” section and locate TPM Security or Intel Platform Trust Technology (PTT).

  • Enable the TPM option, then save changes and exit BIOS, and restart your computer.

    enable tpm in bios settings

Once TPM is enabled, Windows should detect the security chip normally. If you also want o know how to enable TPM 2.0 on windows, please click here.

Fix 2: Update TPM Drivers

Outdated or corrupted drivers can prevent Windows from communicating with the TPM hardware. This may lead to errors, such as a compatible TPM cannot be found. Updating TPM drivers ensures that the operating system can properly interact with the security module.

  • Press “Windows + X” and select “Device Manager”.

  • Expand the “Security Devices” section and locate “Trusted Platform Module”.

  • Right-click it and choose “Update Driver” and select “Search automatically for drivers”.

    update tpm driver
  • Follow the instructions to complete the update and restart your computer.

After rebooting, check if the TPM device appears normally.

Fix 3: Roll Back Recent Windows Updates

If the error, “Alert! TPM device is not detected”, appears after a Windows update, the update may have introduced a compatibility issue. Rolling back to the most recent Windows update can help restore the previous stable configuration.

Rollbacks can sometimes lead to data loss, so it’s crucial to backup. 4DDiG Windows Backup, a simple and reliable tool that lets you back up your entire system or selected disks/partitions quickly.

  • After downloading and installing 4DDiG Windows Backup, connect a hard drive to your computer. Open the software and choose “Create a backup task”.

    FREE DOWNLOAD

    Secure Download

    create a backup task
  • Select the partitions you want to back up, then click the file icon below to pick a location for storing the backup.

    choose partitions to backup
  • Click “Start Backup”, and confirm on the pop-up window to begin the process.

    confirm backup
  • The time required depends on the size of your data and your disk’s read/write speed. Now, your computer has been successfully backed up.

    backup successfully

With a secure backup in place, you can roll back updates with peace of mind.

  • Open “Settings” and go to “System”.

  • Click “Recovery” and click the “Go Back” option if available.

    go back to previous windows
    Note:

    Feature updates have a 10-day rollback window; after that, you'll need a clean install or backup restore.

  • Follow the on-screen instructions to roll back your Windows update, then restart the computer.

After rolling back the update, check whether the TPM error is resolved.

Fix 4: Replace the Motherboard

If none of the previous methods work, the problem may be caused by a hardware failure. Since TPM chips are often integrated into the motherboard, a faulty motherboard can prevent the TPM module from functioning properly.

Hardware replacement is usually the last resort. Be sure to get a professional to replace your motherboard if you do not have prior experience doing that.

More FAQs about TPM

1. How to reset TPM?

To reset TPM, open Windows Defender Security Center, go to Device Security, select Security Processor Troubleshooting in Security Processor Details, and choose Clear TPM. Your system will restart and reset the TPM chip. Make sure to back up encryption keys before performing this action.

2. Can I use my computer without a TPM?

Yes, most computers can still function without a TPM. However, some security features, such as BitLocker encryption, Windows Hello, and Windows 11 installation requirements, may not work properly without TPM. But you can bypass TPM Requirement in Windows 11 installation.

3. How do I reset my Dell TPM?

On your Dell computer, press "Win + R" and type "tpm.msc”. Click "Clear TPM" on the next screen, then click "Restart."

Conclusion

The “AlertI TPM device is not detected” error can appear due to disabled BIOS settings, outdated drivers, Windows update conflicts, or hardware issues. Fortunately, most users can resolve the problem by enabling TPM in BIOS, updating drivers, or rolling back problematic updates. If the TPM chip is faulty, hardware replacement may be required.

For users upgrading to Windows 11, tools like 4DDiG Partition Manager provide an easy way to bypass TPM requirements and complete the installation smoothly. By following the fixes in this guide, you can quickly restore system functionality and eliminate the error message easily.

FREE DOWNLOAD

Secure Download

William Bollson (senior editor)

William Bollson, the editor-in-chief of 4DDiG, devotes to providing the best solutions for Windows and Mac related issues, including data recovery, repair, error fixes.

(Click to rate this post)

You rated 4.5 ( participated)