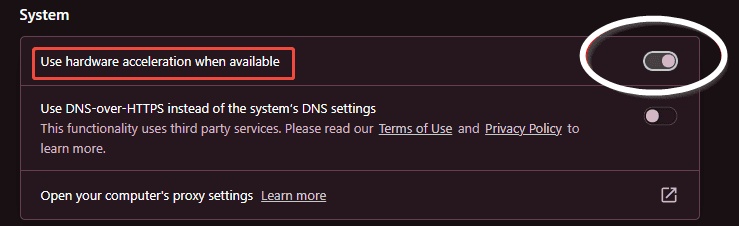
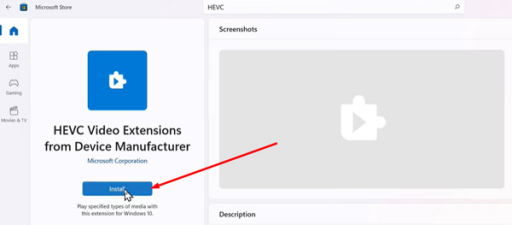
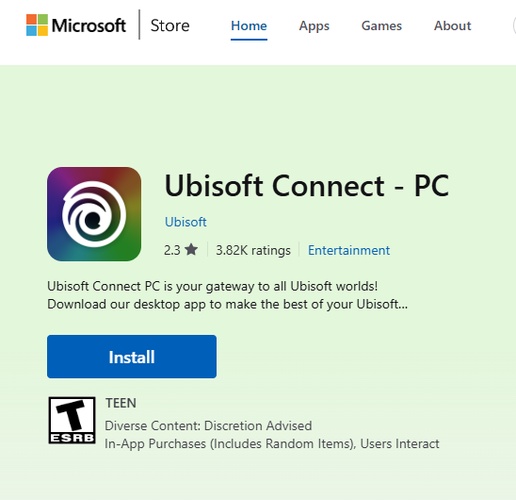
WMIC Is Not Recognized Windows 11/10: Why and How to Fix

5 mins read

Updated on 2026-03-09 12:05:44 to Windows Fix

Seeing the message 'WMIC is not recognized' can be confusing, especially if you rely on command-line tools for system checks or troubleshooting. This issue is increasingly common on Windows 11 and newer Windows 10 builds, where system components have changed quietly in the background. The good news is that this error is rarely serious and almost always fixable. Once you understand why WMIC disappears, restoring it becomes a straightforward process.

1. What Does WMIC Mean?

WMIC stands for Windows Management Instrumentation Command Line. It is a built-in Windows utility that allows users to query system information, hardware details, disk status, operating system data, and running processes using commands instead of graphical tools.

For years, WMIC was widely used by system administrators, IT professionals, and power users to automate diagnostics and retrieve detailed system information quickly.

wmic not recognized windows 11

On newer Windows versions, especially Windows 11, Microsoft has begun phasing out WMIC in favor of PowerShell-based alternatives. As a result, users may suddenly encounter WMIC not being recognized in Windows 11 even though it worked previously.

2. Why WMIC Is Not Recognized on Windows 11/10?

If you see messages such as WMIC is not recognized " in Windows 11 or WMIC is not recognized as an internal or external command, it usually means Windows cannot locate the WMIC executable, or the feature is disabled. Common reasons behind this problem include:

  • WMIC is disabled by default in newer Windows builds: Starting with newer Windows 11 releases, Microsoft no longer enables WMIC automatically. Even though the files may still exist, the command will fail unless the feature is manually turned on.
  • The WMIC system path was removed or corrupted: WMIC relies on a specific system folder being listed in the Windows PATH variable. If that path is removed or damaged, Windows cannot locate the executable and returns a not recognized error.
  • System environment variables were modified: When critical variables are altered incorrectly, built-in commands like WMIC may stop functioning.
  • Windows updates deprecated legacy tools: Microsoft is gradually replacing WMIC with PowerShell-based alternatives. Some updates reduce support or hide legacy tools, causing WMIC commands to stop working unexpectedly.
  • Disk or partition issues affecting system folders: File system errors or corrupted system partitions can prevent Windows from accessing core directories. When this happens, WMIC may fail even though it has not been removed.

In many cases, WMIC still exists on the system, but Windows simply does not know where to find it.

3. How to Fix “WMIC Is Not Recognized on Windows 11/10”?

Now that you know what this issue is and the common reasons behind it, let’s discuss how you can fix it with step-by-step guides.

Fix 1: Add WMIC Back to the System PATH

One of the most common causes of this issue is a missing PATH entry. Manually restoring the PATH ensures Windows knows where the WMIC executable lives. This fix works immediately and does not require restarting Windows in most cases.

  • Press Start, then type “cmd”, and right-click "Command Prompt" to choose the “Run as administrator" option.

  • In the Command Prompt window, paste the following command and run it:

    SET PATH=C:\Windows\System32\wbem;%PATH%;

    run command to add wmic
  • Wait for the command to execute and check if it returns “C:\Windows\System32\wbem\WMIC.exe”. If it returned the same value, the process was successful.

  • In order to permanently save this change, you can go to Settings > System, and click About.

  • Then, click on Advanced system settings, then select the Environment Variables button. In the System variables section, choose Path and click Edit and add %SystemRoot%\System32\Wbem, then click OK.

    click environment variables

This fix is especially effective for “WMIC is not recognized Windows 11” issues caused by environment variable changes.

Fix 2: Enable WMIC via Services App

On Windows 11, WMIC may be completely disabled as an optional feature. Even though the files exist, Windows blocks access unless the feature is turned on manually. Here’s how to do it:

  • Press Win + R and enter services.msc in the Run box.

  • Next, Navigate to Windows Management Instrumentation service, then click Properties from the context menu.

  • In the Properties window, set the Startup Type to Automatic and click Start. After it starts successfully, click Apply and then OK to save the changes.

    enable wmic in services

Once enabled, reopen Command Prompt and test the WMIC command again. This fix directly addresses “Windows 11 WMIC is not recognized” errors after system upgrades.

⚡ Extra Tip: Disk or Partition Errors Can Cause WMIC Not Recognized

Sometimes WMIC fails not because it is disabled, but because Windows cannot properly access system folders. If the WBEM directory or system partition has file system errors, commands may break silently. In these cases, repairing the partition structure is necessary before WMIC can function again.

4DDiG Partition Manager offers a dedicated partition recovery feature that repairs damaged system partitions without reinstalling Windows. Instead of manually troubleshooting disk errors, the software scans and restores corrupted partition data safely.

  • Download and install 4DDiG Partition Manager on your computer. Launch the program and select “Partition Recovery”, then click the drive that you want to repair and click "Quick Scan”.

    FREE DOWNLOAD

    Secure Download

    click quick scan
    Note:

    If the partition you want to recover is not found with a Quick Scan, click the "Deep Scan" or "Full Scan" buttons, but those may take longer to complete.

  • Once the scan is complete, you can choose the partitions you want to repair and click the "Start Recovery" button. Click "Sure" in the pop-up window to confirm and note that this process will overwrite your existing partitions.

    click sure to recover
  • Wait for 4DDiG to repair your partition, and once it is restored, click "Finish".

    partition recovery finished

After recovery, Windows regains proper access to system files, including WMIC dependencies.

More FAQs About WMIC Is Not Recognized

1.How to install WMIC on Windows 11?

WMIC is no longer installed by default on some Windows 11 versions. You can install it through Optional features in Settings.

2.How to enable WMIC in Windows 11?

Go to Settings, open Advanced System settings, then go to “Environment Variables” to enable it with the right Path. Restart your system afterward to activate the command.

3.Why does WMIC not work anymore?

Microsoft is gradually deprecating WMIC in favor of PowerShell. In addition, system path corruption or disk errors can prevent WMIC from running even if it still exists.

Conclusion

When you face the “WMIC is not recognized” error, it usually means the tool is disabled, hidden, or inaccessible rather than permanently removed. Simple fixes like restoring the system PATH or enabling WMIC through Windows Settings resolve most cases quickly. If the problem persists, underlying disk or partition errors may be interfering with system files.

Tools like 4DDiG Partition Manager provide a safe way to repair those issues without reinstalling Windows. With the right approach, WMIC can be restored and used reliably again on both Windows 10 and Windows 11.

FREE DOWNLOAD

Secure Download

William Bollson (senior editor)

William Bollson, the editor-in-chief of 4DDiG, devotes to providing the best solutions for Windows and Mac related issues, including data recovery, repair, error fixes.

(Click to rate this post)

You rated 4.5 ( participated)