How to Unlock Excel Sheet with or without Password
Learn how to unprotect Excel sheet with or without password in this detailed guide. Additionally, consider using 4DDiG File Repair for dealing with Excel files that have issues like corruption or gibberish output problem.
“How do I unprotect an Excel workbook”
“I have a workbook that was sent to me for my use but came password protected as it has sensitive information that was being sent by email. I have the password and have renamed and resaved the file but every time I open it, I again have to enter the password. How can I get this file to stay unlocked?”
Protecting our Excel sheets with passwords is a common practice to ensure data security when sharing them with others. However, there are times when this protection can become inconvenient. Whether you need streamlined access or have forgotten the password, knowing how to unprotect Excel sheet can be extremely useful. In this guide, we will walk you through four methods to unlock your Excel sheet, with and without a password. By the end, you’ll be able to access your workbook effortlessly, without the need to enter a password each time.
Part 1. How to Unprotect Excel Sheet with Password?
If you have the password for the protected worksheet, removing the protection is a breeze. Here are the simple steps to unprotect Excel sheet with password.
-
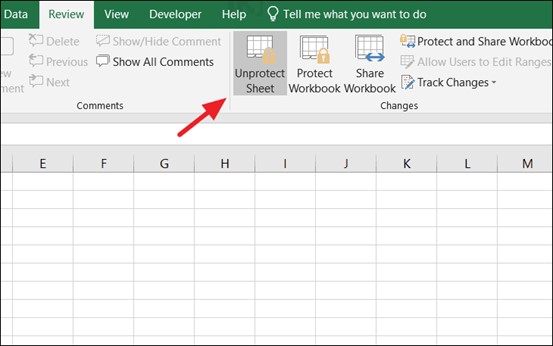
Open the password-protected Excel sheet. Go to the “REVIEW” tab in the ribbon and click the “Unprotect Sheet” option.

Note:
If a sheet is not protected, you won’t see the “Unprotected Sheet” option. Instead, you’ll find it labeled as “Protect Sheet.”
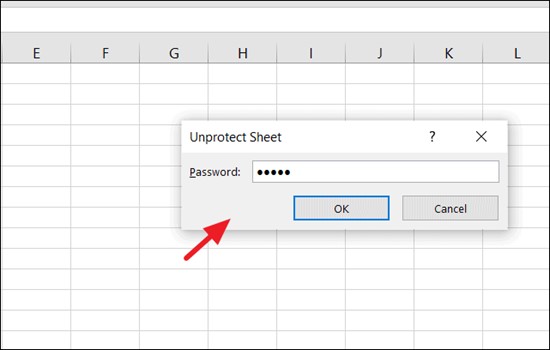
- If the sheet is protected with a password, you will be prompted to enter the password in a dialog box.
Enter the correct password and click “OK.” The Excel sheet will be successfully unprotected, and you can now edit and make changes to it.

Part 2. How to Unprotect Excel Sheet without Password?
There may be instances where you need to unprotect an Excel sheet, but you don’t have the password or have forgotten it. In such cases, you can use alternative methods to remove the protection. Below we’ve outlined three effective ways to help you unprotect Excel sheet without password.
Let's discuss them in detail.
Way 1. Unprotect Excel Worksheet with VBA Code
With VBA (Visual Basic for Applications) code, you can easily unprotect Excel sheet without password. It allows you to bypass password protection. Here’s how you can use it.
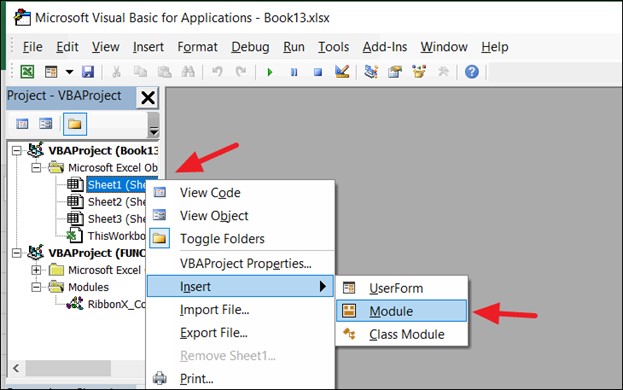
- Open the Excel workbook and right-click on the contains the protected Worksheet and press ALT + F11 to open the Visual Basic Editor.
-
Right-click on the protected Worksheet, and select Insert > Module.

-
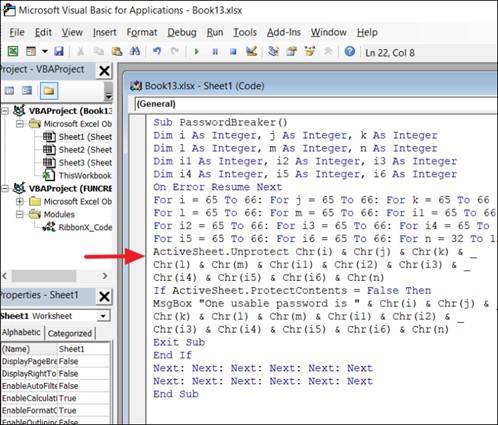
Here you'll need to write a VBA macro to unprotect the Worksheet. Copy and paste the following VBA code into the module.
Sub PasswordBreaker()
Dim i As Integer, j As Integer, k As Integer
Dim l As Integer, m As Integer, n As Integer
Dim i1 As Integer, i2 As Integer, i3 As Integer
Dim i4 As Integer, i5 As Integer, i6 As Integer
On Error Resume Next
For i = 65 To 66: For j = 65 To 66: For k = 65 To 66
For l = 65 To 66: For m = 65 To 66: For i1 = 65 To 66
For i2 = 65 To 66: For i3 = 65 To 66: For i4 = 65 To 66
For i5 = 65 To 66: For i6 = 65 To 66: For n = 32 To 126
ActiveSheet.Unprotect Chr(i) & Chr(j) & Chr(k) & _
Chr(l) & Chr(m) & Chr(i1) & Chr(i2) & Chr(i3) & _
Chr(i4) & Chr(i5) & Chr(i6) & Chr(n)
If ActiveSheet.ProtectContents = False Then
MsgBox "One usable password is " & Chr(i) & Chr(j) & _
Chr(k) & Chr(l) & Chr(m) & Chr(i1) & Chr(i2) & _
Chr(i3) & Chr(i4) & Chr(i5) & Chr(i6) & Chr(n)
Exit Sub
End If
Next: Next: Next: Next: Next: Next
Next: Next: Next: Next: Next: Next
End Sub

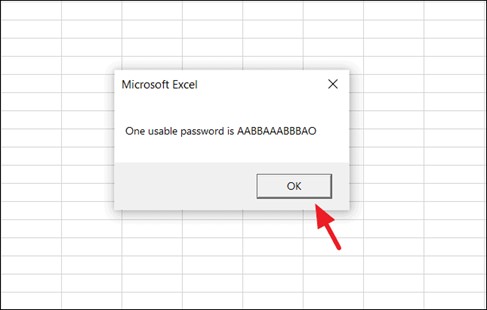
- Press F5 to run the code and wait for macro to give you a cracked password.
-
Simply click “OK” and the sheet will be unprotected.

Way 2. Unprotect Excel spreadsheet without Password from Zip File
If the protected Excel file is saved in the newer .xlsx format, there’s a workaround that involves extracting the Excel file from its container, the zip file, and accessing the spreadsheet without the need for a password.
So, here is how to unlock Excel sheet without password from a zip file.
-
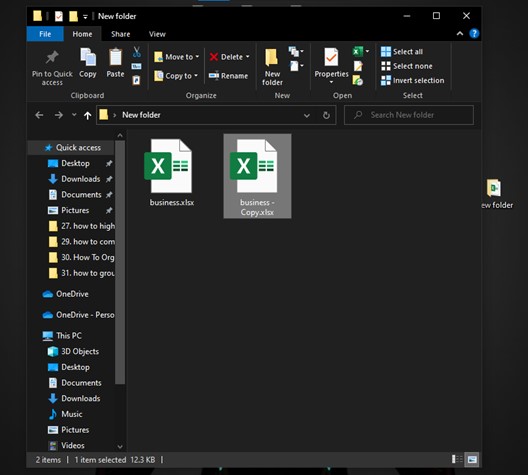
Create a new folder, then make a copy of your Excel file by using the keyboard shortcuts Ctrl+C (copy) and Ctrl+V (paste).

-
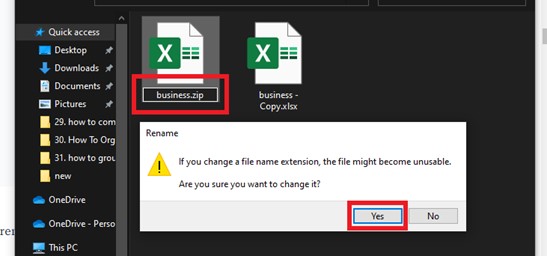
Right-click on the original Excel file, select Rename and change the file extension from “.xlsx” to “.zip.”

-
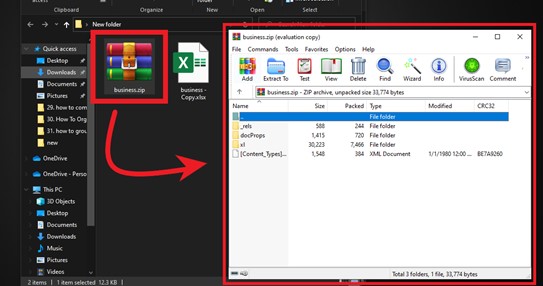
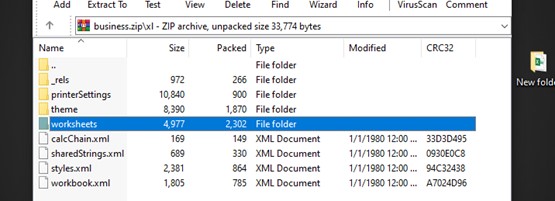
Open the newly renamed .zip file, and inside the .zip file, you will see several folders and files. Go to the "xl" folder.

-
Look for and open a folder called “worksheets.”

- You will see one or more XML files, each corresponding to a worksheet in your Excel file. Identify the XML file for the sheet you want to unlock (e.g., “sheet1.xml” for the second sheet).
-
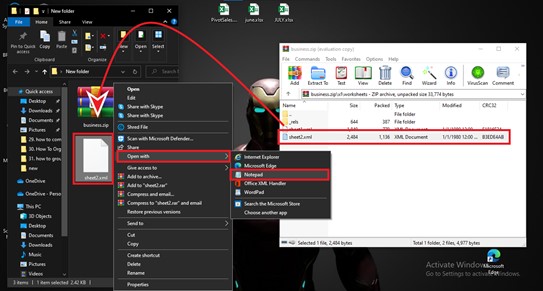
Drag the “sheet1.xml” file from the .zip folder to the folder you created earlier. Then right-click and open it with Notepad.

-
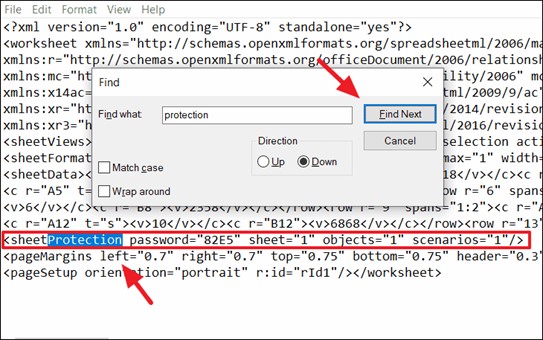
When it opens, press Ctrl+F and type “protection.” Hit Enter. Select and highlight the entire
code section and delete it. 
- Now click the “Exit” icon in Notepad and save the file.
-
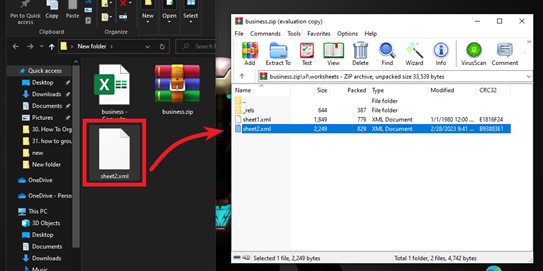
Go back to your .zip folder and delete the original “sheet1.xml” file. Then drag the new “sheet1.xml” file into the .zip folder (the same location where you deleted the original "sheet1.xml" file).

-
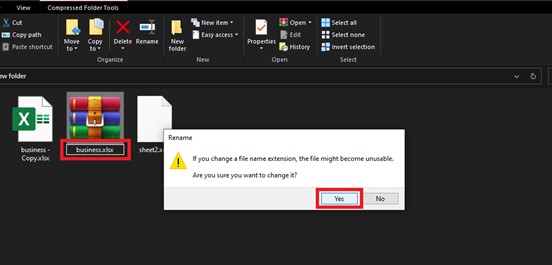
Now rename your zip file, change its file extension from “.zip” to “.xlsx” and click “Yes” to confirm the change.

You have successfully unlocked your Excel file without a password using these steps. Now, you can make changes to your sheet as needed.
Way 3. Utilize Google Sheets to Unprotect Excel Workbook without Password
Google Sheets offers a convenient workaround for accessing and editing Excel workbooks without the need for the original password. Here's how to utilize Google Sheets to unprotect Excel sheet without password:
-
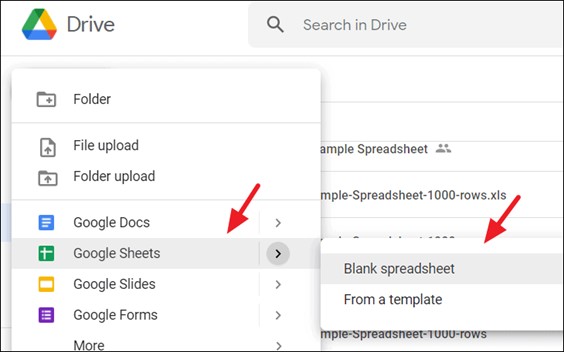
Go to Google Drive, click the “+ New” button, scroll down to Google Sheets and create Blank Spreadsheet.

- Go to the File tab and hit the Import button.
-
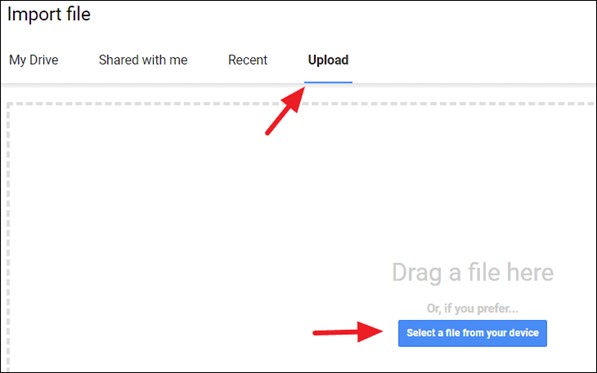
In the Import File dialogue box, go to Upload tab and hit the “Select a file from your device” or “Browse” button to upload the protected Excel file.

-
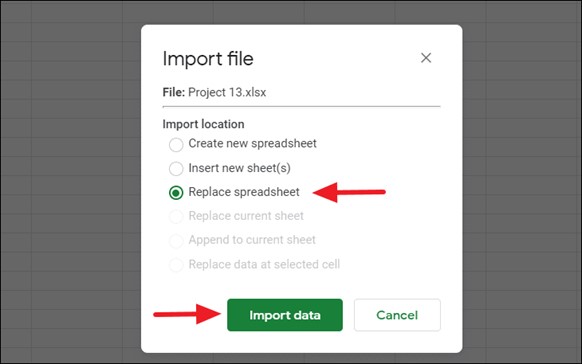
A new window will appear right after you select the Excel file. In it, select Replace Spreadsheet and hit the Import Data button.

All the data from your protected Excel sheet will be imported to this newly created spreadsheet. And you'll be able to access and edit the workbook’s contents needing the original password.
Part 3. How to Open and Repair a Corrupted Excel File?
If you are having corrupted Excel files on your computer and can’t open or access it, 4DDiG File Repair is here to help you. 4DDiG File Repair is a software tool designed to help users handle any file corruption issues, including Excel files not opening or being corrupted.
Here are its key features:
- It can handle a variety of file formats, including Excel, Word, PowerPoint, PDF, and more.
- It repairs corrupted and unplayable videos, photos and audio.
- It boasts a high success rate in repairing files by offering basic and advanced repair modes.
- It displays a preview of the repaired files to ensure the contents are recovered.
Here are the steps that you can follow to repair corrupted Excel files with the help of 4DDiG File Repair.
-
Install the 4DDiG File Repair on your computer and launch it. Now go to the File Repair tab and hit the Add Files button.
FREE DOWNLOADSecure Download
FREE DOWNLOADSecure Download

-
Upload the corrupted Excel file that you want to repair and hit the Start Repair button. The repair process will start immediately and take a few seconds.

-
Once the process is completed, you can preview the repaired Excel file. If everything looks fine, hit the Export button and save the Excel file on your computer.

FAQs about Protecting or Unprotecting Excel
Q1. How do you protect an Excel sheet?
To protect an Excel sheet, open the sheet, go to the “Review” tab, click “Protect Sheet,” and enter a password. Finally, click OK and your worksheet is protected now.
Q2. What are the advantages of protecting an Excel sheet?
Protecting an Excel sheet offers advantages such as enhanced data security, control over access and modifications, and prevention of unauthorized or accidental changes.
Q3. What happens if we protect only the workbook structure?
Protecting the workbook structure restricts users from modifying the workbook's structure, including sheet movement, renaming, insertion/deletion of rows/columns, and access to hidden sheets, but it doesn't prevent editing content within cells. For content editing control, sheet-level protection is needed in addition to workbook-level protection.
Conclusion
Excel’s built-in protection features offer a secure way to safeguard your data, but they can sometimes pose challenges when accessing a workbook. We've discussed how to unprotect sheets with or without password, including the use of VBA code, removal of protection code, and even converting the sheet into Google Sheets. These tricks help you effectively manage and access your Excel workbooks as needed. Additionally, when dealing with Excel files that have issues like corruption or gibberish output, consider using 4DDiG File Repair for assistance.
