How to Move Call of Duty from HDD to SSD on Windows 10/11

5 mins read

Updated on 2026-09-20 18:29:23 to game

If Call of Duty is installed on an HDD, long loading screens, texture pop-in, and slow access to large game files can make every match feel less responsive. Moving the game to an SSD usually improves loading performance without requiring a fresh download. The best method depends on your launcher, while Battle.net and Xbox App provide their own relocation options. This guide covers the preparation steps, clear transfer methods, and checks to complete after the move.

1. Before You Move Call of Duty to an SSD

Before transferring a large game, confirm that the target SSD is ready and protect your files. This prevents a failed copy from leaving you with an incomplete installation or no working backup.

Check SSD Space and Prepare the Drive

Check the available space on the SSD before starting. Call of Duty may include the base game, multiplayer files, campaign packs, high-resolution assets, and updates, so the required size can change. Leave additional free space for future patches.

If the SSD is new, initialize it in Disk Management, create a volume, format it as NTFS, and assign a drive letter. Do not format a drive that contains files you still need.

Back Up Save Data and Cloud-Sync Information

A game move normally changes the installation location, not your account progress, but it is still wise to confirm that your Activision, Steam, Battle.net, or Xbox account is synchronized.

You can also create a file or system backup with 4DDiG Windows Backup before moving Call of Duty. It provides an extra recovery option if the transfer is interrupted or the launcher later needs repair.

⚡ 2. How to Move Call of Duty from HDD to SSD on PC?

Use the method that matches the platform where you installed the game. Do not move only a random subfolder if the launcher expects a specific directory structure. After each transfer, let the launcher verify the files before deleting the original copy.

Method 1: Move COD with 4DDiG Partition Manager

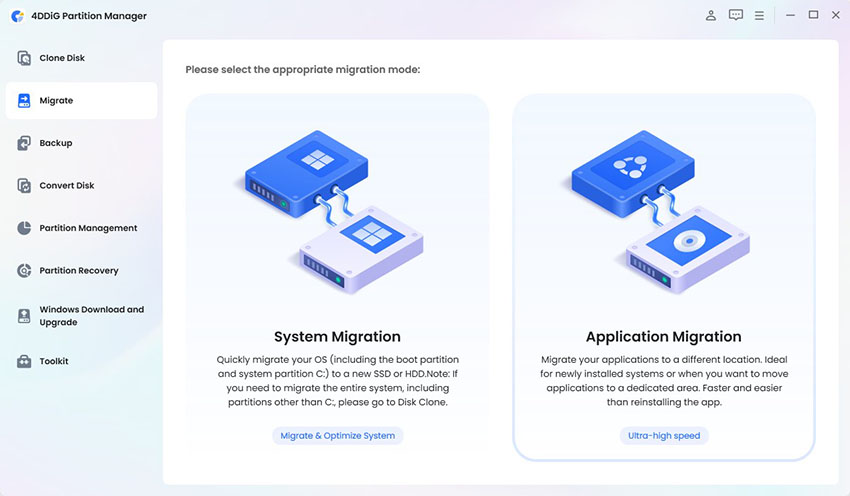
If you want to move Call of Duty from HDD to SSD without reinstalling and do not want to adjust launcher folders manually, use 4DDiG Partition Manager’s Application Migration feature. It is designed to relocate supported installed applications and games while updating their installation path.

  • Install and open 4DDiG Partition Manager, then go to Clone Disk > Application Migration.

    FREE DOWNLOAD

    Secure Download

    application migration
  • Review the applications installed on the HDD. Choose the SSD as the destination and select Call of Duty. Click “Migrate.”

    choose app to move
  • Wait until the migration completes. Do not shut down the computer or disconnect either drive.

    complete migration

Method 2: Use Battle.net’s Move Function

For a Battle.net installation, the client must know the new location after the game folder is transferred. Depending on the client version, you may see a move option or need to locate the existing files.

  • Open the Battle.net app and select the game you want to move.

  • Click the gear icon next to the Play button. Choose Show in Explorer.

    show in explorer
  • Cut (or Copy) the entire game folder. Go to the new drive (SSD) and create a new folder if needed (e.g., D:\Games or E:\Battle.net).

  • Paste the game folder into the new location.

  • Return to the Battle.net app. On the game page, click the gear icon again and select Game Settings.

  • Click Use a Different Folder (or Locate the game).

  • Browse to the new folder you just pasted and select it. Click Select Folder and click Done.

Do not delete the HDD copy until until Battle.net launches the game successfully from the SSD. Keep the folder structure intact during the copy.

Method 3: Move COD Installed via Xbox App

The Xbox App and Microsoft Store versions use protected folders, so moving them manually can cause permission and registration problems. Use the built-in move control whenever it is available.

  • Open the Xbox App and select Call of Duty in your library.

  • Open Manage and choose the Files tab if it is shown.

  • Select Change drive or the available move option, then choose the SSD.

  • Confirm the destination and wait for the Xbox App to finish transferring the installation.

  • Launch Call of Duty and allow the app to update or verify files if prompted.

If the move control is unavailable, check Windows Settings > Apps > Installed apps. Some Microsoft Store packages display a Move option there. Avoid taking ownership of WindowsApps or copying protected folders by hand unless you understand the recovery steps.

FAQs About Moving Call of Duty from HDD to SSD

1. Should COD Be on an SSD or HDD?

An SSD is generally the better location for Call of Duty because it can reduce startup and level-loading times and handle frequent asset access more efficiently.

2. How Long Does It Take to Transfer a Game from HDD to SSD?

The time depends on the game size, HDD read speed, SSD write speed, connection type, and the amount of data being verified. A large COD installation can take several minutes or longer.

3. Does COD Run Faster on an SSD Than an HDD?

Usually, yes, for loading-related tasks. An SSD can shorten game startup and map-loading times and may reduce delays while large assets are read. It does not replace a capable CPU, GPU, or stable network connection, so it should be viewed as a storage improvement rather than a complete performance upgrade.

Conclusion

To move Call of Duty from HDD to SSD, first confirm that the SSD has enough space, prepare the drive, and back up important local data. 4DDiG Partition Manager’s Application Migration is the most direct option when you want to move a supported COD installation without reinstalling.

Battle.net and Xbox App users can also use their platform-specific relocation tools, followed by file verification. Keep the original HDD copy until the game launches successfully from the SSD. If you want a simpler transfer with fewer manual path changes, try 4DDiG Partition Manager.

FREE DOWNLOAD

Secure Download

William Bollson (senior editor)

William Bollson, the editor-in-chief of 4DDiG, devotes to providing the best solutions for Windows and Mac related issues, including data recovery, repair, error fixes.

(Click to rate this post)

You rated 4.5 ( participated)