A Complete Guide to Denoise Multiple Photos Lightroom | Stepwise
Did you know that noise reduction in photos is key to improving image quality, especially in low light conditions? Lightroom, a popular editing tool, allows users to denoise multiple photos Lightroom in one go, saving valuable time while maintaining consistency. This feature is a game-changer for photographers dealing with high-ISO images, as noise can significantly affect details and clarity.
This article will provide a step-by-step walkthrough on how to reduce noise across several photos simultaneously. By the end, you’ll have sharper, cleaner images ready to impress, all with just a few clicks in Lightroom.
Part 1: What Is Image Noise & What Causes It
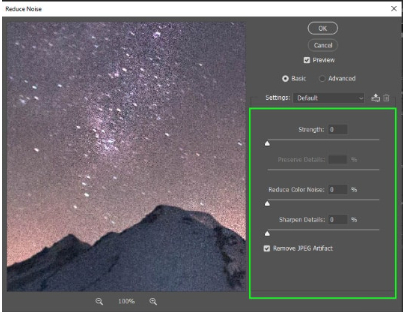
Image noise is the random variation in brightness or color in a photo. It appears as grainy, speckled, or pixelated areas. It often reduces the overall quality and clarity of the image. Noise typically becomes more noticeable in low-light conditions or when images are zoomed in.
⚡ Types of Image Noise:
- Luminance Noise: This affects the brightness levels in an image and is seen as monochrome grain. It is the most common type of noise.
- Chrominance Noise (Color Noise): This appears as random splotches of color, often in low-light images, where different colors like red, green, or blue seem misplaced.
- ISO Noise: Also known as digital noise, this type is linked to the camera’s ISO settings. Higher ISO levels amplify noise, especially in darker conditions.
⚡ Causes of Noise
Several factors contribute to image noise. These include both technical and environmental elements:
- High ISO Settings: Increasing the ISO of your camera sensor amplifies the light signal but also amplifies noise. This is often done in low light and results in grainy images.
- Poor Lighting Conditions: There is not enough light, and the camera will compensate, resulting in grainy or speckled textures.
- Small Camera Sensors: Compact cameras and smartphones with small sensors produce more noise compared to larger sensors in DSLRs.
- Long Exposure: Long exposure can create noise due to heat buildup in the camera sensor.
- Underexposed Images: Brightening underexposed images in post processing can make noise more visible.
Understanding these causes helps photographers mitigate noise during image capture and post-processing.
☞ How to Reduce Noise Caused by High ISO / Long Exposure | 3 Easy Ways
Part 2: The Importance of Lightroom Remove Noise
Lightroom’s noise reduction is a favorite among photographers and editors because of its awesomeness. Here are the benefits:
- User Friendly: Lightroom’s interface is easy to use for both beginners and pros, so workflow is smooth.
- Advanced Tools: Has sliders for luminance and color noise so you can fine tune.
- AI Capabilities: The AI denoise in Lightroom Classic removes noise from RAW files while preserving details in the image.
- Batch Processing: Allows you to edit multiple images at once, saving time and effort.
- Non-Destructive Editing: Lightroom preserves original image data, so you can always go back or reverse edits.
☞ What File Formats Does Lightroom AI Denoise Support?
Lightroom AI Denoise supports specific file types optimized for high-quality noise reduction. The supported formats include:
- RAW Files: These include CR2, NEF, ARW, and RAF, making them ideal for professional-grade images.
- DNG (Digital Negative): A universally compatible RAW format supported by Lightroom’s Denoise feature.
Lightroom’s AI denoise feature does not support linear RGB formats like M-RAW. It works exclusively with files that can be demosaiced, ensuring optimal results for RAW or DNG formats.
By leveraging these features, Lightroom provides a reliable and efficient solution for reducing noise and enhancing image quality.
✅ You May Also Like: Top 10 Best Lightroom Alternatives for 2025 (Free & Paid)
Part 3: How to Denoise Multiple Photos Lightroom [Step-by-Step]
Denoising multiple photos in Lightroom is easy and fast with batch processing. Follow this step-by-step guide to denoise and enhance your images.
💻 On Desktop
Launch the Adobe Lightroom on your desktop.
-
Go to the upper-right “Library” and import your images via clicking the bottom-left “Import” button.
-
Press Ctrl + A (Windows) / Cmd + A (Mac). Alternatively, choose the top “Edit” tab and click “Select All” from the dropdown list.
-
Then click the “Photo” tab from the top menu bar and pick “Enhance” from the draw-down list.

-
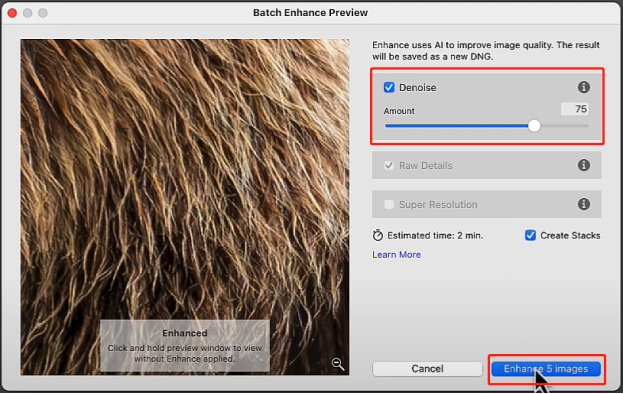
On the pop-up “Batch Enhance Preview” pane, check the “Denoise” box and move its slider to the right to get a higher amount.
-
Once done, tap “Enhance X images” to start.

📲 On Mobile
Upload and select multiple photos to the Lightroom mobile app.
-
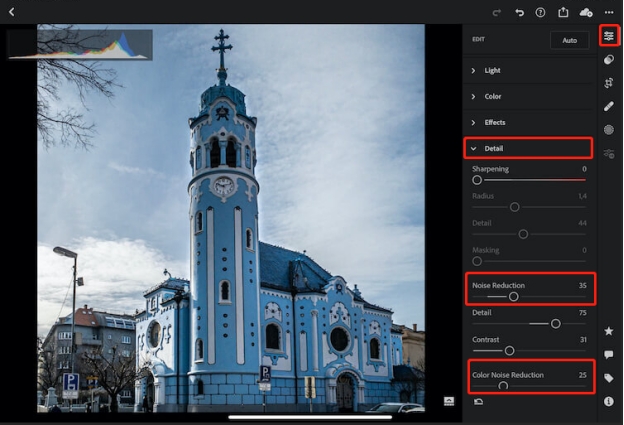
Tap the “Edit” icon on the right side to expand the toolbar. Then expand the “Detail” section.
Proceed to adjust 2 Lightroom Noise Reduction settings:
-
Luminance Noise Reduction: Move its slider to the right to reduce grainy noise.
-
Color Noise Reduction: Slide its slider to the right to reduce color speckles.

-
-
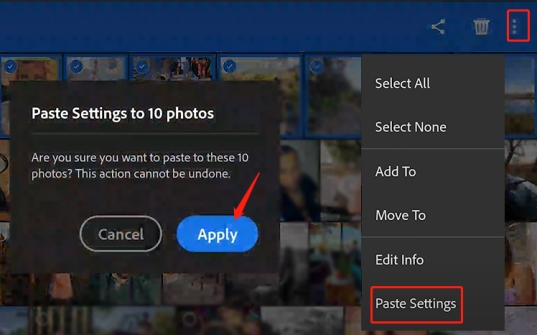
After denoise a photo, click on the top-right vertical three-dot icon on the same screen and select “Copy Settings”. There you can customize the settings you want to sync to other photos.
Return to the your Library tab, select multiple photos.
-
Later, tap the three-dot icon and choose “Paste Settings”. Finally, tap “Apply” to apply the noise reduction settings to all selected photos.

For best results, zoom into 100% view to preview noise reduction effects accurately.
Part 4: Fix Common Issues While Denoising in Lightroom
Denoising in Lightroom is a powerful tool for enhancing image quality, but users may encounter certain issues. Below are common problems and their solutions:
1. Photos from Lightroom Are Very Grainy
Denoising can sometimes result in grainy images, especially when the original photo has high ISO or excessive noise. Read on to find the solutions to fix grainy photos in Lightroom:
☞ Solutions:
✔️ Adjust Noise Reduction Settings: Fine-tune the Luminance slider
under the Noise Reduction section in Lightroom. Increase Luminance to
smooth noise but avoid overdoing it to retain details.
✔️ Use AI-Powered Denoise: Use the Enhance > Denoise AI feature for
RAW files to achieve better results.
✔️ Edit in Smaller Increments: Apply noise reduction gradually and
test results at each step to balance smoothness and sharpness.
2. Lightroom Denoise does not support this photo format at the moment
Lightroom Denoise only works with RAW files that can be demosaiced. Formats like M-RAW (linear RGB) are incompatible, leading to error messages.
☞ Solution:
✔️ Convert to Compatible RAW Format: Use Adobe DNG Converter to
convert your file to a RAW-compatible DNG format, which will allow
Lightroom Denoise to process it.
✔️ Use an Alternative Method: For non-compatible formats, adjust the
Noise Reduction sliders manually in the Develop module to achieve
acceptable noise reduction.
✔️ Check File Format: Before starting, confirm that your image is a
RAW file and not a format like M-RAW, TIFF, or JPEG.
3. Lightroom Classic Batch Denoise Not Showing
Batch denoise functionality may not appear or work as expected.
☞ Solution:
✔️
Use the Enhance Option: Select multiple photos in the Library or
Develop module. Right-click a thumbnail from the selected photos and
choose 'Enhance'. From there, choose the Denoise option to apply it to all
selected photos.
✔️ Update Lightroom Classic: Ensure you are using the latest version
of Lightroom Classic, as Adobe frequently updates features and addresses
bugs.
✔️ Restart Lightroom: If the batch option is still not visible,
restart Lightroom after updating to ensure the feature is properly loaded.
By following these steps, you can resolve common issues and optimize Lightroom's denoising capabilities for your photos.
Part 5: Alternative Way If Denoise Multiple Photos Lightroom Not Working
If Lightroom denoising is not working for multiple photos or specific formats, 4DDiG AI Photo Enhancer is a good alternative for its powerful AI Denoise Model. This tool uses advanced AI technology to remove noise and graininess from photos precisely and make them look clean and professional.
Unlike Lightroom, 4DDiG Photo Enhancer supports various file formats such as JPG, PNG, HEIC, WEBP, etc. Also, it allows you to denoise multiple photos at once. Its AI technology makes it fast and easy to use for both beginners and tech-savvies.
Secure Download
Secure Download
✨ Key Features of 4DDiG AI Photo Enhancer
- Smart Noise Removal: AI removes noise and graininess without losing details.
- Robust AI Models: Provide Face/Denoise/General/Colorize model.
- Batch Processing: Enhance and denoise multiple photos at once with one click.
- 4K/8K Resolution: Increase photo resolution to 4K and higher 8K.
- Supports Various Formats: Works with RAW, HEIC, JPEG, PNG, and more. No compatibility issues.
- Simple Interface: Come with user-friendly interface design.
- All-in-One Tool: Besides denoising, it can also sharpen blurry images, colorize black-and-white photos and upscale quality.
✨ How to Denoise Multiple Photos with the 4DDiG AI Photo Enhancer
-
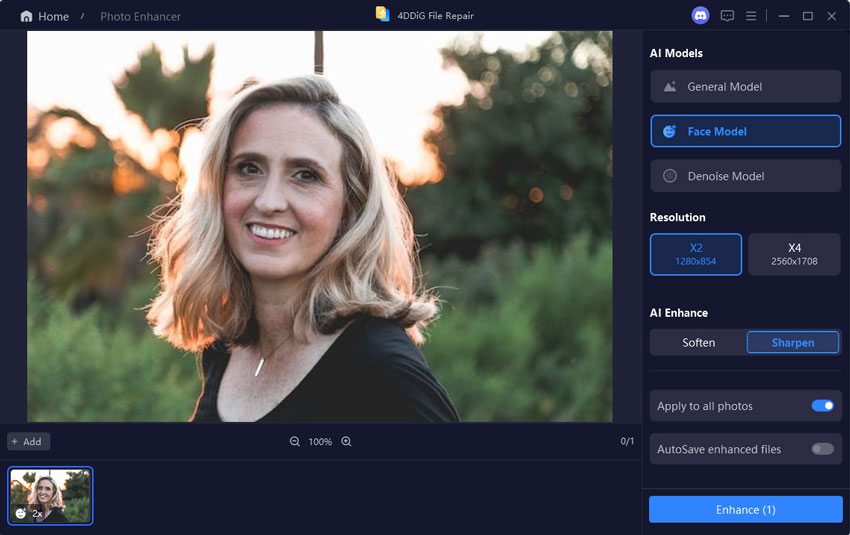
Start the 4DDiG File Repair software and select "AI Enhancer" > "Photo Enhancer" from the home screen.

-
Pick the blue "Add Photos", which empowers you to import the grainy and noise images to this software.

-
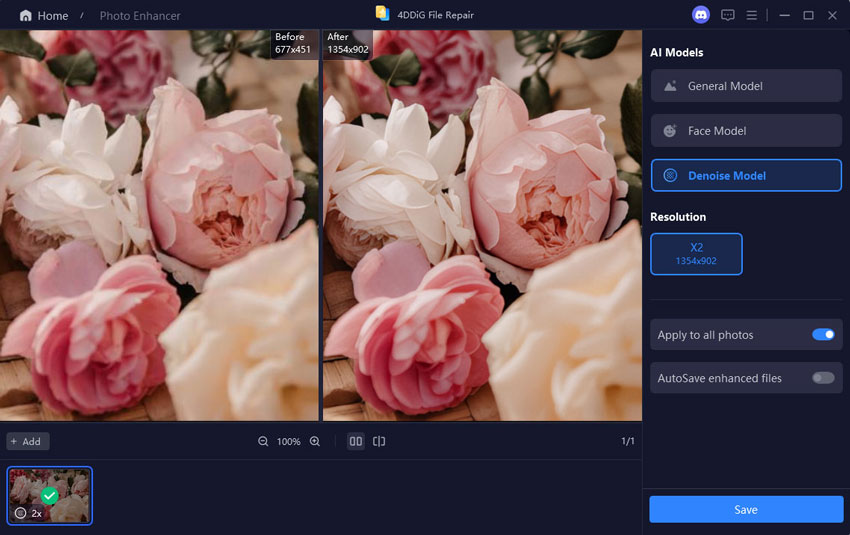
Select the Denoise Model, Face Model, or General Model to reduce grain and noise. Adjust the resolution (X4 is best) if needed and click "Enhance" to process the image.

-
The tool builds the selected AI model to enhance blurry, low-resolution, or poor-quality images. Preview the enhanced photo and save it when you're happy with the result.

With 4DDiG AI Photo Enhancer, you can quickly fix noisy photos without struggling with Lightroom’s limitations. It’s the perfect solution for smooth, clean, and high-quality photo enhancements!
Part 6: People Also Ask About Lightroom Denoise
Q1: How do you use Lightroom Denoise on JPG?
Lightroom doesn’t support JPG files for denoising. You need to convert JPG to RAW or DNG file format before using the denoise tool.
Q2: Can I edit multiple photos at once in Lightroom?
Yes, you can choose multiple photos and apply the same edits to all of them. Use the Sync button to apply the same settings to multiple images including noise reduction.
Q3: How to fix blurry photos in Lightroom?
Use the Sharpness tool in the Detail panel to improve blurry photos in Lightroom. Increase the Amount slider under the Sharpening section.
Conclusion
Denoising photos is vital for creating high-quality, professional images. While Lightroom offers powerful tools to denoise multiple photos Lightroom, limitations like RAW file dependency can hinder some workflows.
That’s where 4DDiG AI Photo Enhancer steps in. It provides advanced alternatives, ensuring high-quality noise removal for various photo types. Whether you’re a beginner or a pro, consider 4DDiG AI for efficient and seamless results in denoising multiple photos in Lightroom. Try those methods today and transform your noisy images into masterpieces!
Secure Download
Secure Download
💡 Summarize with AI:
You May Also Like
- Home >>
- Photo Tips >>
- A Complete Guide to Denoise Multiple Photos Lightroom | Stepwise



 ChatGPT
 Perplexity
 Google AI Mode
 Grok
Grok

