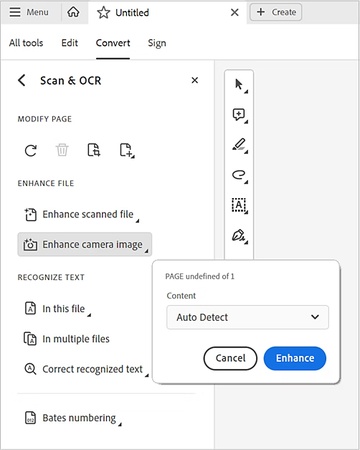
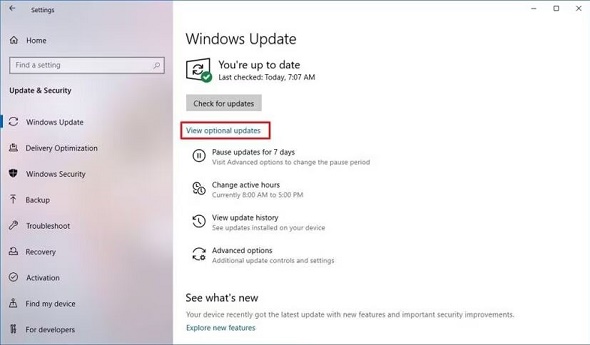
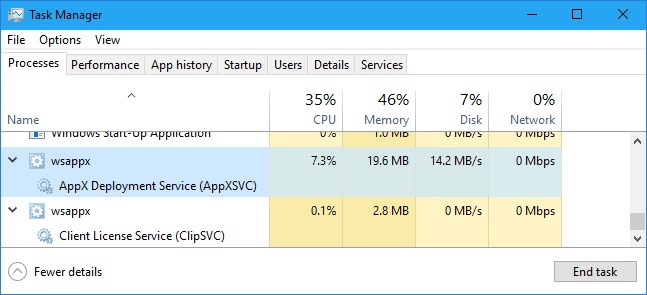
High ISO/Long Exposure Noise Reduction | 3 Easy Ways
Many photographers deal with issues caused by high ISO or exposures. Both shooting at night and capturing handheld pictures in low light can result in image noise that spoils the details and makes things blurry. This guide talks about high ISO and long exposure noise reduction, what causes it, and the software available to fix your images. We’ll examine the reasons for noise and the best ways to eliminate it like an expert.
What Is Noise in Photography?
Those random changes in brightness or color in images that appear as grain, blotches or speckles are called image noise. This issue stands out the most when you are capturing photographs in poor light or use longer capturing periods.
You might be wondering does higher ISO mean more grain, but before we move to that it is important to learn about the types of noise.
🔊 Types of Noise
Here is a quick overview of the common types of noise every photographer must know.
- Type
- Description
- Luminance Noise
- Grainy speckles across the image affect brightness only
- Color (Chrominance) Noise
- Colored patches or blotches, especially in shadow areas
- Banding Noise
- Horizontal/vertical lines due to sensor interference
✍ Common Causes
Why does high iso cause grain? Well, here are all the common causes of noise in photography.
- Cause
- Description
- High ISO settings
- Boosts sensitivity but introduces electronic noise
- Post-processing
- Pushing contrast and shadows increases perceived noise
- Long exposures
- Generates heat and sensor interference over time
- Underexposure
- Lifting shadows in editing reveals grain
- Small sensors
- Have less room for light capture, amplifying noise
❓ Does Long Exposure or High ISO Cause Noise
Are you also thinking about what long exposure noise reduction mean or will it even work?
Yes, having a high ISO or a long exposure may cause noise, but in different manners. The reason grain appears when using a higher ISO is that the sensor amplifies all signals, both needed and unwanted ones.
With longer shutter speeds, heat forms on the sensor and leads to thermal noise. The main goal of in-camera long exposure noise reduction is to suppress those issues. Hence the higher the ISO, the more the grain.
What Is Long Exposure Noise Reduction & High ISO NR (Noise Reduction)
For photographers, there are just two main categories of Noise Reduction (NR).
1️⃣ Long Exposure Noise Reduction
With LENR or long exposure noise reduction, the camera takes a dark image by keeping the shutter closed immediately after you take your picture. After that, the camera removes the noise patterns caused by heat from the image. It gets rid of fixed-pattern and thermal noise yet extends shooting time and makes the process slower.
2️⃣ High ISO Noise Reduction
The high ISO noise reduction setting is helpful, as it usually filters the extra grain and spotty colors visible at many ISO settings in cameras and software. It improves how fine details are shown in exchange for clarity.
Method 1. Use Professional Long Exposure or High ISO Noise Reduction Software [Post-Pocessing]
Shooting at high ISO or for a long time may lead to grain and other unwanted problems. To fix the problem, 4DDiG AI Photo Enhancer provides dedicated programs containing a “Denoise” AI model, helping you eliminate noise that was added by image sensors, inadequate lighting, or slow shutter speeds perfectly in just one click.
Secure Download
Secure Download
Steps to reduce noise from photos with 4DDiG
-
Open 4DDiG File Repair tool on PC, and go to “AI Enhancer” from the left menu. Now, select “Photo Enhancer” and click “Get Started”.
-
Then hit “Add Photos” for adding your images with noise produced by high ISO or long exposure.
-
After adding the image, select your desired “Denoise Model” according to the image requirements and choose the “Resolution” for enhancing the image. Finally, select the “AI Enhance” model and click “Enhance” to begin processing AI Enhancement.
-
Within a few seconds, you will get the results that you can compare in the side-by-side preview. Click "Save" to download your AI-processed images with high ISO noise reduction.
Method 2. High ISO Noise Reduction in Photo Editing Software [Post-Pocessing]
The manual noise reduction features of Lightroom and Photoshop are available when editing RAW or JPEG images. You can reduce grain and smooth fine details with these tools when shooting in dim light, with long exposure or with high ISO.
1. How to Fix High ISO Noise in Lightroom
Users can effectively lower ISO noise with the help of Lightroom’s noise reduction feature. It separates the different types of noise and retains the edges with important details. A good tool for correcting multiple high ISO photographs captured during events, in the dark, or at night.
-
Open your image in Lightroom and click the “Develop” tab from the top-right menu bar.
-
Check the “Denoise” box and choose the denoise amount either by using the slider or by entering a numeric value.
-
Click “Enhance” and after Lightroom denoises your image, save it with high ISO NR.
You can also read this stepwise guide to remove noise from multiple photos at once in Lightroom: A Complete Guide to Denoise Multiple Photos Lightroom | Stepwise.
2. How to Reduce ISO Noise in Photoshop
Reduce Noise and Camera Raw settings allow you to have fine control in Photoshop. It is possible to get rid of grain in high-ISO pictures while still keeping their sharpness. This is the choice for making detailed editing and retouching to refine the texture of the image.
Here are the detailed steps of how to remove high ISO noise in Photoshop:
-
Begin by opening your image in Photoshop and clicking "Filter" and select “Camera Raw Filter” from the draw-down.
-
Expand the “Detail” section from the right menu and move the slider of “Noise Reduction” or “Color Noise Reduction” to achieve long exposure NR.
Save your images once you are satisfied with the results.
If you want to find more features in Photoshop to reduce noise or grain generated by high ISO or long exposure, please check this guide: How to Reduce Noise in Photoshop 2025 | Step-by-Step Guide.
Method 3. Adjust In-Camera Settings for High ISO & Long Exposure NR
You can suppress noise at the time of shooting, but by making certain decisions ahead, you can get better results. Most cameras have an in-camera option for High ISO NR and Long Exposure NR that cuts down on fake pixels in JPEG photographs.
When you are aware of when to enable or disable them, you can start with better image quality.
1. For High ISO NR (Often ISO 100-200, RAW format)
Modern DSLRs and mirrorless cameras (Canon, Nikon, Sony) offer High ISO NR options.
- Camera Brand
- Suggested Value
- Canon
- Standard/Low
- Nikon
- Normal
- Sony
- Low
2. For Long Exposure NR (Enable “Long Exposure Noise Reduction”)
Below are the settings for Long Exposure NR for Canon, Nikon, and Sony cameras.
- Camera Brand
- Suggested Value
- Canon
- Auto/On
- Sony
- On
- Nikon
- On
Here are more tools and methods for fix noisy or grainy images: The Ultimate Guide to Photo Noise Reduction Techniques.
FAQs
Q1: How to read noise in DNS Versus ISO setting?
Use tools like Photons To Photos ISO Noise to compare ISO noise performance across cameras. The lower the read noise, the better the image at high ISO.
Q2: What is the best camera for high ISO low noise?
The Sony A72 III is one of the best cameras for high ISO low noise photography.
Q3: Should I use in-camera noise reduction, like in Canon or Sony?
Of course, users who work with RAW files should simply turn off or drop the built-in NR and deal with the task in software such as 4DDiG or Lightroom afterward.
Q4: How to turn off long exposure noise reduction in Canon?
If you want to turn off this option in the Canon camera, go to Menu and then to Settings. Here locate the LENR feature and turn it off.
Conclusion
Complications called noise are likely to show up in photographs taken when the light is low or the exposure is long, but you can still correct them or make them look better. When you use high ISO settings, take long exposures, or try astrophotography, you can enjoy very clean images by choosing the correct settings.
Using 4DDiG AI Photo Enhancer lets you get brilliant-looking photos easily. Thanks to its Denoise Model, it determines which areas are noisy and which are significant detail automatically with AI, so it is often used for high ISO and long exposure noise reduction.
Secure Download
Secure Download