How to Pull up an Unsaved Word Document
Have you ever closed your Microsoft Word document and suddenly realized you hadn’t saved your latest changes? It’s a common nightmare for many, but thankfully, solutions exist within the software itself to address this very issue. Microsoft Word, the widely used document processing tool, serves as the backbone for drafting everything from academic papers to business reports on both Windows and Mac platforms.
But even with its extensive features, document loss remains a prevalent problem due to accidental closures, system crashes, or simply forgetting to hit save. This article will guide you through 7 reliable methods to retrieve unsaved Word documents so that your hard work doesn’t vanish into thin air.

Part 1: Why Can't I See an Unsaved Word Document?
Ever wondered why you can't see an unsaved Word document after a mishap? It’s frustrating, but there are several common causes for this issue.
Here’s a brief overview:
- Unexpected Shutdowns: If your computer shuts down unexpectedly due to a power outage or system crash, Word might not have had the chance to save your document.
- Software Crashes: Sometimes Word itself may crash or freeze, stopping the automatic saving process.
- AutoRecovery Not Enabled: AutoRecovery is a lifesaver, but it needs to be enabled. If it wasn't, your document might not be automatically saved in the background.
- Temporary Folder Issues: Unsaved documents often reside in temporary folders, which can be tricky to navigate or may get cleared out without your knowing.
Understanding these triggers can help you navigate the solutions more effectively, ensuring you're better prepared to recover your valuable work next time. Let’s explore how to address these challenges and secure your unsaved documents.
Part 2: How to Pull up an Unsaved Word Document?
Now that we understand why unsaved Word documents might go missing, let’s focus on how to retrieve them. In the next section, we'll explore practical steps and tools that can help you recover your work and secure your data effectively.
Here are the easy ways:
Way 1: Pull up an Unsaved Word Document using 4DDiG Data Recovery
One standout solution for retrieving an unsaved Word document is the 4DDiG Data Recovery. This tool shines in its ability to deeply scan your system for any traces of unsaved or lost documents.
It uses advanced algorithms that reach far beyond simple file recovery methods. This feature is crucial for Word documents that may not be visible but still exist in fragmented forms on your hard drive.
Here’s why 4DDiG could be your go-to option:
- Comprehensive Recovery: 4DDiG excels at recovering over 2000 file types, including Word documents, from a variety of storage media such as hard drives, USBs, and SD cards.
- High Success Rate: With cutting-edge technology, 4DDiG promises a high recovery rate, which is crucial when you need to recover documents that you forgot to save.
- Bootable Recovery Drive: You can recover documents even when your system fails to start. It ensures you're covered in almost any data loss scenario.
- Pre-Recovery Preview: Ensures that you recover exactly what you need, reducing unnecessary recovery attempts.
These capabilities make 4DDiG an excellent choice for anyone looking to retrieve an unsaved Word document quickly and effectively. Follow these 3 easy steps to use 4DDiG Windows Data Recovery for retrieving unsaved Word documents:
Secure
Download
Secure
Download
-
Select the Location
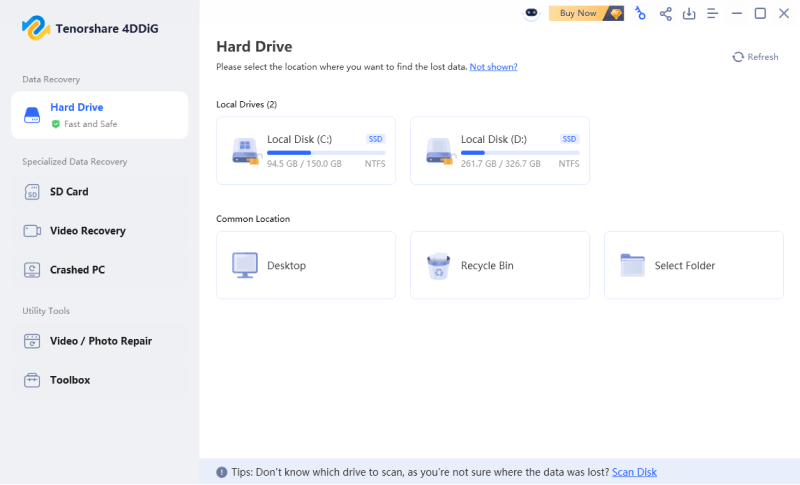
After installing and launching 4DDiG Data Recovery, you'll see the main interface. Choose the drive or location where you lost your unsaved Word document and click "Start." You can also select specific file types to narrow down the search.
-
Scan for Lost Files
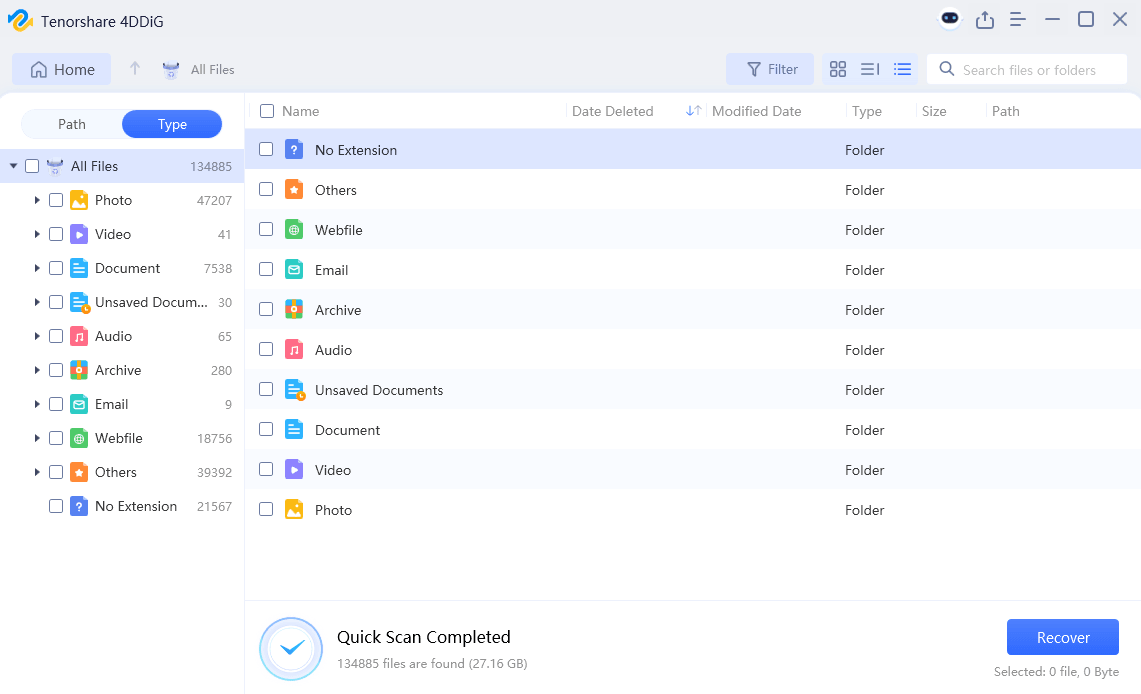
4DDiG Data Recovery will initiate a thorough scan of the selected location to find your unsaved Word document. You can pause or stop the scan if you spot the file you need. The software organizes the recoverable files into categories and file types for easy navigation.
-
Preview and Recover
Once the scan is complete, preview the recoverable files to identify your unsaved Word document. Select the file and click "Recover" to save it to a secure location. To prevent overwriting, choose a different drive to save the recovered file.
Way 2: Searching for AutoRecover files to Pull up an Unsaved Word Document
Microsoft Word’s AutoRecover feature is a lifesaver for when you forget to save your work manually. This function automatically saves a backup copy of your document at regular intervals.
To find these backups, here’s what you need to do:
-
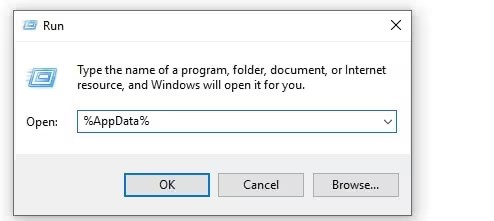
Press the Windows key + R to open the Run dialog box, then type %AppData% and hit Enter. This will take you to the AppData folder, where Word stores its AutoRecover files.

-
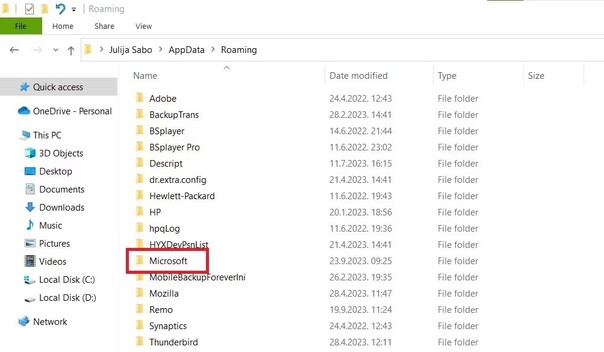
Navigate to the Microsoft folder and look for a folder named "Word."

-
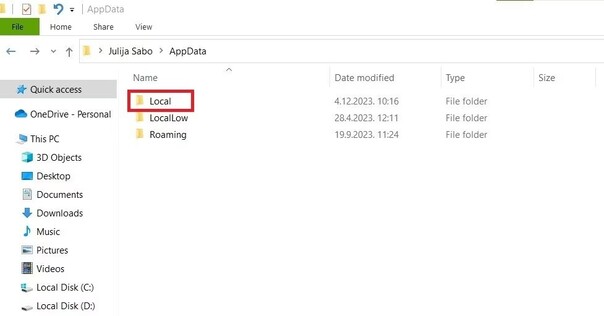
If you can't find it there, head back to the AppData folder, enter the Local folder, and then locate the Microsoft > Office > UnsavedFiles folder.

-
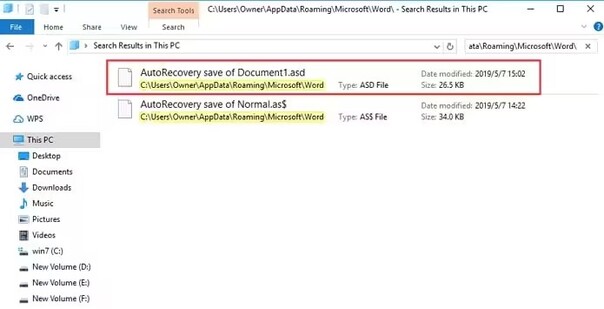
AutoRecover files have an .asd extension, so you can also search for them directly. Open File Explorer, type .asd in the search box, and let Windows do the hunting for you.

-
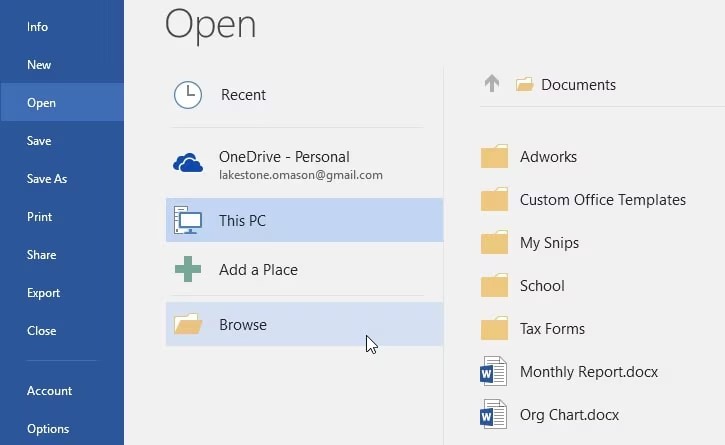
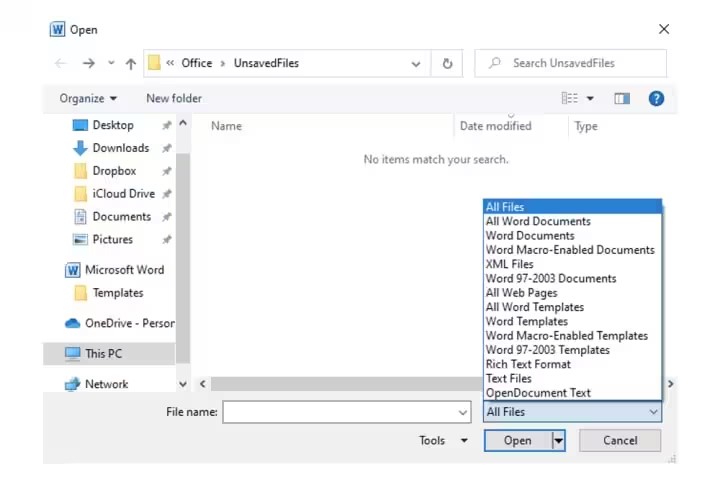
Once you've found the .asd file, open Word, click on File > Open > Browse, and navigate to the location where the file is stored.

-
Make sure to change the file type to "All Files" to see the .asd file.

- Double-click on the .asd file, and voila! Your unsaved document is back.
Way 3: Retrieving Unsaved Word Documents via Windows Search
If you suspect that your unsaved Word document might still be lingering somewhere on your system, Windows Search can be an excellent tool to locate it.
Here’s how you can use Windows Search to try and find your document:
- Initiate the Search by clicking the Start button or pressing the Windows key. Begin typing the name of the document or just parts of it if you remember. If you're using Windows 8.1 or later, simply type directly into the search box on the taskbar.
- Review the Search Results to see if your document appears in the list. If it does, you can simply click on the document to open it in Word.
- If the document isn’t found in the initial search results, don’t give up. You might want to try searching for generic file types like "" or ".doc" to find any Word documents that might not be named but still contain your content.
Way 4: Open Word Backup Files to Pull up Unsaved Word
If you’ve enabled Word's backup feature, it could be your ticket to recovering an unsaved document. Word Backup saves copies of your documents as WBK files, which you can open directly in Word. Here’s how to access and use these backup files:
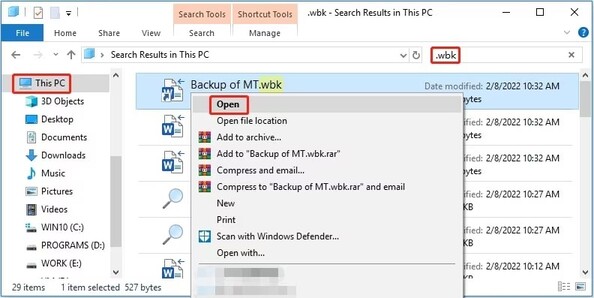
- Locate WBK Files by opening File Explorer. In the search bar, type .wbk and press Enter to search your entire computer. This action will bring up any WBK files present, which are the backup copies created by Word.
-
Open the Found WBK Files by navigating to the directory where the files were found. Double-click on the WBK file or right-click and select 'Open' and then choose Word to view your document.

- If your search doesn’t initially reveal any WBK files, check your Word settings to ensure that the backup feature is activated for future instances. Go to File > Options > Advanced and scroll down to the Save section to verify or modify these settings.
Way 5: Pull up an Unsaved Word Document by Checking Recycle Bin
If you've accidentally deleted a Word file and haven't emptied the Recycle Bin yet, there's a good chance you can recover it.
Here's how to retrieve your document from the Recycle Bin:
- Open the Recycle Bin by double-clicking its icon on your desktop, or you can search for "Recycle Bin" in the Start menu and select it from the results.
- Search for Your Document by typing the file name in the Recycle Bin’s search box, or manually browse through the list of deleted items to find your Word document. Pay attention to the file type and deletion date to help identify the correct file.
-
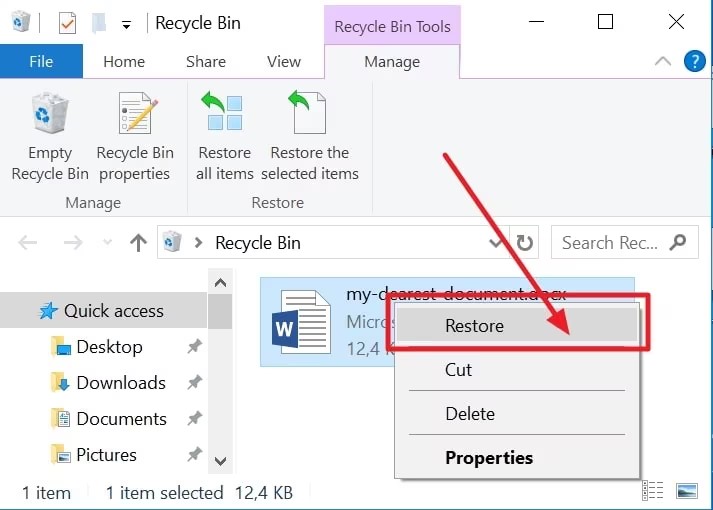
Restore the Document by right-clicking on the Word file and selecting 'Restore' from the context menu. This action will return the document to its original location on your computer.

- Once restored, navigate to the file's original location or use Windows Search to locate and open your document in Word.
Part 3:What're Other Ways to Pull up an Unsaved Word Document?
If the previous methods haven't helped you recover your unsaved Word document, don't lose hope just yet. There are still a few more tricks you can try. Let's explore some additional techniques.
Way 1: Restart Word to Open AutoRecover Files
When you reopen Word after an unexpected closure, it automatically searches for AutoRecover files, which might contain your unsaved work. Here’s how you can potentially recover your document using this feature:
- Simply close and then reopen Microsoft Word. Upon restarting, Word checks for any AutoRecover files.
- If there are any AutoRecover files, Word will display them in the Document Recovery task pane. You will see files labeled either as "[Original]" or "[Recovered]."
- Select the relevant document from the Document Recovery pane. Open it and then go to File > Save As. Be sure to save it in the .docx format to secure your recovery.
This method is especially useful in Microsoft 365, where the software prioritizes opening the most recently changed files first, ensuring that you have immediate access to the documents that are most likely in need of recovery.
Way 2: Pull up an Unsaved Word Document from Temporary Files
Temporary files are your silent backups while you work on a document. These files can be a lifesaver if your document was never saved. Here's how you can locate and recover unsaved Word documents from temporary files:
-
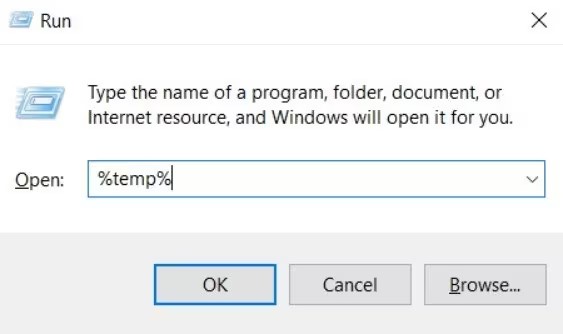
Open the Run dialog box by pressing Windows + R. Type %temp% into the box and hit OK to navigate to the Temporary Files folder.

- In the Temporary Files folder, search for files that have a .tmp extension or files that were recently modified around the time your document was last accessed. These files often represent unsaved documents.
- Once you locate the temporary file corresponding to your unsaved document, remember its exact location. Open Word, go to File > Open > Browse, and navigate to this location. Change the file type to "All Files" to view the .tmp files.
- Select the .tmp file that represents your unsaved Word document, and open it. Word will attempt to recover the contents of the file.
Part 3: Frequently Asked Questions
Q: Is there a way to recover an unsaved Word document after force quit?
Ans: Yes, you can recover an unsaved Word document after a force quit by using the AutoRecover feature. Simply reopen Word, and the Document Recovery pane should display any recovered files.
Q: What is the shortcut to recover an unsaved Word document?
Ans: The quickest way to recover an unsaved Word document is to use a reliable data recovery tool like Tenorshare 4DDiG. This powerful software can scan your computer for unsaved Word documents and help you restore them with ease.
Q: Can I retrieve a previous version of a Word document?
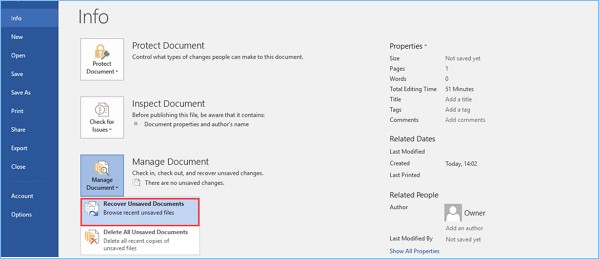
Ans: Yes, you can retrieve a previous version of a Word document. Go to "File," then "Info," select "Manage Document," and click on "Recover Unsaved Documents" or browse the version history if available.
Conclusion
Losing an unsaved Word document doesn't have to be a nightmare. With the right tools and techniques, you can recover your hard work and breathe a sigh of relief. Word offers built-in solutions for retrieving unsaved documents. However, for the most comprehensive and reliable recovery, consider using 4DDiG Data Recovery program. Its powerful scanning and recovery capabilities ensure that your unsaved Word documents are never truly lost. Take control of your data recovery with 4DDiG and never fear the unsaved document again.

 ChatGPT
 Perplexity
 Google AI Mode
 Grok
Grok

