How do I fix choppy video on Windows 10?“I have recently upgraded my computer to Windows 10. But when I am playing any video on my computer, it is stuttering and lagging throughout. Why am I facing such choppy video playback and how do i fix it?”
There are several reasons why Windows 10 or 11 users experience choppy video playback where the videos stutter and glitch. Such an issue can arise suddenly as well as when you upgrade your Windows operating system. The issue could be due to corrupt video files, a malfunctioning media player, a faulty graphics driver, and even an outdated Windows 10 version. We will discuss all the possible causes of why you are experiencing choppy playback. Thereafter, we will provide instructions on how to fix choppy video playback in simple steps.

- Part 1: Why Is My Video Playback Choppy?
-
Part 2: How to Fix Choppy Video Playback Windows 10/11?
- Solution 1. Re-import or Copy the Video again
- Solution 2. Check with Other Media Players
- Solution 3. Update Graphics Drivers on Windows 10
- Solution 4. Repair Choppy Video with 4DDiG Video RepairHOT
- Solution 5. Convert 4K Video to 1080p or Lower Resolution
- Solution 6. Update Browser and Clear Cookies
- Part 3: Pro Tips to Prevent Video Playback Choppy
Part 1: Why Is My Video Playback Choppy?
You need to understand what causes choppy video playback so that you can pick the correct solution to fix the issue. It is difficult for us to pinpoint which one of these causes is applicable in your case, but you might have a better idea because you know the state of your computer better. Here are all the possible reasons why your video is choppy or stuttering.
- You are playing the video from media device rather than your hard drive.
- The media player is outdated or malfunctioning.
- The graphics driver is outdated or faulty.
- The video file is corrupted or damaged.
- The video file has very high resolution.
- There could be some issues with the system configurations.
- Your computer is infected with virus and malware.
- Unsupported video file format or video codec issue.
- Browser issue if you are watching any video online.
⛳ You May Also Like: How to Fix VLC Choppy Playback in 6 Quick Ways
Part 2: How to Fix Choppy Video Playback Windows 10?
Now that you have some ideas about the possible reason behind choppy video playback, it is time to fix the issue. First of all, you have to make sure that your computer is not infected with virus. It is better if you play the video files on another computer to ensure that the problem is with your computer and not with the video file itself. Let's try out these best solutions on how to fix choppy video playing experience in Windows 10.
Solution 1. Re-Import or Copy the Video again
If you are playing the video from any media device such as DVD, USB drive, or SD card, you can experience choppy video playback. This is because the read speed of the media device may not be high and hence, the playback speed needs to come down to match the read speed. Therefore, it is better to copy the video from the media device to your hard drive. Thereafter, you can re-import the video file into the media player and play again.
Solution 2. Check with Other Media Players
If the media player you are using is outdated or malfunctioning, the video playback can be choppy. That is why you should play the video file in different video media. Since you are using Windows 10, you are most likely using Windows Media Player. Instead, you can download VLC Media Player and play the video file there. Make sure that the video file format is compatible. Otherwise, you need to convert the video file format into the ones that VLC or Windows Media Player is compatible with.
Solution 3. Update Graphics Drivers on Windows 10
If the graphics driver is outdated, you can experience videos choppy on Windows 10. The driver may not be able to process the video accurately, and hence, there can be glitches and stutters. That is why you need to update the graphics driver to the latest version available. If the graphics driver is already updated to the latest version, it is better to reinstall the video driver once again to be completely sure that the video driver is not the cause behind the issue.
1. Update Video Driver
-
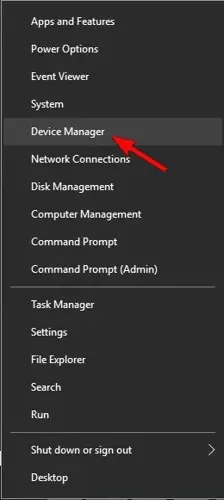
Right-click on the Start menu icon and select the Device Manager option.

- When the Device Manager opens, go to Display Adapters and expand its sub-parts.
Right-click on the graphics driver and click on the Update Driver option.
- On the Update Drivers window, select the Search automatically for drivers option. Make sure you have an active internet connection. It will search for the latest driver only, and you have to follow the on-screen instruction to complete the driver updating process.
- Restart your computer and play the video again to see if the problem is solved.
2. Reinstall Video Driver
- Open the Device Manager by right-clicking on the Start menu icon.
- Expand Display Adapters and right-click on the graphics driver.
Select Uninstall Device option and follow the on-screen instructions to uninstall the driver first. Restart your computer once.
- After the uninstallation, go to the Start menu and open Settings.
- When Settings opens, go to the Windows Update option from the left panel.
Click on the Check for updates button, and your system will automatically search and install the latest driver.
- Once you see the message “You’re up to date”, you can restart your computer and play the video to see if the problem is solved.
Solution 4. Repair Choppy Video with 4DDiG Video RepairHOT
If you have played the video file on another computer and it is stuttering there as well, the problem is with the video file itself. It has most likely got corrupted or damaged and you'll need to repair it to overcome video playback choppy Windows 10 issue. We recommend 4DDiG Video Repair as the best video repair application to repair corrupted video files instantly and perfectly. Here are the top features of 4DDiG Video Repair that make it the best video file repair software.
- Repair videos of all the popular formats starting from MP4 and MOV to FLV and MKV.
- Repair videos that are choppy, jerky, fuzzy, flickering, stuttering, and glitching.
- Support batch processing of videos of different formats at one time.
- Repair videos present on your SD card, USB flash drive, and hard drive.
- Repair videos from mainstream camera brands like Sony, GoPro, and Canon.
Here are the steps on how to fix choppy video recording in Windows 10/11 via 4DDiG Video Repair.
Download and install 4DDiG Video Repair on your computer. Open the application and click the "Video Repair" box from the "Corrupted File Repair" section.
FREE DOWNLOADFor PC
Secure Download
FREE DOWNLOADFor MAC
Secure Download
Click on the "Add Videos" button to import the choppy video file into the application.
Once imported, click on the "Repair All" button to initiate the repair process.
Preview the video file after the repair is done and check if the choppy playback issue has been resolved. If it plays smoothly without interruption, you can click on the "Save" button to save it in the desired location.

Solution 5. Convert 4K Video to 1080p or Lower Resolution
Most users with a low-end CPU or GPU can experience VLC choppy playback, especially when the video belongs to high resolution. For example, you are playing a 4K video that demands high processing from GPU, but your GPU is not able to match the demand, the video will get choppy. Therefore, it is better to scale down the resolution of the video by converting the video from 4K or 1080p to a lower resolution. Here are the steps to lower video resolution in the VLC media player to fix VLC 4k choppy issue.
- Open VLC Media Player and click on the Media menu option. Then click on the Convert/Save option.
Once Convert/Save dialog box opens, click on the Add button and select the 4K video file from your media device. Click on the Convert option from the Covert/Save button.
- On the Convert window, select a desired Profile and click on the Wrench icon.
On the Profile window, go to Video codec tab and then to the Resolution tab. Select the resolution you want. Click on the Save button.
Select the destination file and click on the Start button and you will have the 4K video file in lower resolution.


Solution 6. Update Browser and Clear Cookies
When you are playing videos online and facing choppy playback issue, you need to do two things. First, make sure that the browser is updated to the latest version. Second, you should clear the browsing data because pre-loaded data can obstruct the video from playing smoothly. Here, we are demonstrating how to update Chrome browser and clear browsing data as the solution to how to fix choppy video streaming online.
- Open Chrome browser and click on the More icon at the top-right corner.
- Go to Help and click on the About Google Chrome option.
Chrome will search if any update is available and get the version updated.
- After that, relaunch Chrome go to More Tools and click on the Clear browsing data option.
Select the Cookies and other site data and select the time range as all time.
- Click on the Clear data button, and thereafter, restart Chrome and play the video to see if the problem is fixed.
Part 3. Pro Tips to Prevent Video Playback Choppy
Prevention is always better than cure, and there are certain steps you can take to prevent video playback choppy.
- Close unnecessary applications to reduce system strain, especially when playing high-resolution videos.
- Use SSD or HDD instead of USB drives or SD cards for smoother video playback due to faster read speeds.
- Protect video files from viruses and malware by using antivirus software.
- Stick to popular video formats to ensure smooth playback; convert unusual formats if needed.
- Regularly update your operating system, graphics drivers, and media player for optimal performance.
- Ensure sufficient internet speed and bandwidth availability when streaming online videos to prevent choppy playback.
Conclusion:
We receive queries regarding choppy video playback Windows 10 quite often. The reasons behind the issue can be very basic, and the solutions are simple as well. Most of the time, the issue is either with the system or the file itself. If the video file is damaged or corrupted, we recommend 4DDiG Video Repair to fix the video file instantly in a few simple steps.
 ChatGPT
 Perplexity
 Google AI Mode
 Grok
Grok